How to Create and Iterate Array of Images in JavaScript
- Use Array Objects to Show an Array of Images in JavaScript
- Use Arrays to Show an Array of Images in JavaScript
- Use HTML Templates to Show an Array of Images in JavaScript
- Use Modern JavaScript (ES6) Features to Show an Array of Images in JavaScript
- Conclusion

In this tutorial, we’ll cover various approaches on how to create an array of images using JavaScript, from basic methods to modern ES6 features. Let’s delve into these methods and understand how they enable effective image handling and display.
Use Array Objects to Show an Array of Images in JavaScript
First, let’s examine a coding example demonstrating the use of JavaScript’s array objects to effectively create an array of images.
HTML Code:
<!DOCTYPE html>
<html>
<head>
    <!-- Link to the JavaScript file -->
    <script src="./javascript/imageArray.js"></script>

    <!-- Link to the CSS file -->
    <link rel="stylesheet" href="./css/styles.css">

    <!-- Title of the webpage -->
    <title>Image Iteration</title>
</head>
<body>
    <!-- Heading for user instruction -->
    <h1>Click to see the next image</h1>

    <!-- Container for the main image -->
    <div id="splash">
        <img src="./images/splash class room image.jpg" alt="classroom image" id="mainImage">
    </div>

    <!-- Controls for navigating between images -->
    <div id="controls">
        <button id="previousbtn" onclick="previousImage()">Previous Image</button>
        <button id="nextbtn" onclick="nextImage()"> Next Image</button>
    </div>
</body>
</html>
CSS Code:
/* CSS for styling images */
img {
    width: 350px;
    height: 350px;
}
#previousbtn {
    margin-right: 75px; /* Add right margin to the previous button */
}
#nextbtn {
    margin-left: 75px; /* Add left margin to the next button */
}
JavaScript Code:
var imgArray = new Array();

imgArray[0] = new Image();
imgArray[0].src = './images/splash class room image.jpg';

imgArray[1] = new Image();
imgArray[1].src = './images/splash animal image.jpg';

imgArray[2] = new Image();
imgArray[2].src = './images/splash nature image.jpg';

imgArray[3] = new Image();
imgArray[3].src = './images/splash food image.jpg';

imgArray[4] = new Image();
imgArray[4].src = './images/splash travel image.jpg';

function nextImage() {
  var img = document.getElementById('mainImage');
  for (var i = 0; i < imgArray.length; i++) {
    if (imgArray[i].src == img.src) {
      if (i === imgArray.length) {
        document.getElementById('mainImage').src = imgArray[0].src;
        break;
      }
      document.getElementById('mainImage').src = imgArray[i + 1].src;
      break;
    }
  }
}

function previousImage() {
  var img = document.getElementById('mainImage');
  for (var i = imgArray.length - 1; i >= 0; i--) {
    if (imgArray[i].src == img.src) {
      if (i === imgArray.length) {
        document.getElementById('mainImage').src = imgArray[4].src;
        break;
      }
      document.getElementById('mainImage').src = imgArray[i - 1].src;
      break;
    }
  }
}
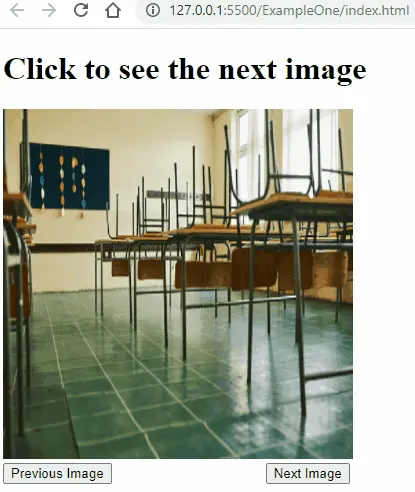
Output:
In the JavaScript code, we have an array named imgArray created to store Image objects. Image objects are created, and their sources are assigned to elements in the imgArray.
We also have the nextImage() function designed to display the next image in the slideshow. It retrieves the current image element, loops through the image array to find the index of the current image, and then displays the next image in the array.
If the current image is the last one, it wraps around the first image.
The previousImage() function is similar to the nextImage(), but it displays the previous image in the slideshow. It retrieves the current image element, loops through the image array in reverse order to find the index of the current image, and then displays the previous image in the array.
If the current image is the first one, it wraps around the last image.
Both functions (nextImage() and previousImage()) essentially handle the logic for navigating through the images in a slideshow, either moving forward to the next image or backward to the previous one. The wrapping behavior ensures a seamless transition from the last image to the first (and vice versa).
The functions utilize the HTML DOM to update the src attribute of an image element to change the displayed image.
Use Arrays to Show an Array of Images in JavaScript
We can also use JavaScript arrays to present a sequence of images seamlessly to users. See the coding example below:
HTML Code:
<!DOCTYPE html>
<html>
<head>
    <!-- Link to the JavaScript file -->
    <script src="./javascript/imageArray.js"></script>

    <!-- Link to the CSS file -->
    <link rel="stylesheet" href="./css/styles.css">

    <!-- Title of the webpage -->
    <title>Image Iteration</title>
</head>
<body onload="makeImage();">
    <!-- Container to display the image -->
    <div class="contents" id="content"></div>

    <!-- Button to go to the next image -->
    <button onclick="nextImage()">Next Image</button>
</body>
</html>
CSS Code:
/* CSS for styling images */
img {
    width: 350px;
    height: 350px;
}
JavaScript Code:
var images = [
  './images/splash class room image.jpg', './images/splash animal image.jpg',
  './images/splash nature image.jpg', './images/splash food image.jpg',
  './images/splash travel image.jpg'
];
var index = 0;

function makeImage() {
  var img = document.createElement('img');
  img.src = images[index];
  document.getElementById('content').appendChild(img);
}

function nextImage() {
  var img = document.getElementById('content').getElementsByTagName('img')[0];
  index++;
  index = index % images.length;
  img.src = images[index];
}
Output:

Here’s a detailed explanation of the provided JavaScript code:
-
An array named
imagesis initialized to hold the file paths of the images that will be displayed on the webpage. -
A variable named
indexis initialized to 0. This variable will keep track of the current index in theimagesarray. -
The
makeImage()function is designed to create and display an image. It:- Creates an
<img>(image) HTML element. - Sets the
srcattribute of the image element to the file path specified by the currentindexin theimagesarray. - Appends the image element to a specific HTML container (identified by its ID as
'content').
- Creates an
-
On the other hand, the
nextImage()function is responsible for displaying the next image in the sequence. It:- Retrieves the current image element within the
'content'container. - Increments the
indexby 1 to move to the next image in theimagesarray. - Uses modulo to ensure the
indexstays within the bounds of theimagesarray (wraps around if it exceeds the array length). - Updates the
srcattribute of the image element to the new image file path based on the updatedindex.
- Retrieves the current image element within the
This code allows navigation through a set of images by displaying one image at a time in a designated HTML container. Calling the nextImage() function moves to the next image in the sequence, and the images cycle back to the beginning once the end of the array is reached.
Use HTML Templates to Show an Array of Images in JavaScript
Moreover, HTML templates can be a structured and clean way to define your images and iterate over them.
HTML Code:
<!DOCTYPE html>
<html>
<head>
    <!-- Link to the JavaScript file -->
    <script src="./javascript/imageArray.js"></script>

    <!-- Link to the CSS file -->
    <link rel="stylesheet" href="./css/styles.css">

    <!-- Title of the webpage -->
    <title>Image Iteration</title>
</head>
<body>
    <!-- Container to display the image -->
    <div id="imageContainer"></div>

    <!-- Button to go to the next image -->
    <button onclick="nextImage()">Next Image</button>
</body>
</html>
JavaScript Code:
const images = [
  './images/splash class room image.jpg', './images/splash animal image.jpg',
  './images/splash nature image.jpg', './images/splash food image.jpg',
  './images/splash travel image.jpg'
];
let currentIndex = 0;

function renderImage(index) {
  const imageContainer = document.getElementById('imageContainer');
  const img = document.createElement('img');
  img.src = images[index];
  imageContainer.innerHTML = '';
  imageContainer.appendChild(img);
}

function nextImage() {
  currentIndex = (currentIndex + 1) % images.length;
  renderImage(currentIndex);
}

document.addEventListener('DOMContentLoaded', () => {
  renderImage(currentIndex);
});
Below is a detailed explanation of the provided code above:
-
An array named
imagesis initialized to hold the file paths of the images that will be displayed on the webpage. -
A variable named
currentIndexis initialized to 0. This variable will keep track of the current index in theimagesarray. -
The
renderImage(index)function is designed to render an image based on the given index. It:- Retrieves the HTML element with the ID
'imageContainer', which will hold the image. - Creates an
<img>(image) HTML element. - Sets the
srcattribute of the image element to the file path specified by the givenindexin theimagesarray. - Clears any previous content inside the
imageContainer. - Appends the new image element to the
imageContainer.
- Retrieves the HTML element with the ID
-
The
nextImage()function is responsible for displaying the next image in the sequence. It:- Calculates the index of the next image using modulo arithmetic to ensure the index stays within the bounds of the
imagesarray (wraps around if it exceeds the array length). - Calls the
renderImage(index)function with the calculated index to display the next image.
- Calculates the index of the next image using modulo arithmetic to ensure the index stays within the bounds of the
-
The code includes an event listener set up to listen for the
DOMContentLoadedevent, indicating that the initial HTML document content has been completely loaded and parsed. When theDOMContentLoadedevent is triggered, it calls therenderImage(currentIndex)function to render the initial image at thecurrentIndex.
This code displays a series of images and allows navigation through them. The nextImage() function is used to cycle through the images, and the renderImage(index) function is responsible for displaying an image based on the given index.
The initial image is rendered when the DOM content is fully loaded.
Use Modern JavaScript (ES6) Features to Show an Array of Images in JavaScript
Modern JavaScript features like arrow functions and the forEach method can make image iteration more concise and readable.
JavaScript Code:
const images = [
  './images/splash class room image.jpg', './images/splash animal image.jpg',
  './images/splash nature image.jpg', './images/splash food image.jpg',
  './images/splash travel image.jpg'
];

let currentIndex = 0;

const renderImage = index => {
  const img = document.getElementById('mainImage');
  img.src = images[index];
};

const nextImage = () => {
  currentIndex = (currentIndex + 1) % images.length;
  renderImage(currentIndex);
};

const previousImage = () => {
  currentIndex = (currentIndex - 1 + images.length) % images.length;
  renderImage(currentIndex);
};

document.addEventListener('DOMContentLoaded', () => {
  renderImage(currentIndex);
});
Here’s a detailed explanation of the provided code:
-
An array named
imagesis declared and initialized with a list of file paths for a set of images that will be displayed on the webpage. -
A variable named
currentIndexis declared and initialized to 0. This variable will keep track of the current index in theimagesarray, indicating which image is currently being displayed. -
The
renderImage(index)function is responsible for rendering an image based on the provided index. It performs the following steps:- Retrieves the HTML
<img>(image) element with the ID'mainImage'. - Sets the
srcattribute of the'mainImage'element to the file path specified by theindexparameter from theimagesarray. This updates the displayed image.
- Retrieves the HTML
-
The
nextImage()function is responsible for displaying the next image in the sequence. It performs the following actions:- Updates the
currentIndexby incrementing it by 1 and then taking the modulo (%) of the result with the length of theimagesarray. This ensures that the index wraps around to 0 when it reaches the end of the array. - Calls the
renderImage()function, passing the updatedcurrentIndexas an argument to display the image at the new index.
- Updates the
-
The
previousImage()function is similar tonextImage()but displays the previous image in the sequence. It performs the following actions:- Updates the
currentIndexby decrementing it by 1 and then taking the modulo (%) of the result with the length of theimagesarray. This ensures that the index wraps around to the last index when it goes below 0. - Calls the
renderImage()function, passing the updatedcurrentIndexas an argument to display the image at the new index.
- Updates the
-
The code includes an event listener for the
DOMContentLoadedevent. When the DOM (Document Object Model) of the webpage is fully loaded and ready, it calls therenderImage()function with the initialcurrentIndexand ensures that an image is displayed as soon as the page is loaded.
Overall, this code sets up a simple image viewer that allows you to navigate through a sequence of images by clicking the Next or Previous buttons. The renderImage() function updates the displayed image, and the nextImage() and previousImage() functions manage the navigation through the images.
Conclusion
We have discussed the different ways to handle image arrays in JavaScript, each with its own advantages and use cases. Depending on your project requirements and coding preferences, you can choose the method that best fits your needs.

Related Article - JavaScript Array
- How to Check if Array Contains Value in JavaScript
- How to Create Array of Specific Length in JavaScript
- How to Convert Array to String in JavaScript
- How to Remove First Element From an Array in JavaScript
- How to Search Objects From an Array in JavaScript
- How to Convert Arguments to an Array in JavaScript