How to Write JSON Into File in C#

In this post, we’ll learn how to use the C# programming language to construct basic JSON objects and write them into a file. To begin, you must have a solid understanding of what JSON is.
The JSON Format
JSON stands for JavaScript Object Notation and is a standard for exchanging minimal data. It uses a portion of the JavaScript programming language as its foundation.
JSON is a total language agnostic structure and uses no special characters. It is simple for people to read and write in JSON and for computers to produce and interpret JSON data.
An alternative to XML, it provides built-in support for the most fundamental data types. The term JavaScript Object Notation refers to the syntax used in both JavaScript and JSON.
Since it is a text-based language, it is simpler for the user to read, and at the same time, it is simpler for machines to interpret. Not years back, programmers used to rely on XML to facilitate communication across different service applications like web services.
However, users began investigating JSON as a possible alternative data serialization standard as the Web API gained popularity.
Download and Install Json.NET
To serialize data in the JSON format, we may either make use of the native class that is provided by the .NET Framework or use any other third-party component. We will use the NewtonSoft serialization library to serialize the JSON structure in this tutorial.
-
To get started, we must prepare the Microsoft Visual Studio workplace and install the
Newtonsoftpackage. -
Launch Microsoft Visual Studio and choose
Filefrom the menu bar, thenNewand theProjectoption. -
Select
Visual C#from the left side and then click onConsole App (.NET Framework). Give an appropriate name and locate your project.We named it
writejsonByZeeshan. After giving a name to it, click onOK.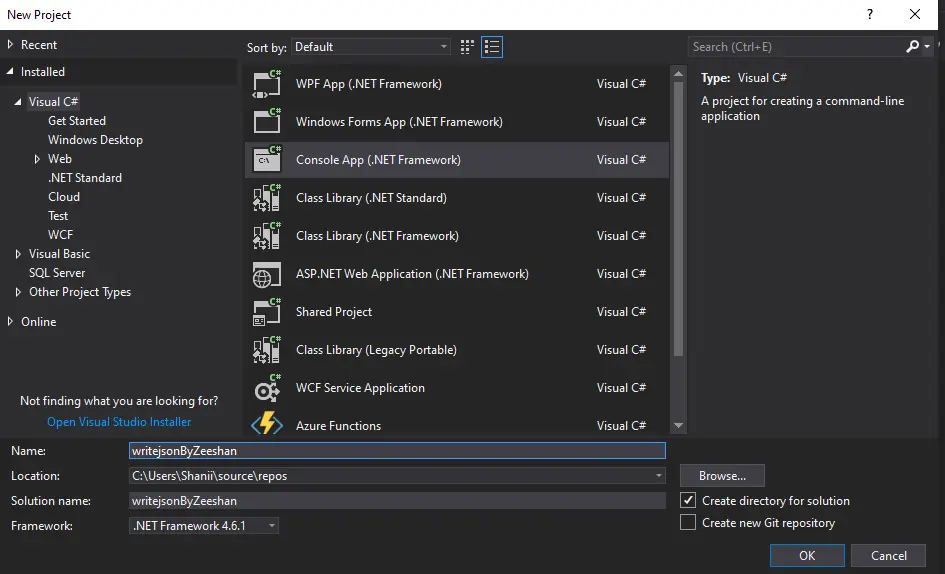
-
Now that the project has been created, we will include a reference to
Json.NET. To do this, we will right-click on theSolution Explorerarea and chooseManage NuGet Packages for Solution. -
After selecting
Newtonsoft.Json, chooseInstallfrom the panel on the right.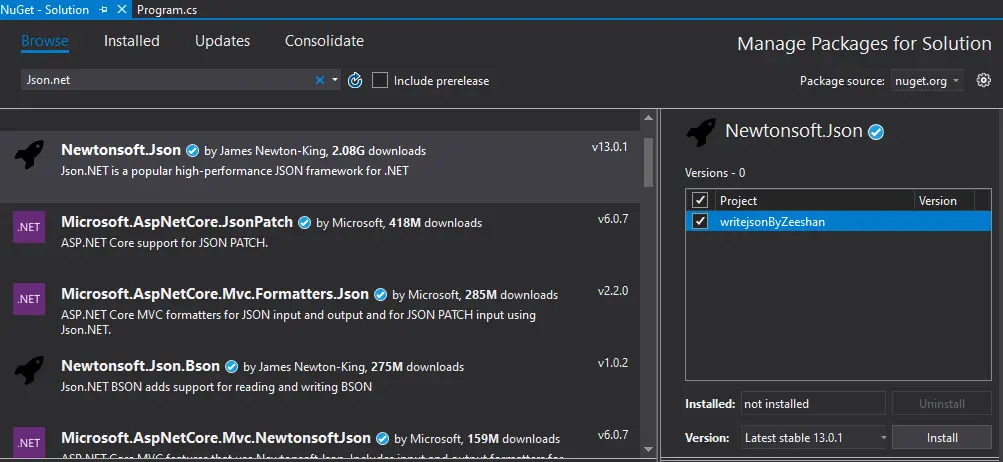
-
After the download is finished, the component will be installed, and
Json.NETwill display a checkmark in the color green.

- Now, you will discover that a reference for
Newtonsoft.jsonhas been added if you go to reference in theSolution Explorer. AfterNewtonsoft.jsonhas been added, it’s time for us to construct the code that will create JSON.
Write JSON Into File Using Json.NET
The reference to Newtonsoft was previously included in our solution when it was first developed. Now is the time to begin working on the first code that will serialize and produce a JSON.
Let’s get started with a basic JSON structure, and then as we go along, let’s progressively advance towards more complicated structures while going line by line through the code and analyzing its functioning in more depth. Let’s begin by putting structure into a JSON file by first adding a new class to our project.
-
To begin, add the following libraries in the
Main():using Newtonsoft.Json; using System; using System.Collections.Generic; using System.IO; using System.Linq; using System.Text; using System.Threading.Tasks;
-
To add a class, right-click on the
Solution Explorerpanel, left-click onAdd, and choose a class from the drop-down menu. After giving it an acceptable name, like we named theStudentclass, the last step is to click theAddbutton.
-
Let’s start defining the variable objects in the new class after successfully creating them. We included the
Name,Rollnum,Grade, andCityin theStudentclass and assigned the following values.class Student { public string Name = "Muhammad Zeeshan"; public int Rollnum = 3227; public string Grade = "A"; public string City = "Islamabad"; } -
So, we’ll create an instance of the
Studentclass namedsin ourMainfunction.Student s = new Student();
<!--
test:
command: c#
expected_output: |
Compilation failed: 1 error(s), 0 warnings
-->
-
Then, with the
JsonConvert.SerializeObjectmethod, we will transform the class object we just specified into JSON format. Let’s put the serialized data into a string variable namedSerializedJsonResult.string SerializedJsonResult = JsonConvert.SerializeObject(s); -
Now that data has been serialized into a JSON format, we must provide a location for it to be saved. A string variable named
jsonpathwill be used for it.string jsonpath = "D:/jsondata/studentdata.json";
-
We’ll use the
ifcondition to check path if it’s correct or not. If the path is already there, the code will overwrite the existing one by making a new one, destroying the old one.if (File.Exists(jsonpath)) { File.Delete(jsonpath); using (var st = new StreamWriter(jsonpath, true)) { st.WriteLine(SerializedJsonResult.ToString()); st.Close(); } } -
If the path is unavailable, then
else-ifwill create a new path and write the JSON to the file.else if (!File.Exists(jsonpath)) { using (var st = new StreamWriter(jsonpath, true)) { st.WriteLine(SerializedJsonResult.ToString()); st.Close(); } }
<!--
test:
command: c#
expected_output: |
Compilation failed: 1 error(s), 0 warnings
-->
Complete Source Code
Example Code (Student Class):
class Student {
public string Name = "Muhammad Zeeshan";
public int Rollnum = 3227;
public string Grade = "A";
public string City = "Islamabad";
}
Example Code (Main Class):
using Newtonsoft.Json;
using System;
using System.Collections.Generic;
using System.IO;
using System.Linq;
using System.Text;
using System.Threading.Tasks;
namespace writejsonByZeeshan {
class Program {
static void Main(string[] args) {
Student s = new Student();
string SerializedJsonResult = JsonConvert.SerializeObject(s);
string jsonpath = "D:/jsondata/studentdata.json";
if (File.Exists(jsonpath)) {
  File.Delete(jsonpath);
  using (var st = new StreamWriter(jsonpath, true)) {
    st.WriteLine(SerializedJsonResult.ToString());
    st.Close();
  }
}
else if (!File.Exists(jsonpath)) {
  using (var st = new StreamWriter(jsonpath, true)) {
    st.WriteLine(SerializedJsonResult.ToString());
    st.Close();
  }
}
}
}
}
Output:
{"Name":"Muhammad Zeeshan","Rollnum":3227,"Grade":"A","City":"Islamabad"}

I have been working as a Flutter app developer for a year now. Firebase and SQLite have been crucial in the development of my android apps. I have experience with C#, Windows Form Based C#, C, Java, PHP on WampServer, and HTML/CSS on MYSQL, and I have authored articles on their theory and issue solving. I'm a senior in an undergraduate program for a bachelor's degree in Information Technology.
LinkedInRelated Article - Csharp JSON
- C# Parse JSON in C#
- How to Convert the Object to a JSON String in C#
- How to Deserialize JSON With C#
- How to Post JSON to a Server in C#
- How to Convert JSON String to C# Object