How to Detect Blob or Circle in OpenCV

This tutorial will discuss detecting blobs or circles in an image using the SimpleBlobDetector class of OpenCV in Python.
Use the SimpleBlobDetector Class of OpenCV to Detect Blobs or Circles in an Image in Python
We can detect blobs or circles in an image using the SimpleBlobDetector class of OpenCV. We can detect a blob or a circle using its area, circularity, convexity, and inertia.
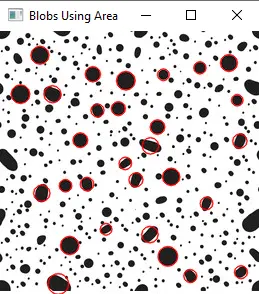
If we want to detect blobs or circles that fall inside a specific area, we must set the filterByArea argument true. Then we can use the minArea parameter to set the minimum area of the blob and the maxArea parameter to set the maximum area of the blob.
It will not detect the blobs less or greater than the specified area. We can use the Params() method of the SimpleBlobDetector class to change the shape we want to detect.
We can drawKeypoints() function of OpenCV to highlight the blobs detected by the function.
For example, let’s detect some blobs in a given image depending on the blob area. See the code below.
import cv2
import numpy as np

image = cv2.imread("blob2.jpg", 0)

params = cv2.SimpleBlobDetector_Params()

params.filterByArea = True
params.minArea = 100

detector = cv2.SimpleBlobDetector_create(params)
keypoints = detector.detect(image)

blank = np.zeros((1, 1))
blobs = cv2.drawKeypoints(
    image, keypoints, blank, (0, 0, 255), cv2.DRAW_MATCHES_FLAGS_DRAW_RICH_KEYPOINTS
)

cv2.imshow("Blobs Using Area", blobs)
cv2.waitKey(0)
cv2.destroyAllWindows()
Output:
Set the filterByCircularity to Filter Blobs or Circles in an Image in Python
We can also detect a blob using its circularity, which will check how much the shape is circular. Circularity is 1 for a circle and 0.78 for a box.
If we only want to detect circular blobs, we must set the filterByCircularity argument to True. Then we can use the minCircularity and maxCircularity to set the minimum and maximum circularity value for the shape.
It will not detect the blobs with circularity greater or less than specified. For example, let’s set the circularity in the above example. See the code below.
import cv2
import numpy as np

image = cv2.imread("blob2.jpg", 0)

params = cv2.SimpleBlobDetector_Params()

params.filterByArea = True
params.minArea = 100

params.filterByCircularity = True
params.minCircularity = 0.9

detector = cv2.SimpleBlobDetector_create(params)
keypoints = detector.detect(image)

blank = np.zeros((1, 1))
blobs = cv2.drawKeypoints(
    image, keypoints, blank, (0, 0, 255), cv2.DRAW_MATCHES_FLAGS_DRAW_RICH_KEYPOINTS
)

cv2.imshow("Using area,circularity", blobs)
cv2.waitKey(0)
cv2.destroyAllWindows()
Output:
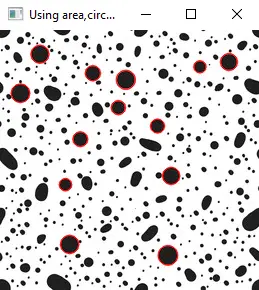
As you can see, only circular blobs have been detected in the above output.
Set the filterByConvexity to Filter Blobs or Circles in an Image in Python
We can also filter blobs using their convexity. First, we have to set the filterByConvexity argument to true, and then we can use the minConvexity and maxConvexity to set the minimum and maximum value of convexity.
An ellipse is also a circle, will also be detected along with a perfect circle. We can use the filterInertia argument to filter the blobs using the inertia of shapes.
For a perfect circle, the inertia is 1, and for ellipse, it is between 0 to 1. We can use the minInertiaRatio and maxInertiaRatio to set inertia’s minimum and maximum value.
We can also show the number of blobs on the image using the putText() function of OpenCV.
For example, let’s set the value for convexity and inertia and show the number of blobs detected on top of the given image. See the code below.
import cv2
import numpy as np

image = cv2.imread("blob2.jpg", 0)

params = cv2.SimpleBlobDetector_Params()

params.filterByArea = True
params.minArea = 100

params.filterByCircularity = True
params.minCircularity = 0.9

params.filterByConvexity = True
params.minConvexity = 0.2

params.filterByInertia = True
params.minInertiaRatio = 0.01

detector = cv2.SimpleBlobDetector_create(params)

keypoints = detector.detect(image)

blank = np.zeros((1, 1))
blobs = cv2.drawKeypoints(
    image, keypoints, blank, (0, 0, 255), cv2.DRAW_MATCHES_FLAGS_DRAW_RICH_KEYPOINTS
)

number_of_blobs = len(keypoints)
text = "Circular Blobs: " + str(len(keypoints))
cv2.putText(blobs, text, (10, 100), cv2.FONT_HERSHEY_SIMPLEX, 0.8, (0, 0, 255), 2)

cv2.imshow("Original Image", image)
cv2.imshow("Circular Blobs Only", blobs)
cv2.waitKey(0)
cv2.destroyAllWindows()
Output:
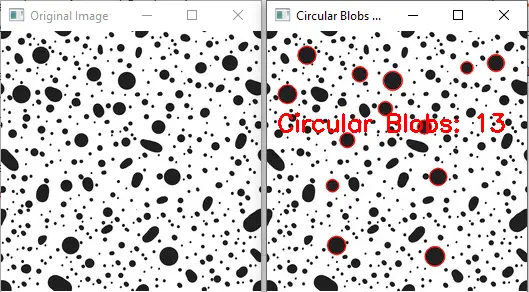
We can also set the position, font family, font scale, color, and line thickness of the text. We have also shown the original image on the left for comparison.
We can also filter blobs according to their colors by setting the filterByColor argument true. Then we can use the minThreshold and maxThreshold to set these minimum and maximum thresholds of the color we want to detect.
It will not detect the blobs with color values less than or greater than the specified threshold. We can also detect other shapes by changing the parameters of the SimpleBlobDetector class.
For example, we detected the circular shape blob in the above example, but we can also detect blobs of other shapes like a rectangular blob.
Click this link for more details about the parameters of the SimpleBlobDetector class.

Related Article - Python OpenCV
- How to Fix No Module Named CV2 in Mac in Python
- Image Masking in OpenCV
- How to Utilize Bitwise_AND on an Image Using OpenCV
- OpenCV Package Configuration
- OpenCV ArUco Markers
- How to SIFT Using OpenCV in Python