How to Recognize Face in Python OpenCV
-
Use the
face_recognitionLibrary to Recognize Faces in an Image in OpenCV -
Use the
putText()Function to Put Text on Top of an Image in OpenCV

This tutorial will discuss recognizing faces present in an image using the face_recognition library in OpenCV.
Use the face_recognition Library to Recognize Faces in an Image in OpenCV
Face recognition is used to recognize faces present in an image or video. For example, Facebook uses face recognition to tag people in a post.
If we tag our friends in a picture, the Facebook algorithm will recognize that person’s name and tag him automatically next time we upload a picture of that person. We can also build a similar algorithm using the face_recognition library.
The face recognition library works in multiple steps to recognize faces. In the first step, we need to pass the pictures of known persons to train the model, and the library will use the HOG or histogram of oriented gradients to find the faces present in the given images.
In face recognition, we only need the picture of a face, and we don’t need any other data because it will make the algorithm slower and more complex because of large data.
The HOG algorithm compares each pixel with its neighboring pixels to find the direction of intensity and mark it with a gradient in the direction of increasing intensity level.
The algorithm already has a gradient image of an average face. The algorithm compares the gradient image with the known gradient of a face to determine which part of the image contains the face.
For example, let’s find the faces present in an image using the face recognition library’s face_locations() function. See the code below.
import cv2
import dlib
import face_recognition

img = cv2.imread("tom1.jpg")
known_img = face_recognition.load_image_file("tom1.jpg")

loc = face_recognition.face_locations(known_img)
cv2.rectangle(img, (loc[0][0], loc[0][3]), (loc[0][1], loc[0][2]), (255, 0, 0), 3)
print(loc)

cv2.imshow("locations", img)
cv2.waitKey(0)
cv2.destroyAllWindows()
Output:
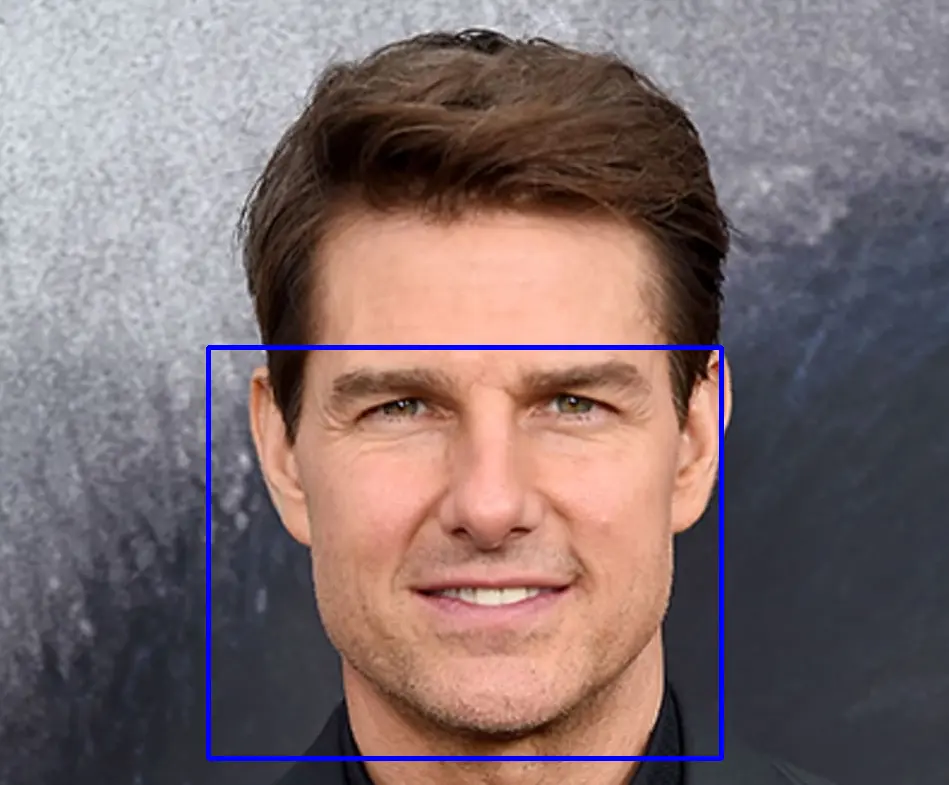
As we can see in the above output, the face is detected in the above image using the HOG algorithm. We imported the same image using two functions because the imread() function reads the image in the BGR color scale while the load_image_file() function reads an image in RGB color space.
The face recognition library uses RGB images while OpenCV uses BGR images, and we need both in the above code. We used the rectangle() function of OpenCV to draw a rectangle around the detected face.
The face_locations() function returns the rectangle’s points or corner locations, which we can use inside the rectangle() function to draw the rectangle. The face_locations() function also has two optional arguments, the number_of_times_to_upsample and the batch_size.
A computer stores an image as an array of numbers, so if a face image of a person is rotated or the lighting in the image is changed, the computer will consider it another image even though it’s the same face. The library solves this problem using face landmark estimation in the second step.
In face landmark estimation, we use a machine-learning algorithm to get 68 facial landmarks that are important in face recognition, like the landmarks around the eyes and nose.
Using these landmarks, we can rotate and share our image to create a perfectly centered image with eyes and nose at the center of the image.
We don’t have to worry about the face’s orientation or angle. In the third step, we have to train a model which we will use to make a prediction.
We can’t simply compare the unknown image with all the known images to identify the person because it will take time.
Rather than using the whole face image, we can use some features from each image, such as the distance between the ears, eyes, and nose size and compare them with the unknown face image.
But, we don’t know which features will be best to recognize the face. So we will use the deep convolution neural network to find the 128 measurements or facial features from each known image.
To train the model, we must provide two images of a known person and one image of an unknown person, and the neural network will find the 128 measurements by comparing the given images. Training a model also takes a lot of time, so the face library uses the pre-trained model of OpenFace to get the 128 measurements for all the known faces.
In the last step, we must use a classifier to check if the unknown face resembles any known faces. The face recognition library uses the SVM or space vector machine classifier for prediction.
For example, let’s use one image of Tom Cruise for training and another for testing. See the code below.
import cv2
import dlib
import face_recognition

known_img = face_recognition.load_image_file("tom1.jpg")
unknown_img = face_recognition.load_image_file("tom2.jpg")

known_en = face_recognition.face_encodings(known_img)[0]
unknown_en = face_recognition.face_encodings(unknown_img)[0]

result = face_recognition.compare_faces([known_en], unknown_en)
print(result)

cv2.imshow("Known Image", known_img)
cv2.imshow("Un_Known Image", unknown_img)
cv2.waitKey(0)
cv2.destroyAllWindows()
Output:
[True]
The result is true in the output, which means the unknown image is Tom Cruise. We used the face recognition library’s face_encodings() function in the above code to find the 128 measurements.
The first argument of the face_encodings() function is the input image. The second argument, known_face_locations, is optional, and it is used to set the bounding box of each face, and by default, its value is set to none.
The third argument, num_jitters, is also optional, and it is used to set the re-sample value used to find encoding, and by default, its value is set to 1. The fourth argument, model, is also optional and is used to set the model type used to find the encoding, and by default, it is set to small.
The small model is fast but less accurate, and the large model is slow but more accurate. We used the compare_faces() to compare the unknown face with the known faces.
The first argument of the compare_faces() function contains the encodings of the known faces, and the second argument contains the encoding of the unknown face. The third argument, tolerance, is optional and is used to set the distance between faces, and by default, its value is set to 0.6.
Use the putText() Function to Put Text on Top of an Image in OpenCV
We can also put text on top of the image if it resembles the known face using the putText() function of OpenCV. For example, let’s use the Tom Cruise image to train the model and then test the model with the image of Dwayne Johnson.
See the code below.
import cv2
import dlib
import face_recognition

img = cv2.imread("rock1.jpg")
known_img = face_recognition.load_image_file("tom2.jpg")
unknown_img = face_recognition.load_image_file("rock1.jpg")

known_en = face_recognition.face_encodings(known_img)[0]
unknown_en = face_recognition.face_encodings(unknown_img)[0]

result = face_recognition.compare_faces([known_en], unknown_en)

loc = face_recognition.face_locations(unknown_img)
cv2.rectangle(img, (loc[0][0], loc[0][3]), (loc[0][1], loc[0][2]), (255, 0, 0), 3)

if result[0]:
    text = "Tom Cruise"
else:
    text = "Unknown"
cv2.putText(
    img,
    text,
    (loc[0][0], loc[0][3] - 20),
    cv2.FONT_HERSHEY_SIMPLEX,
    1.2,
    (0, 0, 255),
    2,
    cv2.LINE_AA,
)

cv2.imshow("locations", img)
cv2.waitKey(0)
cv2.destroyAllWindows()
Output:
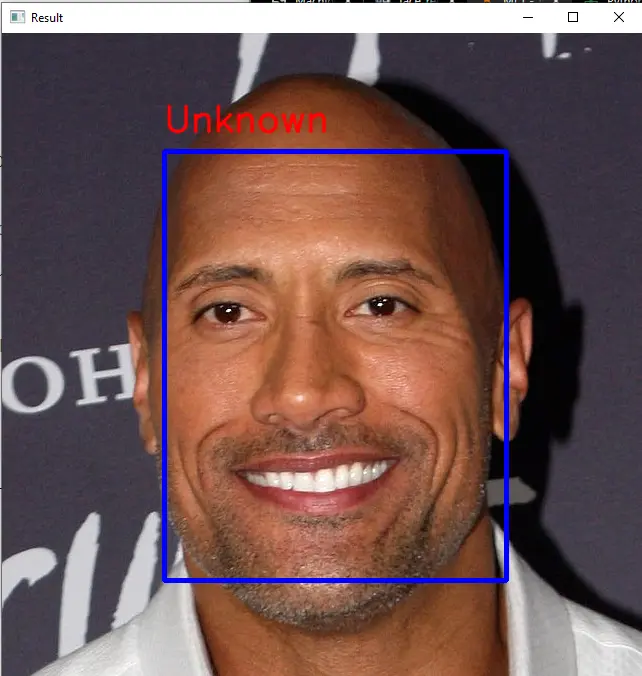
The above face does not resemble the face of Tom Cruise. We can also train the model using multiple images of different persons, and we can also find faces in a video.
In the case of a video, we have to process each frame individually. Check this link for more details about the face recognition library.
