How to OpenCV Bounding Box
-
Use the
boundingRect()Function of OpenCV to Find Bounding Boxes Around Shapes Present in an Image -
Arguments of the
findContours()andrectangle()Functions of OpenCV

This tutorial will discuss finding bounding boxes around shapes present in an image using the boundingRect() function of OpenCV.
Use the boundingRect() Function of OpenCV to Find Bounding Boxes Around Shapes Present in an Image
We can find and add a bounding rectangle or box around shapes present in an image using the boundingRect() function of OpenCV.
The boundingRect() function returns the x and y coordinates along with the rectangle’s width and height, and we can use these values to draw a rectangle around the shape present in the image using the rectangle() function.
We must pass the contours inside the boundingRect() function. We can find the contours of the given image using the findContours() function of OpenCV, but we have to use a binary or black and white image inside the findContours() function.
To convert the given image into binary, we must use the cvtColor() and threshold() function of OpenCV. The cvtColor() function is used to convert one color space into another, and we will use it to convert the BGR image to grayscale.
The threshold() function converts the grayscale image into binary with only two values, 0 and 255. For example, let’s draw a bounding box around each shape present in the given image.
See the code below.
import cv2
import numpy as np

image = cv2.imread("shapes.png")
original = image.copy()

gray = cv2.cvtColor(image, cv2.COLOR_BGR2GRAY)
thresh = cv2.threshold(gray, 0, 255, cv2.THRESH_BINARY_INV + cv2.THRESH_OTSU)[1]

ROI_number = 0
cnts = cv2.findContours(thresh, cv2.RETR_EXTERNAL, cv2.CHAIN_APPROX_SIMPLE)
cnts = cnts[0] if len(cnts) == 2 else cnts[1]
for c in cnts:
    x, y, w, h = cv2.boundingRect(c)
    cv2.rectangle(image, (x, y), (x + w, y + h), (0, 0, 255), 2)

cv2.imshow("image", image)
cv2.imshow("Thresh", thresh)
cv2.waitKey()
Output:
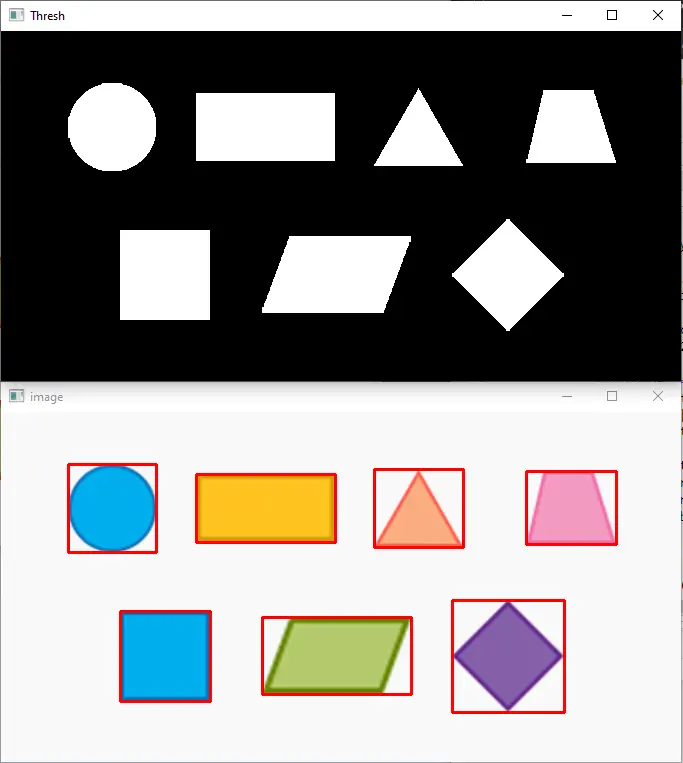
The top image is the binary image with only two colors, white and black, and the below image is the original image with bounding boxes.
Arguments of the findContours() and rectangle() Functions of OpenCV
The first argument of the findContours() function is the binary image, and the second argument is the contour retrieval method.
We use the cv2.RETR_EXTERNAL because we only need the external contours. The third argument is the approximation method used to find the contours.
We use the rectangle() function to draw the bounding box around the shapes; we use the rectangle() function, which draws a rectangle around each shape.
The first argument of the rectangle() function is the image on which we want to draw the bounding box.
The second argument is the starting position, which will set the rectangle’s starting point. The third argument is the ending position of the rectangle.
The fourth argument defines the rectangle’s color in BGR triplet format, and the fifth argument is the line thickness of the rectangle. We can also extract and store each shape separately as an individual image file.
We can use the rectangle coordinates to define the region of interest, which we can extract using the NumPy slicing and save it using the imwrite() function of OpenCV.
The image of each shape will be stored in the same directory as the original image.
For example, let’s store each shape present in the above image. See the code below.
import cv2
import numpy as np

image = cv2.imread("shapes.png")
original = image.copy()

gray = cv2.cvtColor(image, cv2.COLOR_BGR2GRAY)
thresh = cv2.threshold(gray, 0, 255, cv2.THRESH_BINARY_INV + cv2.THRESH_OTSU)[1]

ROI_number = 0
cnts = cv2.findContours(thresh, cv2.RETR_EXTERNAL, cv2.CHAIN_APPROX_SIMPLE)
cnts = cnts[0] if len(cnts) == 2 else cnts[1]
for c in cnts:
    x, y, w, h = cv2.boundingRect(c)
    cv2.rectangle(image, (x, y), (x + w, y + h), (0, 0, 255), 2)
    ROI = original[y : y + h, x : x + w]
    cv2.imwrite("Image_{}.png".format(ROI_number), ROI)
    ROI_number += 1

cv2.imshow("image", image)
cv2.imshow("Thresh", thresh)
cv2.waitKey()
Output:

As you can see, each image is extracted and saved separately in the current directory where the code file is saved.
