How to Detect Object in Python OpenCV

This tutorial will discuss detecting objects in an image or video stream using the cascade classifier and YOLO in OpenCV.
Use Cascade Classifier for Object Detection in OpenCV
We can detect objects present in an image like a human face, animal face, eyes, etc. We can use the CascadeClassifier class of OpenCV to detect objects present in an image.
The cascade classifier uses Haar features to detect objects using a cascade of features. We have to use a trained model containing the feature of the object that we want to detect in an image.
OpenCV has many pre-trained models based on Haar features. The algorithm makes windows from the input image and then compares them with the feature sets.
A single pre-trained model contains around 160,000 features, and it takes a lot of time to compare the window with each feature.
So the algorithm makes cascades from the features, and if a window matches with the first cascade, it will be compared with the second cascade; otherwise, it will be discarded.
In this way, the algorithm will take less time to detect objects. For example, let’s use an image containing a cat and a human and the cascade classifier to detect eyes present in the image.
See the code below.
import cv2

src_img = cv2.imread("animal.jpg")
gray_img = cv2.cvtColor(src_img, cv2.COLOR_BGR2GRAY)
c_classifier = cv2.CascadeClassifier(f"{cv2.data.haarcascades}haarcascade_eye.xml")
d_objects = c_classifier.detectMultiScale(gray_img, minSize=(50, 50))
if len(d_objects) != 0:
    for (x, y, h, w) in d_objects:
        cv2.rectangle(src_img, (x, y), ((x + h), (y + w)), (0, 255, 255), 5)

cv2.imshow("Detected Objects", src_img)
cv2.waitKey(0)
cv2.destroyAllWindows()
Output:
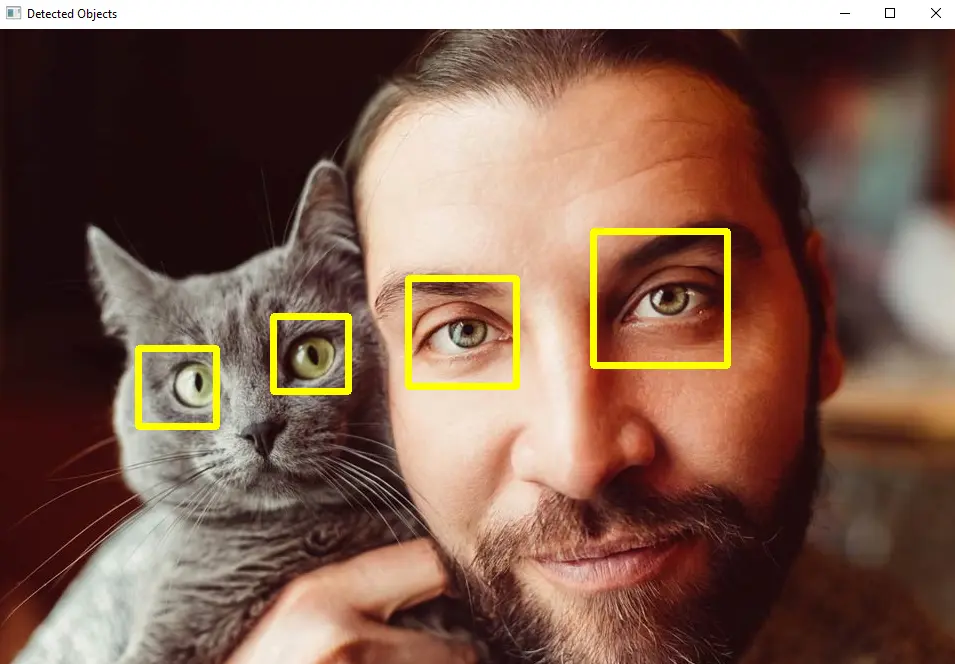
We used the pre-trained model haarcascade_eye.xml for eye detection in the above code, but we can use many other pre-trained models like face, smile, and body detection. The pre-trained models are saved inside the data folder of OpenCV, and they can also be found at this link.
We used the detectMultiScale() function of the cascade classifier to detect objects. The function will return a vector for each object containing the x and y coordinates and the width and height of the detected object.
We can use this output to draw a shape around the detected object, like a rectangle or circle.
The first argument of the detectMultiScale() function is the input image in grayscale. The second argument, minSize, is used to set the minimum size of the object that we want to detect.
There are also other optional arguments that we can set inside the detectMultiScale() function. The first optional argument is scaleFactor, and it is used to set the image scale, and by default, its value is set to 1.1.
The second optional argument is minNeighbors, and it is used to set the number of minimum neighbors used for object detection, and by default, its value is set to 3. The third optional argument is maxSize, which sets the maximum size of the object we want to detect.
We used the rectangle() function of OpenCV to draw a rectangle around the detected objects. The first argument is the image on which we want to draw the rectangle.
The second and third arguments are the starting and ending positions for the rectangle. The fourth argument is used to define the color in the BGR color scale, and the fifth argument is used to set the line width of the rectangle.
The pre-trained models mostly contain facial features, but we can also make our model for object detection. Check this link for more details about the model training of the cascade classifier.
Use YOLO for Object Detection in OpenCV
Multiple detectors are being used in object detection like single-shot detectors, RNN, and fast RNN. The single-shot detector is fast compared to other detectors but has low accuracy.
YOLO is like a single-shot detector, and it is fast compared to a single-shot detector but has the same accuracy as a single-shot detector. YOLO passes the whole image through a deep neural network to detect objects present in an image or video.
The algorithm finds bounding boxes around an object present in an image along with their confidence, and it filters the boxes depending on the confidence. If the confidence of a box is lower than a specific value, the box will be dropped.
YOLO also uses a non-maximum suppression technique to eliminate the overlapping bounding boxes around a single object. In this way, we will only get one bounding box around one object.
YOLO has pre-trained weights and configurations for the deep neural network, which we can load using the dnn.readNetFromDarknet() function of OpenCV. We can also get the class names for different objects present in the COCO dataset.
We have to download the weights, configurations and COCO names files to use them in OpenCV. We can use the COCO names to put the object’s name on the bounding box.
After loading the data, we have to read the image and create a blob using the dnn.blobFromImage() function, which we can then pass into the deep neural network using the setInput() function.
We can set the preferred backend of the neural network to OpenCV using the setPreferableBackend() function. We can also set the preferable target to CPU or GPU using the setPreferableTarget() function.
YOLO will work faster if we have a GPU than a CPU. We have to run the network until the last layer, and we can use the getLayerNames() function to find the layer names and the getUnconnectedOutLayers() function to get the last layer.
Now we will use a loop to find the bounding boxes and their confidence, and if the confidence is lower than a specific value, the box will be dropped, and the other boxes will be saved.
After that, we will use the dnn.NMSBoxes() function to filter the boxes using the non-maximum suppression technique.
The dnn.NMSBoxes() function will return us the x and y coordinates and the width and height of the bounding boxes, and we can pass these values inside the rectangle() function to draw a rectangle around each detected object.
We can use the putText() function of OpenCV to put the object name on top of the rectangle using the COCO names.
For example, let’s use an image and find the object present using YOLO. See the code below.
import cv2
import numpy as np

img_src = cv2.imread("animal.jpg")
cv2.imshow("window", img_src)
cv2.waitKey(1)

classes_names = open("coco.names").read().strip().split("\n")
np.random.seed(42)
colors_rnd = np.random.randint(0, 255, size=(len(classes_names), 3), dtype="uint8")

net_yolo = cv2.dnn.readNetFromDarknet("yolov3.cfg", "yolov3.weights")
net_yolo.setPreferableBackend(cv2.dnn.DNN_BACKEND_OPENCV)
net_yolo.setPreferableTarget(cv2.dnn.DNN_TARGET_CPU)

ln = net_yolo.getLayerNames()
ln = [ln[i - 1] for i in net_yolo.getUnconnectedOutLayers()]

blob_img = cv2.dnn.blobFromImage(
    img_src, 1 / 255.0, (416, 416), swapRB=True, crop=False
)
r_blob = blob_img[0, 0, :, :]

cv2.imshow("blob", r_blob)
text = f"Blob shape={blob_img.shape}"

net_yolo.setInput(blob_img)
outputs = net_yolo.forward(ln)

boxes = []
confidences = []
classIDs = []
h, w = img_src.shape[:2]

for output in outputs:
    for detection in output:
        scores_yolo = detection[5:]
        classID = np.argmax(scores_yolo)
        confidence = scores_yolo[classID]
        if confidence > 0.5:
            box_rect = detection[:4] * np.array([w, h, w, h])
            (centerX, centerY, width, height) = box_rect.astype("int")
            x_c = int(centerX - (width / 2))
            y_c = int(centerY - (height / 2))
            box_rect = [x_c, y_c, int(width), int(height)]
            boxes.append(box_rect)
            confidences.append(float(confidence))
            classIDs.append(classID)

indices_yolo = cv2.dnn.NMSBoxes(boxes, confidences, 0.5, 0.4)
if len(indices_yolo) > 0:
    for i in indices_yolo.flatten():
        (x, y) = (boxes[i][0], boxes[i][1])
        (w, h) = (boxes[i][2], boxes[i][3])
        color = [int(c) for c in colors_rnd[classIDs[i]]]
        cv2.rectangle(img_src, (x, y), (x + w, y + h), color, 3)
        text = "{}: {:.4f}".format(classes_names[classIDs[i]], confidences[i])
        cv2.putText(img_src, text, (x, y - 5), cv2.FONT_HERSHEY_SIMPLEX, 0.6, color, 2)

cv2.imshow("window", img_src)
cv2.waitKey(0)
cv2.destroyAllWindows()
Output:
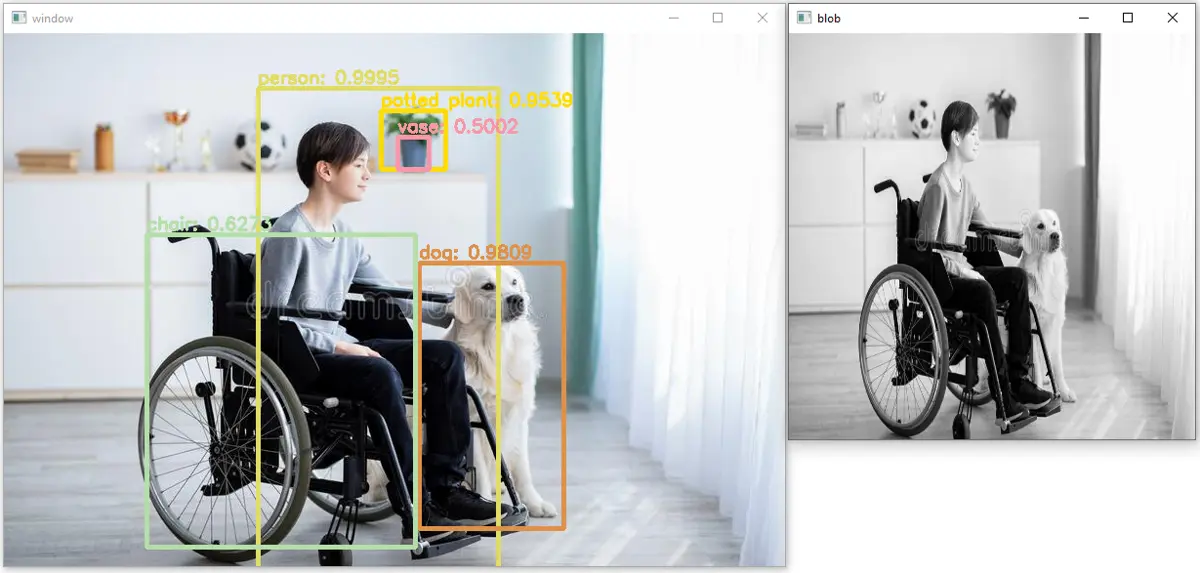
As we can see, five objects have been detected in the above image, and their accuracy or confidence is also placed on top of the rectangles. We can also apply the same code to a video; we have to read each frame, apply the above code on each frame, and then save the frame in a video again.
In the above code, the np.random.randint() function is used to create random colors. The first argument is the starting value of the color, and the second argument is the ending value of the color.
The third argument, size, is used to set the size of each color, and the fourth argument, dtype, is used to set the data type of the output. The append() function adds the value to the given array.
The rectangle() function of OpenCV is used to draw rectangles around the detected objects. The first argument is the image on which we want to draw the rectangle.
The second argument is the starting point or the position of the rectangle’s upper left corner, and the third argument is the ending point or the position of the right button corner of the rectangle. The fourth argument is the color, and the fifth argument is the line width of the rectangle.
The putText() function is used to put text on the image. The first argument is the image on which we want to put the text, and the second is the text we want to put on the image.
The third argument is the starting position of the text, and the fourth argument is the font style of the text. The fifth argument is used to set the font scale, and the sixth argument is used to set the line width of the text.
