Image Masking in OpenCV
If we want to filter out some part of the image and then combine this filtered-out part with another image, then this can be done using masking. In OpenCV, the Bitwise AND operator is used to combine two different images into one, or it can combine some parts of one image into another.
Bitwise AND generally computes the bitwise logical combination per element of two arrays/scalar/images. In this article, we will see how to apply masking on an image using the OpenCV library’s Bitwise AND operator.
Perform Masking in OpenCV Using the Bitwise AND Operator
Bitwise operators are used in OpenCV so that we can extract or filter out the part of an image, portraying the image and operating with non-rectangular ROIs (Region of Interest). To perform the Bitwise AND operation in OpenCV, we use the bitwise_and() method.
The syntax for bitwise_and() is as follows.
cv.bitwise_and(img_array_1, img_array_2, destination_array, masking)
The bitwise_and() method takes four arguments.:
img_array_1: Data of image 1 in array format.img_array_2: Data of image 2 in array format.destination_array: Output image with the same size and type as the input array. This is an optional parameter.masking: This is the mask operation performed on the resulting image. This is an optional parameter.
Let’s see how masking works using bitwise_and() with the help of the below example.
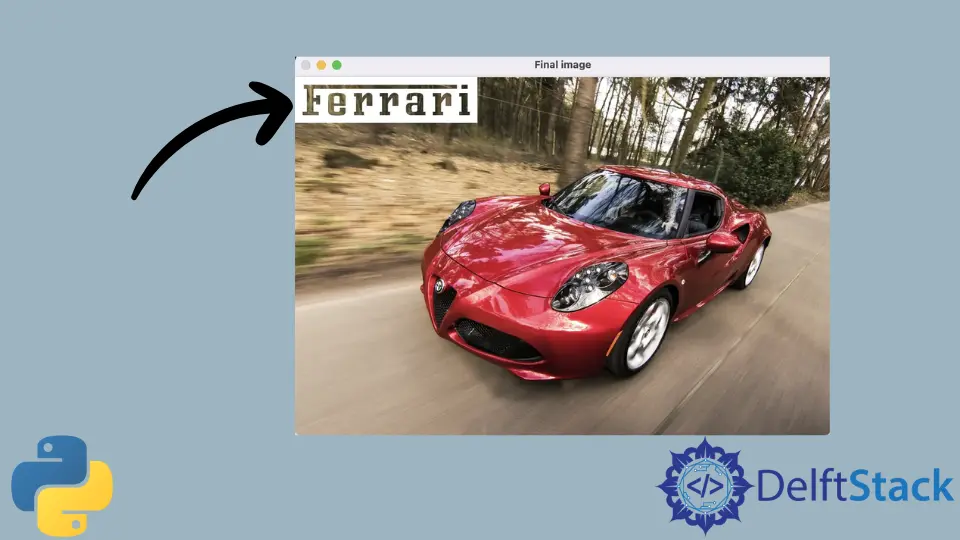
Suppose we have two images, one image of a logo and another of a car, and we need to add the logo on the top left side of the image of the car. So, to achieve this, we will write the below code in Python using OpenCV.
First, we need to read images of both the logo and the car image and then assign them to the img1 and img2 variables, respectively. By masking, we will use ROI to apply or show the logo on the top-left side of the car image.
For this, we will extract the row, cols, and channels data from img2, our logo. Since we want to put this logo on the car image’s top left corner, we will apply the rows and cols of img2 on the img1 (0,0) coordinates, as shown below.
Code Snippet:
# import opencv
import cv2 as cv

# Loading images
img1 = cv.imread("car.jpg")
img2 = cv.imread("logo.png")

# We want to put the logo on the top-left corner, so we create ROI
rows, cols, channels = img2.shape
roi = img1[0:rows, 0:cols]

# Now create a mask of the logo and create its inverse mask, also
img2gray = cv.cvtColor(img2, cv.COLOR_BGR2GRAY)
ret, mask = cv.threshold(img2gray, 10, 255, cv.THRESH_BINARY)
mask_inv = cv.bitwise_not(mask)

# Now black out the area of the logo in ROI
img1_bg = cv.bitwise_and(roi, roi, mask=mask_inv)

# Take only the region of the logo from the logo image.
img2_fg = cv.bitwise_and(img2, img2, mask=mask)

# Put logo in ROI and modify the main image
dst = cv.add(img1_bg, img2_fg)
img1[0:rows, 0:cols] = dst

cv.imshow("mask", mask)
cv.imshow("inv_mask", mask_inv)
cv.imshow("img1_bg", img1_bg)
cv.imshow("img2_fg", img2_fg)
cv.imshow("Final image", img1)
cv.waitKey(0)
cv.destroyAllWindows()
After this, we have to create the mask and inverse mask of the logo. For this, we initially changed the logo’s background color to grey and used this to make the mask and inverse mask image as mask and mask_inv.
To change the image’s background color, we will use the cvtColor() method, and for creating a mask, we will use the threshold() method. Finally, we will use the bitwise_not() to inverse the image.
We can also use the imshow() function on the mask and mask_inv images to examine what has been changed during masking.
Now we black out the area of the logo in ROI and do bitwise_and() to get the logo’s background, i.e., img2. Similarly, we take only the logo from the logo image and do bitwise_and() to get the foreground of the car image, i.e., img1.
Here, we can also use the imshow() function on img1 (car image) and img2 (logo image) images to check out which things have been changed.
Now, we add both img1 and img2, so we get the logo with the background of a car in ROI. We then put this output image in dst.
Output:
We later add the dst in the whole car image and get the final output using imshow(). That’s how we use ROI to get some specific part of the image and add it to another image to get the final image.
Sahil is a full-stack developer who loves to build software. He likes to share his knowledge by writing technical articles and helping clients by working with them as freelance software engineer and technical writer on Upwork.
LinkedIn