How to SIFT Using OpenCV in Python
- SIFT Algorithm for Feature Extraction
-
Use the
SIFTClass to Implement SIFT Using OpenCV in Python - Match Two Images by Implementing the SIFT Algorithm Using OpenCV in Python
- Conclusion

Feature extraction is an integral process in image processing and machine learning. It refers to converting raw data to information by extracting valuable bits of information.
In image processing, we find valid key points and their descriptors.
In Python, we use the OpenCV library to process and operate images. We can apply different techniques and predefined algorithms using this library.
This tutorial will demonstrate how to implement the SIFT algorithm using OpenCV and use it for feature matching in Python. We will also learn to match two images using the SIFT algorithm using OpenCV in Python.
SIFT Algorithm for Feature Extraction
SIFT (Scale Invariant Feature Transform) is a complex and helpful feature extraction technique. It overcomes the issue of other algorithms that can be rotation-variant or scale-variant, which means that the extracted information can vary if the image is rotated or scaled to a different size.
The SIFT algorithm avoids all this by extracting valid key points and their descriptors. It is scale and rotation-invariant.
We have already discussed feature extraction. Let us now discuss the steps involved in SIFT algorithm for feature extraction.
There are five stages in total.
Scale-Space Extrema Detection
The first stage is called Scale-space Extrema Detection.
As discussed, we need features that are present on every scale. For larger scales, we require larger windows.
This stage involves using a different scaling parameter and calculating the Difference of Gaussians, that is, the difference of Gaussian blurring with varying scaling parameter values. It will select a coordinate using a given scaling value and check whether it exists with higher and lower scaling values.
Keypoint Localization
Let us now move on to stage two, which is Keypoint Localization. This stage will filter out the selected key points.
It will use the Taylor Series expansion of scale to get more refined key points and find their intensities. If the intensity is less than the specified threshold, then it is rejected.
Orientation Assignment
The next stage is called Orientation Assignment. As discussed, the key points are rotation-invariant, and this stage ensures the same.
It will take the surrounding regions of a key point for calculating gradients and their directions. Thirty-six bins are created and plotted on a histogram to represent the 360 degrees, and the peaks higher than 80% are considered new key points and are used to determine the orientation of the selected keypoint.
Keypoint Descriptor
The fourth stage aims to create a Keypoint Descriptor by taking a 16x16 block neighboring the keypoint and dividing it into 16 blocks of 4x4. An orientation histogram is constructed for each block containing 8 bins.
All these values are represented as a keypoint descriptor vector.
Keypoint Matching
The final stage involves Keypoint Matching. It matches two key points by finding their neighbors.
This is used to eliminate false matches.
Now we have discussed the SIFT algorithm in detail. Let us see how to implement this using Python’s OpenCV library.
Use the SIFT Class to Implement SIFT Using OpenCV in Python
The SIFT_create() constructor object can be used to create an object of the SIFT class that can detect the key points from an image.
We can specify different parameters, although every parameter has some default value. The parameters are: nfeatures, nOctaveLayers, contrastThreshold, edgeThreshold, sigma, and descriptorType.
The nfeatures parameter can specify the number of best features to select from the result. The layers in each octave can be specified using the nOctaveLayers parameter, which has a default of 3.
The contrastThreshold and edgeThreshold values filter out the weak and edge-like features. The sigma of Gaussian is specified using the sigma parameter, which can be lowered for pictures clicked with a soft lens.
The final parameter specifies the type of descriptors that can be either CV_32F or CV_8U.
Let us see how to use this method.
import numpy as np
import cv2 as cv

i = cv.imread("obj.png")
g = cv.cvtColor(i, cv.COLOR_BGR2GRAY)

sift_ob = cv.SIFT_create()
kp = sift_ob.detect(g, None)
img = cv.drawKeypoints(g, kp, i)

cv.imshow("Output", img)
cv.waitKey(0)
cv.destroyAllWindows()
Output:
Let us try to understand the above example.
We read the image using the imread() function. Then, we converted this image to grayscale using the cvtColor method that can change any image’s color space.
The algorithm works well with grayscale images.
We created an object using the SIFT_create() function with the default values. We use the detect() function with the created object to identify the points in the given image; it returns a tuple that stores the result.
We draw the key points on the image for a better visual representation using the drawKeypoints() function. We pass the tuple and the image in this function.
The final image is displayed using the imshow() function.
The waitKey() function prevented the output window from closing automatically, waiting for the user to press some key. We closed the window using the destroyAllWindows() function.
SIFT existed earlier in the OpenCV Contrib library and was added to OpenCV when its patent expired in 2020. It is no longer available in OpenCV version 3.4.2.16.
Let us now discuss how to match two images by implementing the SIFT algorithm using OpenCV in Python.
Match Two Images by Implementing the SIFT Algorithm Using OpenCV in Python
As discussed above, we can detect various key points and descriptors using the SIFT algorithm. For this, we can use a Brute-Force matcher.
A Brute-Force matcher will take one keypoint and its descriptor at a time and try to match it with a set of features from another image, returning the closest match.
So, we will create a Brute-Force matcher object using the BFMatcher() constructor. This object accepts two parameters.
The first parameter is the normType parameter, which is the distance used. For string based, we should use NORM_HAMMING, but for our case (SIFT), we can use NORM_L1 or NORM_l2.
The second parameter is crossCheck, which, if set to True, will only return the corresponding matches in either set. After creating the BFMatcher object, we can use the match() function to pass the two sets of descriptors for matching.
After this, we can use the drawMatches() function to draw the respective matches on the two images. The images are put side by side, and the matched keypoints are joined using a line.
Every line has a unique color to identify the feature. Let us see an example of this.
We will match the features of the following two images of the Qutub Minar.
Image 1:

Image 2:

Code:
import cv2
import matplotlib.pyplot as plt

# %matplotlib inline

i1 = cv2.imread("q3.jpeg")
i2 = cv2.imread("q4.jpeg")

img1 = cv2.cvtColor(i1, cv2.COLOR_BGR2GRAY)
img2 = cv2.cvtColor(i2, cv2.COLOR_BGR2GRAY)

sift = cv2.SIFT_create()

k_1, des_1 = sift.detectAndCompute(img1, None)
k_2, des_2 = sift.detectAndCompute(img2, None)

bf = cv2.BFMatcher(cv2.NORM_L1, crossCheck=True)

matches = bf.match(des_1, des_2)
matches = sorted(matches, key=lambda x: x.distance)

img3 = cv2.drawMatches(img1, k_1, img2, k_2, matches[:50], img2, flags=2)
cv2.imshow("Output", img3)
cv2.waitKey(0)
cv2.destroyAllWindows()
Output:
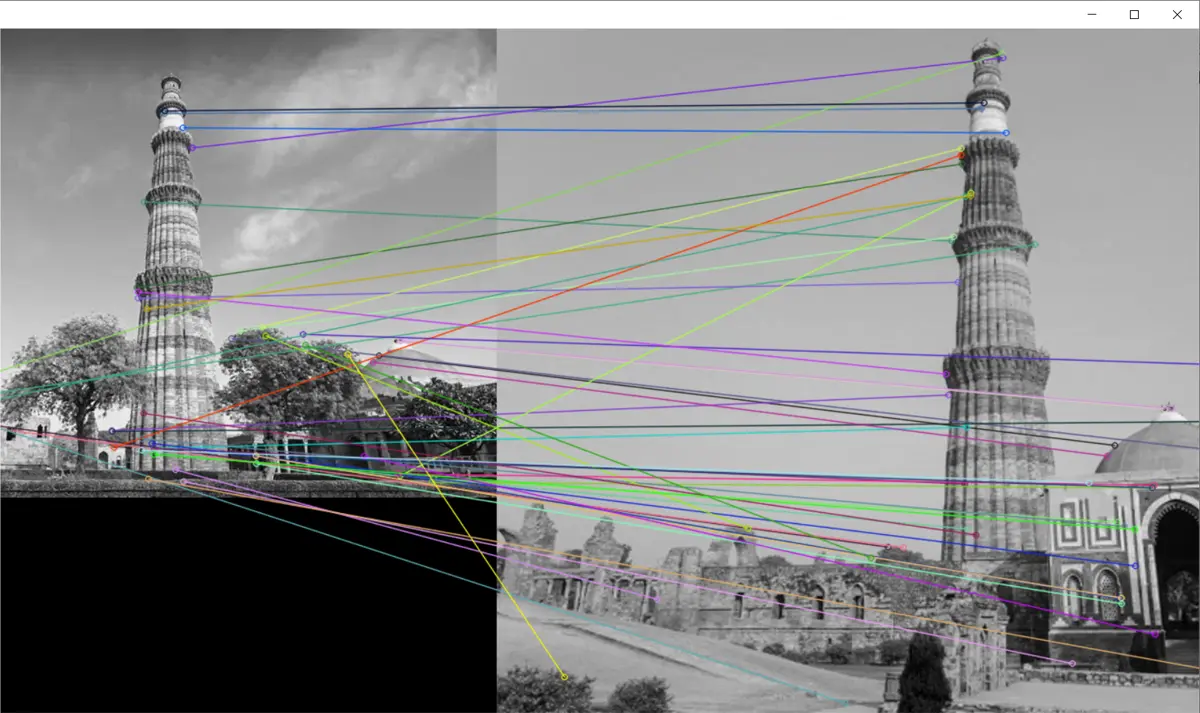
In the above example, we matched the features of two images using the SIFT algorithm and Brute-Force matcher.
First, we extracted the features for the two images using the SIFT algorithm. Then we matched these features using the Brute-Force matcher object.
The resultant matches were drawn on both the images using the drawMatches() function.
Conclusion
This tutorial demonstrated implementing the SIFT algorithm for feature extraction using OpenCV in Python. The theory behind SIFT algorithm was discussed in detail, and its advantages over other techniques were highlighted.
The five stages of this algorithm were detailed. These were Scale-Space Extrema Detection, Keypoint Localization, Orientation Assignment, Keypoint Descriptors, and Keypoint Matching.
We discussed implementing this technique by creating an object of the SIFT class using the SIFT_create() object. We highlighted the use of the detect() method from this class and drew the key points using the drawKeypoints() function.
We also discussed matching two images using the SIFT Algorithm using OpenCV in Python. For this, first, we extracted the features using the SIFT algorithm; then, we created an object of Brute-Force matcher.
We passed the descriptors to the match() attribute of the object to find the matches. The result was drawn on both images to give a visual representation using the drawMatches() function.

Manav is a IT Professional who has a lot of experience as a core developer in many live projects. He is an avid learner who enjoys learning new things and sharing his findings whenever possible.
LinkedIn