How to Move Objects in JavaFX
In this article, we will move an object in four directions left, right, up, and down. For this purpose, we are going to use the below code.
Move Objects in JavaFX
Let’s take a look at the code below. We will explain it later.
// Importing necessary packages.
import javafx.application.Application;
import javafx.geometry.Insets;
import javafx.geometry.Pos;
import javafx.scene.Scene;
import javafx.scene.control.Button;
import javafx.scene.layout.BorderPane;
import javafx.scene.layout.HBox;
import javafx.scene.layout.Pane;
import javafx.scene.paint.Color;
import javafx.scene.shape.Circle;
import javafx.stage.Stage;

public class MoveObject extends Application {
  @Override public void start(Stage primaryStage) { // Our main method
    BallPane BallPane = new BallPane();

    HBox ButtonHolder = new HBox(5); // Create an Hbox named "ButtonHolder"
    Button LeftBtn = new Button("Left"); // Create a button that move the ball left
    Button RightBtn = new Button("Right"); // Create a button that move the ball Right
    Button UpBtn = new Button("Up"); // Create a button that move the ball Up
    Button DownBtn = new Button("Down"); // Create a button that move the ball Down
    ButtonHolder.getChildren().addAll(
        LeftBtn, RightBtn, UpBtn, DownBtn); // Contain all the button to the `ButtonHolder` Hbox

    // Create actions for the buttons
    LeftBtn.setOnAction(e -> BallPane.MoveLeft());
    RightBtn.setOnAction(e -> BallPane.MoveRight());
    UpBtn.setOnAction(e -> BallPane.MoveUp());
    DownBtn.setOnAction(e -> BallPane.MoveDown());

    BorderPane pane = new BorderPane(); // Create a BorderPane
    pane.setCenter(BallPane); // Set the BallPane to pane
    pane.setBottom(ButtonHolder); // Set the ButtonHolder to pane
    pane.setPadding(new Insets(0, 20, 0, 20)); // Apply necessary paddings
    BorderPane.setAlignment(ButtonHolder, Pos.CENTER); // Align the ButtonHolder

    Scene scene = new Scene(pane, 250, 250); // Create a scene
    primaryStage.setTitle("Move a Ball"); // Provide an application title "Move a Ball"
    primaryStage.setScene(scene); // Set the scene to stage
    primaryStage.show(); // Visualizing the stage.
  }

  public static void main(String[] args) {
    Application.launch(args);
  }
}

class BallPane extends Pane { //  Create a Pane for pane
  private double radius = 25; // Define the ball redius
  private double width = 210; // Define the ball width
  private double height = 210; // Define the ball height
  Circle Ball = new Circle(width / 2, height / 2, radius); // Calcuate the circle

  BallPane() { // Set ball properties
    Ball.setFill(Color.GREEN);
    Ball.setStroke(Color.BLACK);
    getChildren().add(Ball);
  }

  public void MoveLeft() { // Method for moving the ball left
    if (Ball.getRadius() < Ball.getCenterX()) {
      Ball.setCenterX(Ball.getCenterX() - 10);
    }
  }

  public void MoveRight() { // Method for moving the ball Right
    if (Ball.getCenterX() < width - Ball.getRadius()) {
      Ball.setCenterX(Ball.getCenterX() + 10);
    }
  }

  public void MoveUp() { // Method for moving the ball Up
    if (Ball.getRadius() < Ball.getCenterY()) {
      Ball.setCenterY(Ball.getCenterY() - 10);
    }
  }

  public void MoveDown() { // Method for moving the ball Down
    if (Ball.getCenterY() < height - Ball.getRadius()) {
      Ball.setCenterY(Ball.getCenterY() + 10);
    }
  }
}
We already commented the purpose of each line on the code. Now, we will discuss the idea behind it.
After importing all necessary packages, we created our main method with a Stage named primaryStage. We also created an HBox that holds the necessary buttons in a container.
After that, we create actions for the buttons. And other parts of the code were described by commands.
We now discuss the working process of actions that move the object on the left, right, up, and down.
public void MoveLeft() { // Method for moving the ball left
  if (Ball.getRadius() < Ball.getCenterX()) {
    Ball.setCenterX(Ball.getCenterX() - 10);
  }
}
The above method will change the object’s position to the left side or, technically, to the -x direction when the user clicks on this button.
public void MoveRight() { // Method for moving the ball Right
  if (Ball.getCenterX() < width - Ball.getRadius()) {
    Ball.setCenterX(Ball.getCenterX() + 10);
  }
}
Then, the method shared above will change the object’s position to the right side or, technically, to the +x direction when the user clicks on this button.
public void MoveUp() { // Method for moving the ball Up
  if (Ball.getRadius() < Ball.getCenterY()) {
    Ball.setCenterY(Ball.getCenterY() - 10);
  }
}
After that, the method shared above will change the object’s position to the upper side or, technically, to the +y direction when the user clicks on this button.
public void MoveDown() { // Method for moving the ball Down
  if (Ball.getCenterY() < height - Ball.getRadius()) {
    Ball.setCenterY(Ball.getCenterY() + 10);
  }
}
Lastly, the above method will change the object’s position to the lower side or, technically, to the -y direction when the user clicks on this button.
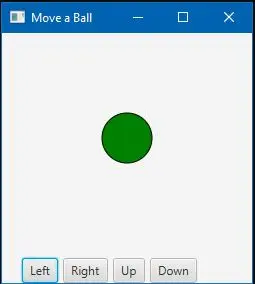
After compiling the code and running it, you will get an output like the one below.
Output:
Remember, if your IDE doesn’t support the automatic inclusion of Libraries. Then you may need to include necessary Library files manually before compiling; otherwise, it will show an error.

Aminul Is an Expert Technical Writer and Full-Stack Developer. He has hands-on working experience on numerous Developer Platforms and SAAS startups. He is highly skilled in numerous Programming languages and Frameworks. He can write professional technical articles like Reviews, Programming, Documentation, SOP, User manual, Whitepaper, etc.
LinkedIn