JavaFX에서 개체 이동
이 기사에서는 객체를 왼쪽, 오른쪽, 위, 아래 네 방향으로 이동합니다. 이를 위해 아래 코드를 사용하겠습니다.
JavaFX에서 개체 이동
아래 코드를 살펴보겠습니다. 나중에 설명하겠습니다.
// Importing necessary packages.
import javafx.application.Application;
import javafx.geometry.Insets;
import javafx.geometry.Pos;
import javafx.scene.Scene;
import javafx.scene.control.Button;
import javafx.scene.layout.BorderPane;
import javafx.scene.layout.HBox;
import javafx.scene.layout.Pane;
import javafx.scene.paint.Color;
import javafx.scene.shape.Circle;
import javafx.stage.Stage;

public class MoveObject extends Application {
  @Override public void start(Stage primaryStage) { // Our main method
    BallPane BallPane = new BallPane();

    HBox ButtonHolder = new HBox(5); // Create an Hbox named "ButtonHolder"
    Button LeftBtn = new Button("Left"); // Create a button that move the ball left
    Button RightBtn = new Button("Right"); // Create a button that move the ball Right
    Button UpBtn = new Button("Up"); // Create a button that move the ball Up
    Button DownBtn = new Button("Down"); // Create a button that move the ball Down
    ButtonHolder.getChildren().addAll(
        LeftBtn, RightBtn, UpBtn, DownBtn); // Contain all the button to the `ButtonHolder` Hbox

    // Create actions for the buttons
    LeftBtn.setOnAction(e -> BallPane.MoveLeft());
    RightBtn.setOnAction(e -> BallPane.MoveRight());
    UpBtn.setOnAction(e -> BallPane.MoveUp());
    DownBtn.setOnAction(e -> BallPane.MoveDown());

    BorderPane pane = new BorderPane(); // Create a BorderPane
    pane.setCenter(BallPane); // Set the BallPane to pane
    pane.setBottom(ButtonHolder); // Set the ButtonHolder to pane
    pane.setPadding(new Insets(0, 20, 0, 20)); // Apply necessary paddings
    BorderPane.setAlignment(ButtonHolder, Pos.CENTER); // Align the ButtonHolder

    Scene scene = new Scene(pane, 250, 250); // Create a scene
    primaryStage.setTitle("Move a Ball"); // Provide an application title "Move a Ball"
    primaryStage.setScene(scene); // Set the scene to stage
    primaryStage.show(); // Visualizing the stage.
  }

  public static void main(String[] args) {
    Application.launch(args);
  }
}

class BallPane extends Pane { //  Create a Pane for pane
  private double radius = 25; // Define the ball redius
  private double width = 210; // Define the ball width
  private double height = 210; // Define the ball height
  Circle Ball = new Circle(width / 2, height / 2, radius); // Calcuate the circle

  BallPane() { // Set ball properties
    Ball.setFill(Color.GREEN);
    Ball.setStroke(Color.BLACK);
    getChildren().add(Ball);
  }

  public void MoveLeft() { // Method for moving the ball left
    if (Ball.getRadius() < Ball.getCenterX()) {
      Ball.setCenterX(Ball.getCenterX() - 10);
    }
  }

  public void MoveRight() { // Method for moving the ball Right
    if (Ball.getCenterX() < width - Ball.getRadius()) {
      Ball.setCenterX(Ball.getCenterX() + 10);
    }
  }

  public void MoveUp() { // Method for moving the ball Up
    if (Ball.getRadius() < Ball.getCenterY()) {
      Ball.setCenterY(Ball.getCenterY() - 10);
    }
  }

  public void MoveDown() { // Method for moving the ball Down
    if (Ball.getCenterY() < height - Ball.getRadius()) {
      Ball.setCenterY(Ball.getCenterY() + 10);
    }
  }
}
우리는 이미 코드의 각 줄의 목적을 설명했습니다. 이제 그 뒤에 있는 아이디어에 대해 논의할 것입니다.
필요한 모든 패키지를 가져온 후 primaryStage라는 Stage를 사용하여 기본 메서드를 생성했습니다. 또한 필요한 버튼을 컨테이너에 담는 HBox도 만들었습니다.
그런 다음 버튼에 대한 작업을 만듭니다. 그리고 코드의 다른 부분은 명령으로 설명되었습니다.
이제 객체를 좌, 우, 상, 하로 움직이는 동작의 작동 과정에 대해 설명합니다.
public void MoveLeft() { // Method for moving the ball left
  if (Ball.getRadius() < Ball.getCenterX()) {
    Ball.setCenterX(Ball.getCenterX() - 10);
  }
}
위의 방법은 사용자가 이 버튼을 클릭하면 개체의 위치를 왼쪽으로, 기술적으로는 -x 방향으로 변경합니다.
public void MoveRight() { // Method for moving the ball Right
  if (Ball.getCenterX() < width - Ball.getRadius()) {
    Ball.setCenterX(Ball.getCenterX() + 10);
  }
}
그런 다음 위에서 공유한 메서드는 사용자가 이 버튼을 클릭할 때 객체의 위치를 오른쪽으로, 기술적으로는 +x 방향으로 변경합니다.
public void MoveUp() { // Method for moving the ball Up
  if (Ball.getRadius() < Ball.getCenterY()) {
    Ball.setCenterY(Ball.getCenterY() - 10);
  }
}
그 후 위에서 공유한 메서드는 사용자가 이 버튼을 클릭할 때 객체의 위치를 위쪽으로, 기술적으로는 +y 방향으로 변경합니다.
public void MoveDown() { // Method for moving the ball Down
  if (Ball.getCenterY() < height - Ball.getRadius()) {
    Ball.setCenterY(Ball.getCenterY() + 10);
  }
}
마지막으로 위의 방법은 사용자가 이 버튼을 클릭하면 개체의 위치를 아래쪽으로, 기술적으로는 -y 방향으로 변경합니다.
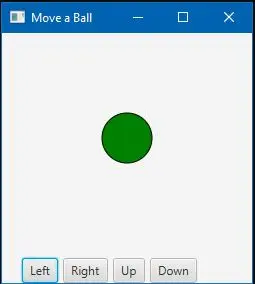
코드를 컴파일하고 실행하면 아래와 같은 결과를 얻을 수 있습니다.
출력:
IDE가 라이브러리 자동 포함을 지원하지 않는 경우 기억하십시오. 그런 다음 컴파일하기 전에 필요한 라이브러리 파일을 수동으로 포함해야 할 수 있습니다. 그렇지 않으면 오류가 표시됩니다.

Aminul Is an Expert Technical Writer and Full-Stack Developer. He has hands-on working experience on numerous Developer Platforms and SAAS startups. He is highly skilled in numerous Programming languages and Frameworks. He can write professional technical articles like Reviews, Programming, Documentation, SOP, User manual, Whitepaper, etc.
LinkedIn