JavaFX에서 KeyEvent 사용

KeyEvent는 키 누르기를 감지하고 키를 누를 때 특정 코드 블록을 실행하는 데 사용됩니다.
이 기사에서는 키 이벤트를 생성하고 사용자가 키를 누를 때 간단한 코드를 실행하는 방법을 보여줍니다. 이해하기 쉽도록 간단한 예도 살펴보겠습니다.
JavaFX에서 KeyEvent 사용
키 이벤트를 생성하는 일반적인 형식은 다음과 같습니다.
scene.setOnKeyPressed(
    (KeyEvent event)
        -> {
            // Create a key event that execute when any key pressed from your keyboard
            //  Add the actions that we are going to take when a key pressed.
        });
사용자 키 누르기를 감지하고 키를 눌렀다는 메시지를 표시하는 예제를 볼 것입니다.
우리 예제의 소스 코드는 아래와 같을 것이며, 필요한 명령을 제공하여 각 라인을 설명할 것입니다. 한번 봅시다.
import javafx.application.Application; // Package to create application
import javafx.scene.Scene; // Package to create a scene
import javafx.scene.control.Label; // Package to create a label
import javafx.scene.input.KeyEvent; // Package to create a key event
import javafx.scene.layout.HBox; // Package for the Hbox
import javafx.stage.Stage; // Package to create a stage

public class FxKeyListen extends Application {
  Label lbl; // Declares a label
  HBox _hbox; // Declares a HBox.

  public void start(Stage SimpleStage) throws Exception {
    SimpleStage.setTitle(
        "Detect key event"); // Set the application title which is "Detect key event"
    lbl =
        new Label("No key is pressed !!!"); // Create a label with default text "No key pressed !!!"
    _hbox = new HBox(lbl); // Create a HBox  with a label
    Scene scene = new Scene(_hbox, 400, 400); // Create a scene with HBox and necessary dimentions.

    scene.setOnKeyPressed(
        (KeyEvent event)
            -> { // Create a key event that execute when any key pressed from your keyboard
          lbl.setText("Key press detected !!!"); // The actions that we are going to take when a key
                                                 // pressed. In our case we are changing the label
                                                 // text to "Key press detected !!!"
        });
    SimpleStage.setScene(scene); // Set the scene
    SimpleStage.show(); // Visualize the scent
  }

  public static void main(String[] args) {
    Application.launch(args); // Run our application
  }
}
우리는 이미 각 라인의 목적을 명령했습니다. 이제 코드가 어떻게 작동하는지 설명하겠습니다.
키를 누르지 않았습니다 !!!라는 기본 텍스트로 코드에 레이블을 만들었습니다. lbl = new Label ("누른 키 없음 !!!"); 줄로. 이 레이블은 아무 키도 누르지 않았음을 사용자에게 표시하는 것을 목표로 합니다.
그런 다음 사용자가 키보드에서 키를 누를 때 실행할 작업으로 간단한 키 누르기 이벤트를 만들었습니다. 레이블의 기본 텍스트를 변경하고 Key press detected !!!로 설정합니다. 따라서 이를 위해 lbl.setText("Key press detected !!!");와 같은 작업으로 코드를 추가합니다.
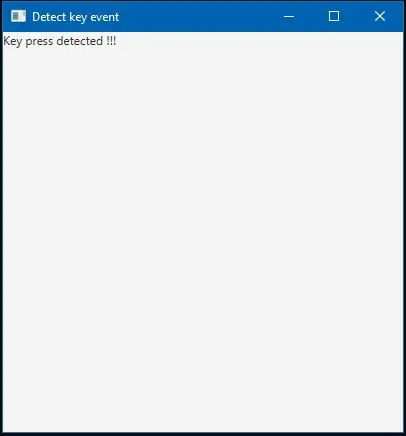
이제 성공적인 컴파일 후 코드를 실행하면 키 이벤트 감지라는 제목의 창이 열리고 키보드에서 키를 누르면 아래와 같은 출력이 표시됩니다.
출력:
IDE가 라이브러리 자동 포함을 지원하지 않는 경우 기억하십시오. 그런 다음 컴파일하기 전에 필요한 라이브러리 파일을 수동으로 포함해야 할 수 있습니다.

Aminul Is an Expert Technical Writer and Full-Stack Developer. He has hands-on working experience on numerous Developer Platforms and SAAS startups. He is highly skilled in numerous Programming languages and Frameworks. He can write professional technical articles like Reviews, Programming, Documentation, SOP, User manual, Whitepaper, etc.
LinkedIn