How to Fix Error: JavaFX FXML Load Exception

This tutorial educates about the reasons causing the JavaFX FXML load exception and provides a quick solution.
Reasons Causing the JavaFX FXML Load Exception
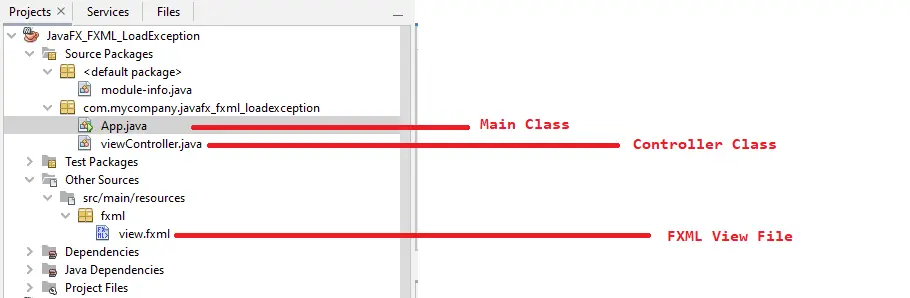
The first reason for getting the JavaFX FXML load exception is when the path to an FXML file is not specified correctly to a loader. The path /fxml/view.fxml refers to a file view.fxml in a folder named fxml which resides in the resources folder, i.e., on the classpath.
The getClass().getResource() call invokes an object classloader at runtime, which searches for the classpath for a resource passed to it. In this way, it will find the fxml folder and view.fxml file inside that folder.
The second reason can be having a mismatched component ID which means we may have updated a component ID in our Controller file but forgot to change that ID on the FXML file (or vice-versa). In this case, the Controller would not be able to link that component on the view.fxml file.
See the following chunk to have a clear understanding.
On the Controller File:
@FXML
Button btnName1
On the FXML View File:
fx:id="btnName_1"
Following is the solution to both of these reasons.
Solution to the JavaFX FXML Load Exception
To run this application, we are using Java 18, JavaFX 13, and NetBeans IDE version 13. You may use all of them as per your choice.
Example Code (view.fxml file, the view file):
<!--Step1: XML declaration-->
<?xml version="1.0" encoding="UTF-8"?>

<!--Step 2: import necessary java types in FXML-->

<?import javafx.scene.control.Button?>
<?import javafx.scene.control.Label?>
<?import javafx.scene.layout.AnchorPane?>

<!--Step 3: specify the FXML namespace-->

<AnchorPane prefHeight="300.0" prefWidth="400.0"
xmlns="http://javafx.com/javafx/11.0.1"
xmlns:fx="http://javafx.com/fxml/1" fx:controller="com.mycompany.javafx_fxml_loadexception.viewController">

    <!--Step 4: layout pane have children-->
    <children>
        <Button fx:id="btTest" layoutX="170.0"
        layoutY="208.0" mnemonicParsing="false"
        onAction="#onBtTestAction" text="Button" />

        <Label layoutX="167.0" layoutY="126.0" text="Cick here!" />
   </children>

</AnchorPane>
Following is the step-by-step explanation of the above code.
-
We write an XML declaration by describing the version and encoding.
-
Import all the necessary Java types in FXML.
-
We use the
AnchorPanetag to declare thefxnamespace prefix. This tag permits the child nodes’ edges to be anchored to the offset from an edge of the anchor pane.If there is padding or border in the anchor pane, then the offsets would be measured from those insets’ inside edges. The
AnchorPanetag has various properties listed below with a brief explanation.-
The
prefHeightandprefWidthproperties can be used to override the region’s computed preferred height and width. -
In FXML, the
fx:controlleris used to specify the controller on arootelement. Remember that we are allowed to have one controller per FXML document and must be specified on therootelement.What is the
rootelement in this code? TheAchnorPanetag is therootelement for this code example which is a top-level object in an object graph of the FXML document.All the UI elements will be added to this element. Further, we also need to know the rules a controller must satisfy; these rules are listed below:
- A controller is instantiated by the
FXMLloader. - A controller must have the public
no-argsconstructor. TheFXMLloader would be unable to instantiate it if it is not there, resulting in an exception at load time. - A controller can contain accessible functions that can also be specified as the event handlers in the FXML.
- The
FXMLcontroller automatically looks for a controller’s accessible instance variable(s). If the accessible instance variable’s name matches an element’sfx:idattribute, an object reference from the FXML will automatically be copied into a controller instance variable.
This feature will make UI elements’ references in the FXML accessible to the controller. Then, the controller would be able to use them.
- A controller is instantiated by the
-
A controller can also access the
initialize()function, which must not accept arguments and return thevoidtype. Once the FXML document’s loading process is complete, theFXMLloader calls theinitialize()function.
-
-
In FXML, the layout panes contain the children as their child elements. Considering the project requirements, we can add labels, buttons, and other elements.
Example Code (viewController.java class, the controller class):
// Step 1: replace this package name with your package name
package com.mycompany.javafx_fxml_loadexception;

// Step 2: import necessary libraries
import javafx.fxml.FXML;
import javafx.scene.control.Button;

// Step 3: viewController class
public class viewController {
  // define button
  @FXML private Button btTest;

  // define the action when the button is clicked
  @FXML
  public void onBtTestAction() {
    System.out.println("CLICK");
  } // end onBtTestAction method

} // end viewController class
The viewController.java class is a controller class that uses the @FXML annotation on some members. Remember that this annotation can be used on constructors and classes.
Using this annotation, we specify that the FXML loader can easily access this member even if that is private. We do not need to use the @FXML annotation if the FXML loader uses a public member.
However, using @FXML for a public member does not raise any error. So, it is good to annotate every member.
The following FXML sets the onBtTestAction() function of a controller class as an event handler for the Button:
<Button fx:id="btTest" layoutX="170.0" layoutY="208.0" mnemonicParsing="false" onAction="#onBtTestAction" text="Button" />
Example Code (App.java class, the main class):
// Step 1: replace the package name with your package name
package com.mycompany.javafx_fxml_loadexception;

// Step 2: import necessary libraries
import java.io.IOException;
import javafx.application.Application;
import javafx.fxml.FXMLLoader;
import javafx.scene.Parent;
import javafx.scene.Scene;
import javafx.stage.Stage;

// Step 3: primary launch class extending the Application class
public class App extends Application {
  /**
   *
   * @param stage
   */
  @Override
  public void start(Stage stage) {
    // load the view.fxml file, add it to the scene and show it
    try {
      Parent parent = FXMLLoader.load(getClass().getResource("/fxml/view.fxml"));
      // create a scene
      Scene scene = new Scene(parent);
      // set scene to a stage
      stage.setScene(scene);
      // show the stage
      stage.show();
    } // end try
    catch (IOException e) {
      e.printStackTrace();
    } // end catch
  } // end start method

  public static void main(String[] args) {
    launch(args);
  } // end main method

} // end App class
The main file extends the Application class and overrides its abstract method start(). In the start() method, we load the view.fxml file, create a scene, set this scene to a stage, and display that stage.
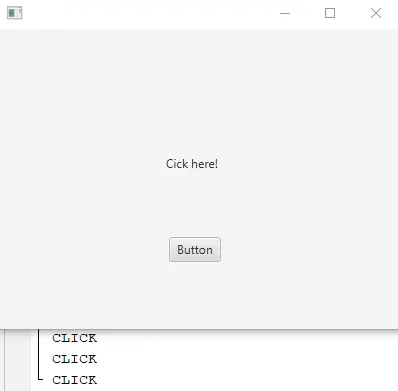
OUTPUT (prints the word CLICK on IDE’s console whenever we click on the Button):
Check the following screenshot to place each file at the correct location: