How to Use OCR to Extract Text From an Image in OpenCV

This article will cover everything you need to get started with optical character recognition, also known as OCR. You will learn how to extract text from images and visualize the extracted text on an image in OpenCV.
Use OCR With the EasyOCR Library to Extract Text From an Image in OpenCV
In this article, there are four key things that we need to do:
-
We need to install and import our dependencies.
-
Then, we need to read our images or video.
-
Next, we will draw our results.
-
Lastly, we will be using OpenCV to look at how we can handle images with multiple lines of text and visualize them.
Optical character recognition, also known as OCR, recognizes text in images. It converts tight handwritten or printed text into a machine-readable format.
Many industries use OCR technology for automation banking; one can use OCR to process handwritten checks. Another important application of OCR is to extract information from handwritten documents.
We will be using the EasyOCR library to use OCR, which is powered by the PyTorch library. This library makes it easier to go through and perform optical character recognition on an image or a document.
Let’s get started with the installation and import our dependencies. The first dependency that we need to install is PyTorch because EasyOCR runs on PyTorch.
It depends on what type of operating system the user is running and using a GPU or not. The installation may be slightly different, but the good thing is that if the user goes to python.org, it will automatically select the best type of installation method for the user.
Run this command to install the EasyOCR package:
pip install easyocr
Now we are ready to use the dependencies.
import easyocr
import cv2
import matplotlib.pyplot as plot
import numpy as np
Now we need to read our images. We will include a variable to hold that image path, and the next thing is to use EasyOCR to perform that optical character recognition.
We defined easyocr.Reader() class, and we passed the language we wanted to use to this. If we are not using GPU, we will set the gpu parameter equal to False.
In the next line, we defined the reader.readtext() method and passed our image path.
IMG_P = "sign.png"
reader = easyocr.Reader(["en"])
RST = reader.readtext(IMG_P)
RST
Its result comes back with a few different things when we run this code.

We got an array where the text is in our image, and we will be able to see this better when we visualize it. The second part is the text identified, and the last is the confidence.
Let’s visualize the result, and to do this, we need to define a couple of key variables to identify where our different coordinates are. We will get the top left corner and bottom right corner values to get and define the coordinates.
We will define indexes from the array to grab the component values and convert them into a tuple because when passing it to OpenCV, it is expecting a tuple as an argument.
We will do a similar thing to grab the bottom right and the text, but we do not need to convert the text into a tuple.
T_LEFT = tuple(RST[0][0][0])
B_RIGHT = tuple(RST[0][0][2])
text = RST[0][1]
font = cv2.FONT_HERSHEY_SIMPLEX
Now we used the imread() method to read our image, and in the next line, we overlaid the rectangle, which is the component, and then we overlaid our text to draw our rectangle.
The rectangle() method takes the first parameter as an image. The next parameter we passed is the T_LEFT coordinate, and the next one is the B_RIGHT coordinate.
The next parameter passed is a tuple, and it follows to a bright green color. We also passed the rectangle thickness.
We visualized the text using the putText() method that takes several parameters. The first is an image coordinate where we want to set the position of the extracted text, the font style, and the font size, and the next consists of the color, thickness, and line style.
import easyocr
import cv2
import matplotlib.pyplot as plot
import numpy as np
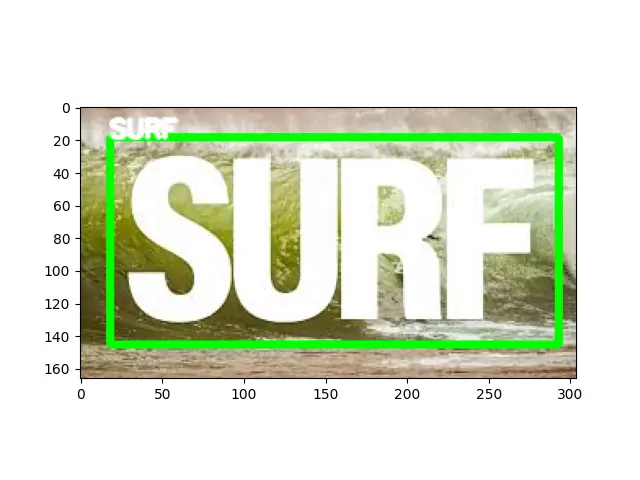
IMG_P = "surf.jpeg"
reader = easyocr.Reader(["en"])
RST = reader.readtext(IMG_P)
RST
T_LEFT = tuple(RST[0][0][0])
B_RIGHT = tuple(RST[0][0][2])
text = RST[0][1]
font = cv2.FONT_HERSHEY_SIMPLEX
IMG = cv2.imread("surf.jpeg")
IMG = cv2.rectangle(IMG, T_LEFT, B_RIGHT, (0, 255, 0), 3)
IMG = cv2.putText(IMG, text, T_LEFT, font, 0.5, (255, 255, 255), 2, cv2.LINE_AA)
plot.imshow(IMG)
plot.show()
We can see a box drawn around the text, and the surf appears inside the rectangle.
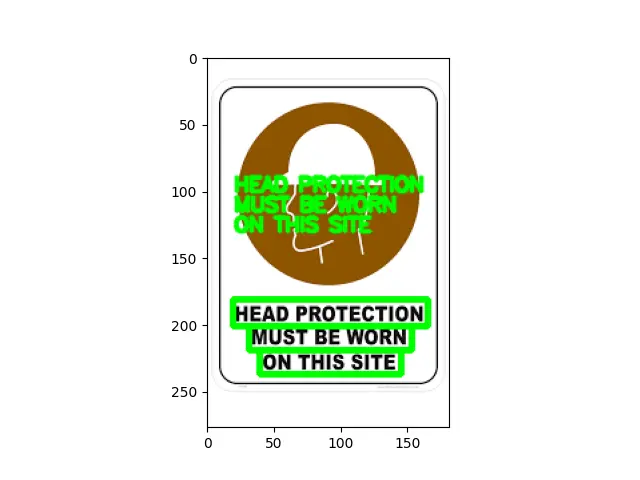
Let’s see how to handle if we have an image that has multiple lines of text. It is pretty much the same; the only thing that is changed is when we print the results, we see several different lines.
Hence, we need to loop through to visualize and plot each detection individually.
import easyocr
import cv2
import matplotlib.pyplot as plot
import numpy as np

IMG_P = "sign.png"

reader = easyocr.Reader(["en"])
RST = reader.readtext(IMG_P)
RST

font = cv2.FONT_HERSHEY_SIMPLEX

IMG = cv2.imread(IMG_P)
spacer = 100
for detection in RST:
    T_LEFT = tuple(detection[0][0])
    B_RIGHT = tuple(detection[0][2])
    TEXT = detection[1]
    IMG = cv2.rectangle(IMG, T_LEFT, B_RIGHT, (0, 255, 0), 3)
    IMG = cv2.putText(IMG, TEXT, (20, spacer), font, 0.5, (0, 255, 0), 2, cv2.LINE_AA)
    spacer += 15

plot.imshow(IMG)
plot.show()
Output:

Hello! I am Salman Bin Mehmood(Baum), a software developer and I help organizations, address complex problems. My expertise lies within back-end, data science and machine learning. I am a lifelong learner, currently working on metaverse, and enrolled in a course building an AI application with python. I love solving problems and developing bug-free software for people. I write content related to python and hot Technologies.
LinkedIn