How to Detect Image Color Using OpenCV in Python

The OpenCV library is created to help with Computer Vision tasks and is compatible with various programming languages. The library has implementations of different helpful algorithms and techniques to process images.
This tutorial will demonstrate how to perform color detection in an image using Python’s OpenCV library.
There are various applications for color detection. We can use it to distinguish objects in real life. This can also be considered an image segmentation technique as we try to label every pixel based on similar characteristics.
We will detect the color using the HSV color space, which stands for Hue Saturation Value. This is a cylindrical color space, which is very useful when working with color information.
Hue determines the color information, Saturation represents the intensity of the color, and Value determines the brightness based on how much the color is mixed with black.
Image Color Detection Using the OpenCV Library in Python
We will use various functions from the OpenCV library for color detection. Let us discuss them below.
We will detect one specific color in a given image and add boundaries around the detected segments.
We need to convert the required image from the BGR color space to HSV. To perform such conversions in images, we can use the cvtColor() function from the OpenCV library.
We need the boundaries for the given color and return a binary mask of the places where the color is present in the image. The inRange() function of OpenCV takes a given image and returns the binary mask of where the color is presently based on the specified upper and lower bounds.
This mask is the subset of the image where the color is detected.
We can then apply morphological operations to this binary mask to filter unwanted noise. We will use the morphologyex() function from the OpenCV library to achieve this.
It performs erosion after dilation to close out small holes in the object.
We also need to add boundaries to the image using this created binary mask.
bitwise_and() is used to segment the parts of the image that match a given mask. The mask is supplied using the mask parameter.
It compares every pixel from the source image and matches the corresponding one in the specified mask.
To add the boundaries to this segmented image, we will use the two methods, findContours() and drawContours(). This contour can be thought of as a curve joining points along a boundary for some segmented image.
The first function returns a list of all contours for the given image. We will use the drawcontours() function to draw the contours.
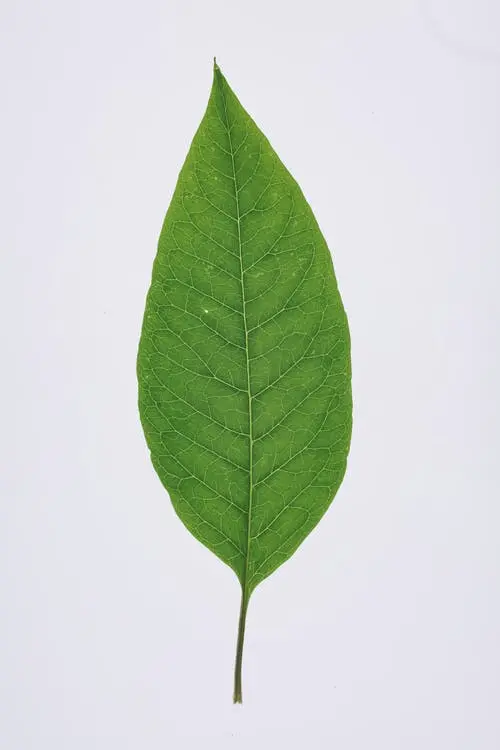
Let us now implement the code for color detection and find the green color in the following image.
Code:
import cv2
import numpy as np

img = cv2.imread("img3.jpeg")
hsv_img = cv2.cvtColor(img, cv2.COLOR_BGR2HSV)
bound_lower = np.array([25, 20, 20])
bound_upper = np.array([100, 255, 255])

mask_green = cv2.inRange(hsv_img, bound_lower, bound_upper)
kernel = np.ones((7, 7), np.uint8)

mask_green = cv2.morphologyEx(mask_green, cv2.MORPH_CLOSE, kernel)
mask_green = cv2.morphologyEx(mask_green, cv2.MORPH_OPEN, kernel)

seg_img = cv2.bitwise_and(img, img, mask=mask_green)
contours, hier = cv2.findContours(
    mask_green.copy(), cv2.RETR_EXTERNAL, cv2.CHAIN_APPROX_SIMPLE
)
output = cv2.drawContours(seg_img, contours, -1, (0, 0, 255), 3)

cv2.imshow("Result", output)
cv2.waitKey(0)
cv2.destroyAllWindows()
Output:
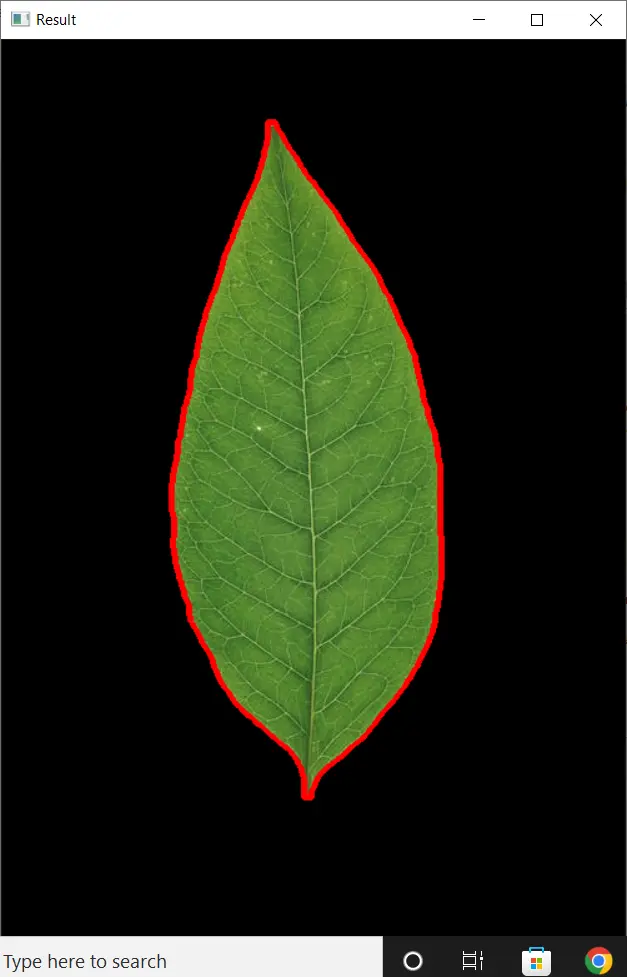
Let us now get briefed on the implemented code.
The imread() function read the image. We converted the color space of this image from BGR to HSV using the cvtColor() function; note the cv2.COLOR_BGR2HSV parameter within the function.
We then specified the upper and lower bound values to detect the green color in the image and created the binary mask using the inRange() function.
The noise is removed twice from this mask using the morphologyEx() function.
For the first time, with the cv2.MORPH_CLOSE parameter, we filtered the white noise from the black part. And for the second time, we used the cv2.MORPH_CLOSE to filter black noise from the white part.
Then we drew the boundaries on the segmented part. We determined the segmented part and its contours using the findContours() and drew the boundary with the drawContours() method.
Conclusion
This tutorial discussed how to perform color detection using OpenCV in Python. We worked with an image and detected the parts that matched the green color.
There are several steps associated with this. We need to convert the image to the correct HSV color space and create the mask for the required color.
Then we need to filter out the noise from this mask. This mask is then used with the original image to segment the detected part, and we draw boundaries over it.

Manav is a IT Professional who has a lot of experience as a core developer in many live projects. He is an avid learner who enjoys learning new things and sharing his findings whenever possible.
LinkedIn