Image Segmentation in OpenCV
-
Image Segmentation Using
opencvin Python -
Use the
GrabCutAlgorithm for Image Segmentation Usingopencv -
Use Color-Detection for Image Segmentation Using
opencv - Conclusion
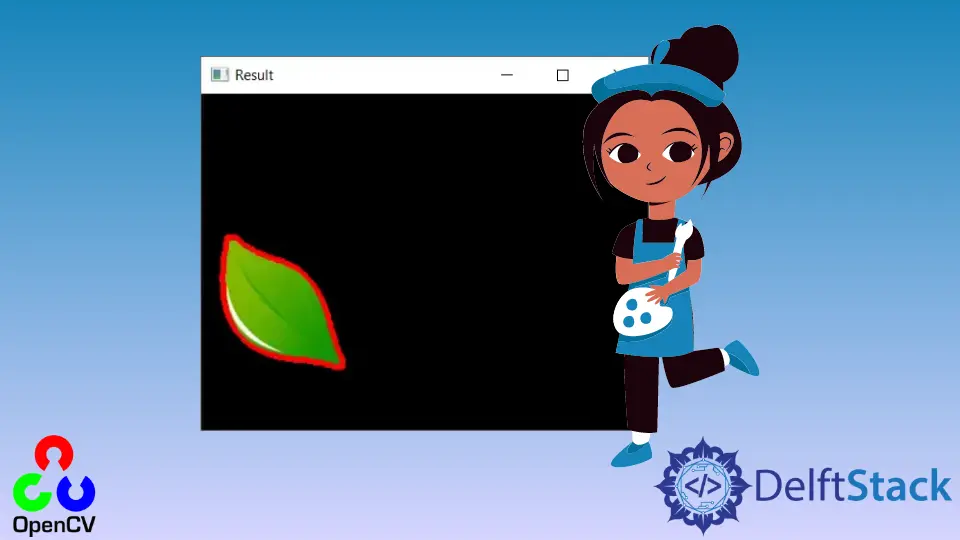
Image processing is a crucial step in Computer Vision tasks. In Python, we can use the opencv library to implement several image processing techniques using different objects and methods.
This tutorial will demonstrate how to perform image segmentation using opencv in Python.
Image Segmentation Using opencv in Python
Image segmentation refers to the process of dividing a given image into several parts.
We add curves that join the points along the boundary of the segmented parts. These curves are termed contours.
Image segmentation is very useful in Computer Vision and has many real-life applications. We can use this technique to segment parts of an image to classify various objects.
Several methods available can be used for image segmentation using opencv in Python.
The main method which differs in every image segmentation technique is usually based on the criterion for the segmented image. We can have image segmentation based on detecting some color, pre-defined algorithms like the Watershed algorithm, edge detection, and even selecting the segmented portions based on user inputs.
We will discuss some of these methods in the following sections.
Use the GrabCut Algorithm for Image Segmentation Using opencv
This method requires user interaction with the mouse and keyboard. The opencv library inbuilt has objects and methods that can read user input from mouse and keyboard.
The GrabCut algorithm is a very simple and useful tool for image segmentation. In this technique, we use the user input to select some region of a given image.
This algorithm automatically detects the foreground and background of the segmented portion, and we can display them.
We can use the grabCut() function from the opencv library to implement this algorithm. We will pass the image along with the box of the selected region within this function for image segmentation.
See the following code for an example.
import cv2
import numpy as np


def algo_grabcut(img, bounding_box):
    seg = np.zeros(img.shape[:2], np.uint8)
    x, y, width, height = bounding_box
    seg[y : y + height, x : x + width] = 1
    background_mdl = np.zeros((1, 65), np.float64)
    foreground_mdl = np.zeros((1, 65), np.float64)

    cv2.grabCut(
        img, seg, bounding_box, background_mdl, foreground_mdl, 5, cv2.GC_INIT_WITH_RECT
    )

    mask_new = np.where((seg == 2) | (seg == 0), 0, 1).astype("uint8")
    img = img * mask_new[:, :, np.newaxis]
    cv2.imshow("Output", img)


def box_draw(click, x, y, flag_param, parameters):
    global x_pt, y_pt, drawing, topleft_pt, bottomright_pt, img

    if click == cv2.EVENT_LBUTTONDOWN:
        drawing = True
        x_pt, y_pt = x, y

    elif click == cv2.EVENT_MOUSEMOVE:
        if drawing:
            topleft_pt, bottomright_pt = (x_pt, y_pt), (x, y)
            image[y_pt:y, x_pt:x] = 255 - img[y_pt:y, x_pt:x]
            cv2.rectangle(image, topleft_pt, bottomright_pt, (0, 255, 0), 2)

    elif click == cv2.EVENT_LBUTTONUP:
        drawing = False
        topleft_pt, bottomright_pt = (x_pt, y_pt), (x, y)
        image[y_pt:y, x_pt:x] = 255 - image[y_pt:y, x_pt:x]
        cv2.rectangle(image, topleft_pt, bottomright_pt, (0, 255, 0), 2)
        bounding_box = (x_pt, y_pt, x - x_pt, y - y_pt)

        algo_grabcut(img, bounding_box)


drawing = False
topleft_pt, bottomright_pt = (-1, -1), (-1, -1)

img = cv2.imread("img4.jpg")
img = cv2.resize(img, (500, 500))
image = img.copy()
cv2.namedWindow("Frame")
cv2.setMouseCallback("Frame", box_draw)

while True:
    cv2.imshow("Frame", image)
    ch = cv2.waitKey(1)
    if ch == 32:
        break

cv2.destroyAllWindows()
Output:
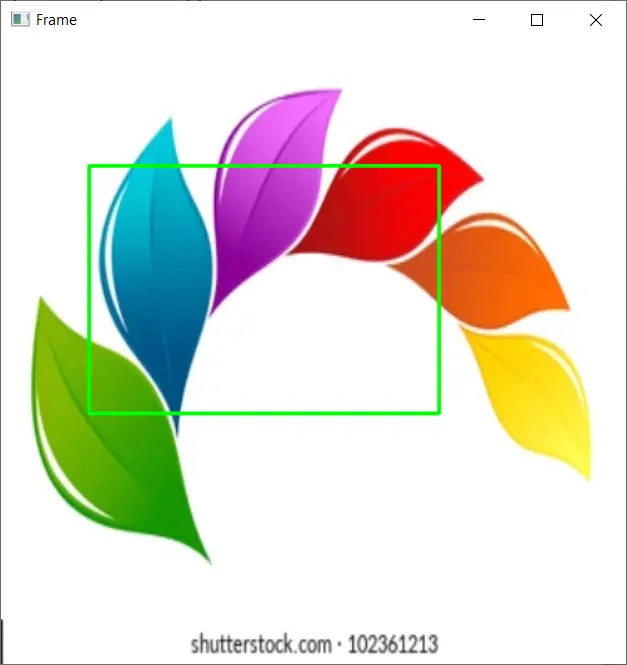
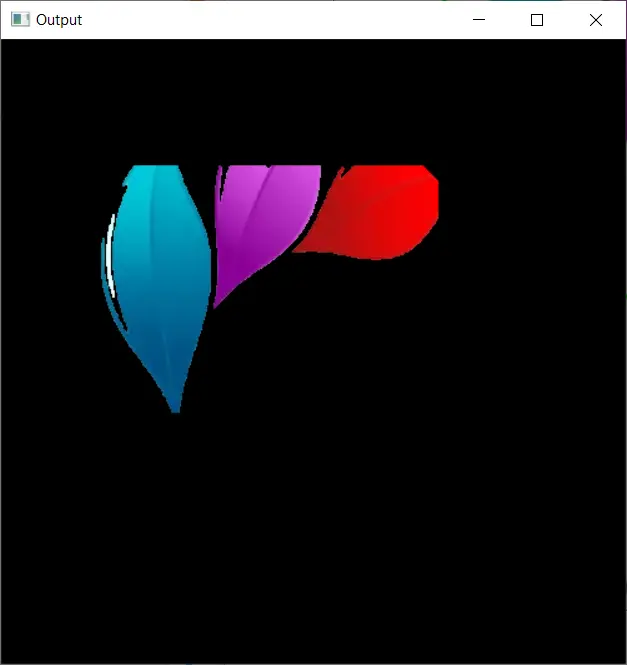
Let us understand what is happening in the above example.
The box_draw() function reads the user interaction with the mouse to select the region for image segmentation. The box and image are passed to the algo_grabcut() function that takes the image and creates the binary mask for the segmented image.
We use this mask and display the foreground of the segmented portion.
Use Color-Detection for Image Segmentation Using opencv
In Python, we can use the opencv for color detection. There are different color spaces available for an image to represent its colors.
For our case, we will use the HSV color space to determine the ranges for the given color.
We will use different colors for image segmentation. We create a range for a given color and use the inRange() function from the opencv library to detect objects that match this color.
This returns a binary mask. We then refine this mask and add contours to this detected part.
As discussed earlier, contours are the curves on the boundaries of the segmented part. We will use the findContours() function to find the borders using the created mask and then draw these contours with the drawContours() function.
See the code below.
import cv2
import numpy as np

img = cv2.imread("img4.jpg")
hsv_img = cv2.cvtColor(img, cv2.COLOR_BGR2HSV)
bound_lower = np.array([36, 25, 25])
bound_upper = np.array([70, 255, 255])

mask_green = cv2.inRange(hsv_img, bound_lower, bound_upper)
kernel = np.ones((7, 7), np.uint8)

mask_green = cv2.morphologyEx(mask_green, cv2.MORPH_CLOSE, kernel)
mask_green = cv2.morphologyEx(mask_green, cv2.MORPH_OPEN, kernel)

seg_img = cv2.bitwise_and(img, img, mask=mask_green)
contours, hier = cv2.findContours(
    mask_green.copy(), cv2.RETR_EXTERNAL, cv2.CHAIN_APPROX_SIMPLE
)
output = cv2.drawContours(seg_img, contours, -1, (0, 0, 255), 3)

cv2.imshow("Result", seg_img)
cv2.waitKey(0)
cv2.destroyAllWindows()
Output:
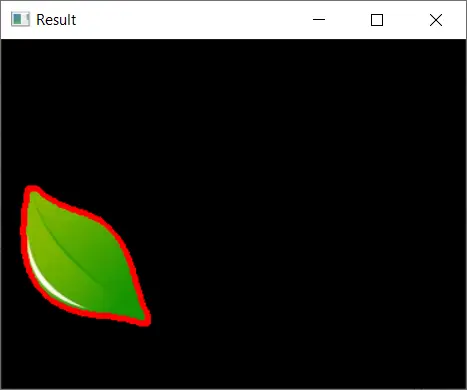
In the above code, we segment green objects from a given image. First, we convert the image to the HSV color space using the cvtColor function.
Then we proceed to create the mask that stores the detected color. We remove any unwanted noise from this mask as well.
Then we draw the contours to the detected segment and display it. The waitKey() function prevents the image window from closing automatically.
It waits for the user to press some key and then close it.
Conclusion
In this tutorial, we discussed image segmentation using Python’s opencv library. We also implemented a few techniques for this, although many more are possible.
We discussed the basics behind image segmentation and what will be the approach and final result in every method.
We discussed two methods in detail. First, we implemented the GrabCut algorithm.
In this algorithm, the user selects a region he wants to use for segmentation. From this portion, we detect the foreground objects and display them.
In the second technique, we used color detection. We detected objects of green color.
In this type of segmentation, we convert the image to the given color space and use the color ranges from this model to detect colors using the inRange() function. We use this mask for image segmentation and drawing contours around the edges.
Manav is a IT Professional who has a lot of experience as a core developer in many live projects. He is an avid learner who enjoys learning new things and sharing his findings whenever possible.
LinkedIn