The Checkbox Onclick Events in JavaScript
This article will discuss how to call a JavaScript function, which will help us manage an HTML checkbox when it is clicked and teach you how to handle the onclick event in JavaScript.
the onclick Event in JavaScript
The onclick event lets you execute a function when an element is clicked. When a user clicks the button, they’ll see an alert in their browser showing that the button was clicked.
The onclick event can also be added to any element. Through this tutorial, you will learn how to manage checkboxes using the onclick event using JavaScript, which will let you know if the checkbox has been checked.
Below is an example of the onclick button. When a user clicks the button, they’ll see an alert in their browser showing that the Button was clicked!.
<button onclick="myFunction()">Click me</button>

<script>
  function myFunction() {
    alert('Button was clicked!');
  }
</script>
The HTML checkbox input element allows us to select a single value for submission in a form.
Manage HTML Checkboxes With onclick Event Using JavaScript
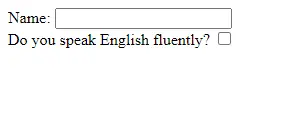
To start working with checkboxes, you will need to create a form that contains a checkbox. In this example, you will create a form that inputs the user’s name and consists of a checkbox that the user should click if he thinks he is fluent enough in English.
If that is not the case, a prompt will appear, telling the user that they must be fluent in English to apply for the position.
Code - HTML:
<form action="">
  <label for="name">Name:</label>
  <input type="text" name="name"><br>
  <label for="language">Do you speak English fluently?</label>
<input type="checkbox" id="fluency" checked />
</form>
The code above creates a form that contains a checkbox.
Now, you need to attach an event to the checkbox. It checks its condition each time it’s changed and shows the message if it has been unchecked.
Two events can be attached to the checkbox and executed when the checkbox value is changed. They are the onclick and onchange events.
There is a problem with the onchange function, and it is not called upon until the checked state has been updated. Since the Internet Explorer Browser does not fire the onChange event until the checkbox loses focus, it will output different results than in Google Chrome and other browsers.
So you should stick to the onclick event to avoid all this.
<input type="checkbox" onclick="checkFluency()" id="fluency" checked />
Here you will add an onclick event. Once it is clicked, this will call a function called checkFluency().
Code - JavaScript:
function checkFluency() {
  var checkbox = document.getElementById('fluency');
  if (checkbox.checked != true) {
    alert('you need to be fluent in English to apply for the job');
  }
}

When the checkbox is left unchecked, the code will give us an output saying that the user is required to have fluency in English to apply for the job. With the help of the onclick event and the JavaScript function, you can easily find out if the checkbox is checked or not.
Also, it allows you to add any condition within your if-else statement. In this article, you learned how to manage the HTML checkboxes using JavaScript through its onclick event and calling a function checkfluency.