Vertical Alignment in React Native
- Use Flexbox to Align Element Vertically in React Native
-
Use the
alignSelfProperty to Align Element Vertically in React Native - Use Absolute Positioning to Align Element Vertically in React Native
- Conclusion
React Native is one of the most used frameworks for developing apps on both Android and IOS. When working on a React Native app, aligning is very important to make the app more user-friendly.
There are two kinds of alignment available for any React Native element: Horizontal and Vertical. In vertical alignment, three properties are available: flex-start, Center, and flex-end.
Vertical alignment in React Native is a crucial aspect of UI design, allowing developers to control the positioning of elements along the vertical axis. This guide explores various methods to achieve vertical alignment, providing detailed explanations and example codes for each approach.
Use Flexbox to Align Element Vertically in React Native
Flexbox is a layout model that allows you to create dynamic and flexible layouts. It works by distributing available space among elements within a container, allowing you to easily achieve various alignments and distributions of elements.
Flexbox is particularly useful for handling both horizontal and vertical alignment, making it a key tool for building responsive designs.
In React Native, vertical alignment can be achieved by using the flex property along with alignItems or justifyContent. These properties allow you to control how elements are aligned within their parent container along the vertical axis.
To align a React Native element, you only need to make the following changes to the style:
React_Element_ID :{
    justifyContent: 'center', // For aligning vertically
    flex:1
}
Let’s have an example to make it clearer to us. In our example below, we illustrated how we could align an image vertically in a React Native app.
// Importing necessary packages
import { StatusBar } from 'expo-status-bar';
import { StyleSheet, Image, Text, View } from 'react-native';

// Our main function
export default function App() {

  return ( // Creating the UI elements.
    <View style={styles.container}>
      <Text>Simple Image</Text>
      <Image
        style={styles.img}
        source={{
          uri: 'https://st2.depositphotos.com/1031343/6062/v/450/depositphotos_60622807-stock-illustration-keep-it-simple-stamp.jpg',
        }}
      />
      <StatusBar style="auto" />
    </View>
  );
}

// Providing all necessary styles
const styles = StyleSheet.create({
  container: {
    flex: 1,
    backgroundColor: '#fff',
    alignItems: 'center',
    justifyContent: 'flex-start',
    marginTop: 100,
  },
  img: {
    width: 100,
    height: 100,
  },
});
In the program, we first import the necessary components and modules from the react-native and expo-status-bar packages.
In the App main function, there is a View component, which acts as a container for other UI elements. It is given a style defined by the styles.container.
Inside the View, there is a Text component displaying the text "Simple Image".
Following the Text component, there is an Image component displaying an image. It is given a style defined by the styles.img, and the source of the image is specified with a URI.
Next, the StatusBar component from expo-status-bar is used to control the appearance of the status bar at the top of the screen.
Then, the styles object contains the CSS styles for the components.
styles.container defines the styles for the main container. It uses Flexbox to make it take up the full available space, sets the background color to white, centers its children both horizontally and vertically, and adds a margin from the top of 100 units.
Finally, styles.img defines the styles for the image. It sets the width and height to 100 units each.
Output:
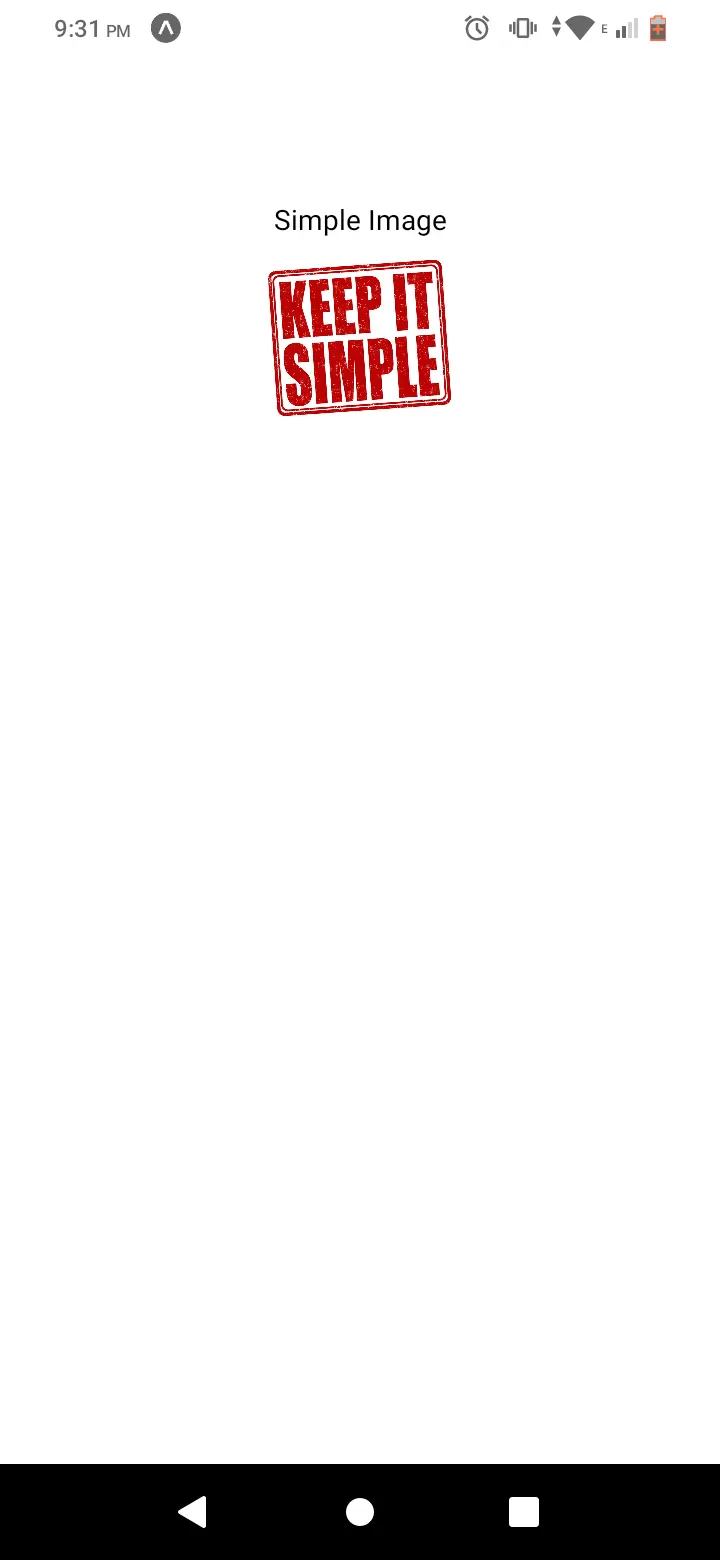
Overall, this code creates a React Native application with a simple UI consisting of a text element and an image. The image is loaded from a remote URI, and the components are styled using CSS-like styles.
Use the alignSelf Property to Align Element Vertically in React Native
In React Native, the alignSelf property is used to override the default alignment set by the parent container. It allows you to specify how a single item should align itself in the cross-axis, which is perpendicular to the main-axis direction.
The alignSelf property accepts various values:
auto |
The default value. It inherits the value from its parent. |
flex-start |
Aligns the item to the start of the cross-axis. |
flex-end |
Aligns the item to the end of the cross-axis. |
center |
Centers the item along the cross-axis. |
stretch |
Stretches the item to fill the container along the cross-axis. |
baseline |
Aligns the item’s baseline with the baseline of its parent. |
The alignSelf property allows individual elements to override their parent’s align-items property. This method is useful when you want to align specific elements differently from their container.
import React from 'react';
import { View, Text, StyleSheet } from 'react-native';

const App = () => {
  return (
    <View style={styles.container}>
      <View style={styles.box}>
        <Text>Aligned Content 1</Text>
      </View>
      <View style={[styles.box, {alignSelf: 'flex-end'}]}>
        <Text>Aligned Content 2</Text>
      </View>
    </View>
  );
};

const styles = StyleSheet.create({
  container: {
    flex: 1,
    justifyContent: 'center',
    alignItems: 'center',
  },
  box: {
    width: 100,
    height: 100,
    backgroundColor: 'lightblue',
    justifyContent: 'center',
    alignItems: 'center',
  },
});

export default App;
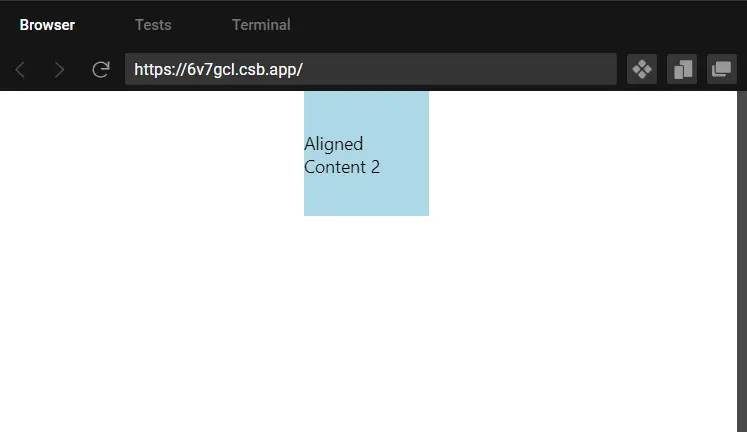
Output:
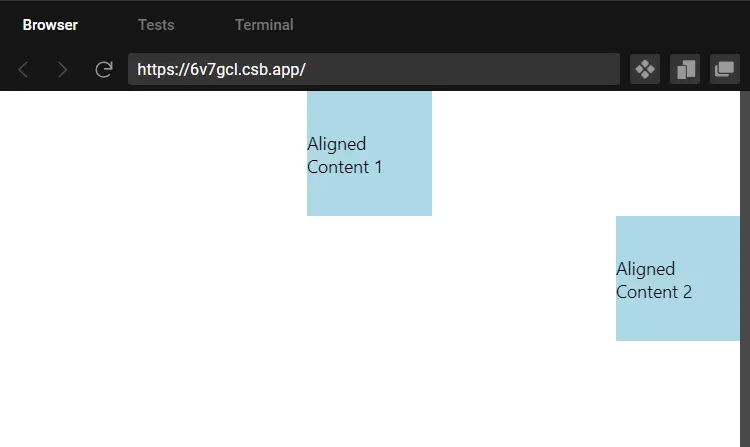
We have two View components inside the main container. Both have the box style, defining their appearance.
The second View has an additional style {alignSelf: 'flex-end'}. This overrides the vertical alignment and positions it at the bottom.
In the styles object, there is a container and a box.
The container style is applied to the outermost View element. It sets flex: 1 to allow the container to take up the entire available space.
It also uses justifyContent: 'center' and alignItems: 'center' to horizontally and vertically center its child elements.
The box style is applied to the boxes containing text. It sets the width and height to 100 units, gives it a light blue background, and centers the text both horizontally and vertically within the box.
In summary, this code creates a React Native application with two aligned boxes containing text content. The first box is centered within the container, while the second box is aligned to the end (flex-end) of the container due to the specific style applied to it.
Use Absolute Positioning to Align Element Vertically in React Native
In React Native, elements are typically positioned using the Flexbox layout, which provides a flexible and responsive way to arrange items within a container. However, there are situations where you may need more control over the positioning, which is where absolute positioning comes into play.
With absolute positioning, an element is removed from the normal flow of the document and is positioned based on coordinates specified in relation to its nearest positioned ancestor. If no ancestor has a specified position, it uses the initial containing block (usually the viewport) as a reference.
To use absolute positioning in React Native, you’ll need to utilize the position: 'absolute' style property along with the top, right, bottom, and left properties to specify the coordinates. Here’s an example:
import React from 'react';
import { View, Text, StyleSheet } from 'react-native';

const App = () => {
  return (
    <View style={styles.container}>
      <View style={styles.box}>
        <Text style={styles.text}>Top Left</Text>
      </View>
      <View style={[styles.box, styles.absoluteTopRight]}>
        <Text style={styles.text}>Top Right</Text>
      </View>
      <View style={[styles.box, styles.absoluteBottomLeft]}>
        <Text style={styles.text}>Bottom Left</Text>
      </View>
      <View style={[styles.box, styles.absoluteBottomRight]}>
        <Text style={styles.text}>Bottom Right</Text>
      </View>
    </View>
  );
};

const styles = StyleSheet.create({
  container: {
    flex: 1,
    justifyContent: 'center',
    alignItems: 'center',
  },
  box: {
    width: 100,
    height: 100,
    backgroundColor: 'lightblue',
    borderWidth: 1,
    borderColor: 'blue',
    margin: 10,
    justifyContent: 'center',
    alignItems: 'center',
  },
  text: {
    color: 'white',
    fontWeight: 'bold',
  },
  absoluteTopRight: {
    position: 'absolute',
    top: 0,
    right: 0,
  },
  absoluteBottomLeft: {
    position: 'absolute',
    bottom: 0,
    left: 0,
  },
  absoluteBottomRight: {
    position: 'absolute',
    bottom: 0,
    right: 0,
  },
});

export default App;
Output:
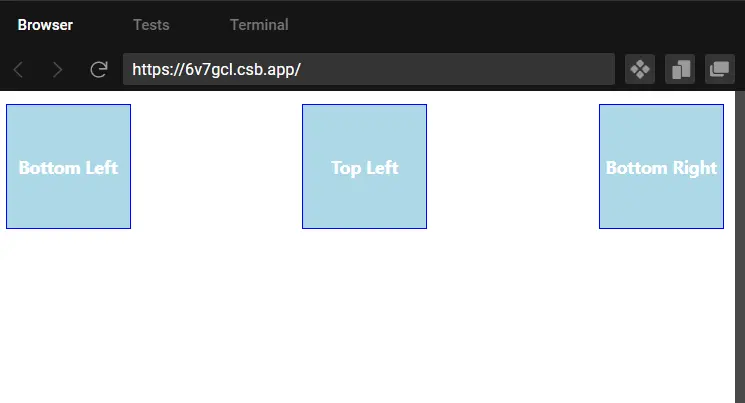
In this example, we have a parent View with flex: 1 to take up the entire screen. Inside it, we have four child View components (box) with different absolute positions.
The first box is positioned using the default Flexbox layout. Then, the second box has position: 'absolute', top: 0, and right: 0, which places it in the top-right corner.
The third box is positioned in the bottom-left corner using position: 'absolute', bottom: 0, and left: 0. Lastly, the fourth box is in the bottom-right corner using position: 'absolute', bottom: 0, and right: 0.
Absolute positioning can be used to precisely control the vertical alignment of elements. This method is particularly useful when you need to align elements relative to their parent or the screen.
import React from 'react';
import { View, Text, StyleSheet } from 'react-native';

const App = () => {
  return (
    <View style={styles.container}>
      <View style={styles.box}>
        <Text>Aligned Content 1</Text>
      </View>
      <View style={[styles.box, {position: 'absolute', bottom: 0}]}>
        <Text>Aligned Content 2</Text>
      </View>
    </View>
  );
};

const styles = StyleSheet.create({
  container: {
    flex: 1,
    justifyContent: 'center',
    alignItems: 'center',
  },
  box: {
    width: 100,
    height: 100,
    backgroundColor: 'lightblue',
    justifyContent: 'center',
    alignItems: 'center',
  },
});

export default App;
Output:
Similar to the example in the alignSelf property, we have two View components inside the main container. Both have the box style defining their appearance.
The second View has an additional style {position: 'absolute', bottom: 0}. This positions it at the bottom of the container.
Overall, this code creates a React Native application with two aligned boxes containing text content. The first box is centered within the container, while the second box is aligned to the bottom of the container using absolute positioning.
Conclusion
This guide explores various methods for achieving vertical alignment in React Native applications. Three main techniques are covered:
- Using Flexbox: Flexbox is a powerful layout model that allows for dynamic and flexible arrangements of elements within containers. It provides properties like
flex,alignItems, andjustifyContentto easily control both horizontal and vertical alignment. - Utilizing the
alignSelfProperty: This property allows individual elements to override their parent’s alignment settings. It offers options likeauto,flex-start,flex-end,center,stretch, andbaselinefor precise control over element alignment. - Employing Absolute Positioning: Absolute positioning is a technique that removes an element from the normal flow of the document, allowing for precise control over its placement using coordinates relative to its nearest positioned ancestor.
Each method is explained in detail with example code snippets to illustrate how they can be implemented in React Native applications. Developers can choose the most suitable method based on their specific requirements and design preferences.
By leveraging these techniques, they can ensure that UI elements are accurately aligned along the vertical axis, contributing to a polished and user-friendly mobile app.

Aminul Is an Expert Technical Writer and Full-Stack Developer. He has hands-on working experience on numerous Developer Platforms and SAAS startups. He is highly skilled in numerous Programming languages and Frameworks. He can write professional technical articles like Reviews, Programming, Documentation, SOP, User manual, Whitepaper, etc.
LinkedInRelated Article - React Native
- How to Align Text Vertically in React-Native
- How to Set Font Weight in React Native
- How to Align Text in React-Native
- How to Animate SVG in React Native
- How to Set the Border Color in React-Native
- React Native Foreach Loop