How to Print Server on Raspberry Pi
- Common Unix Printing System (CUPS) for Print Server
-
SAMBAfor Raspberry Pi Print Server -
Add a Printer to
CUPS
This article discusses the print server installation on the Raspberry Pi, which has three steps. Installing the software (which is pretty straightforward) and configuring the settings and network takes a few complex steps.
This process lets you connect the print server to multiple devices rather than just a single device. This allows you to share printers among many devices rather than a costly setup.
Common Unix Printing System (CUPS) for Print Server
To set up the print server on multiple devices, we use the Common Unix Printing System (CUPS), the backbone of many Linux printing software.
We use this CUPS software to print the files correctly using the device. To support the CUPS on your device, make sure you download the correct version from this link.
Hardware Requirements
For the successful installation of the print server via CUPS, we need the following hardware devices.
-
Raspberry Pi (specific version is not compulsory)
-
network connection
2.1 Wired via Ethernet or
2.2 Wireless via Wi-Fi -
micro SD card for memory allocation
-
USB printer
-
controllers like mouse and keyboard (optional requirements)
Installation Guide
We use the Debian Jessie package to easily install the print server on the Raspberry Pi device. Before installing it, ensure you have the latest or updated version of the Raspbian operating system installed on the Pi device.
-
The first step is to update and upgrade the Raspberry Pi device using these commands.
# update and upgrade the Raspberry Pi device via the command prompt
sudo apt update
sudo apt upgrade
-
After you update the Pi device, install the
CUPSsoftware for the print server and write the command inside the terminal.# install the CUPS software sudo apt install cupsThis
CUPSsoftware allows you to use the printer over the network or via USB. It also provides you with a management interface that works with the internet. -
Once you successfully installed the
CUPSsoftware, we need to add thepiuser to thelpadmingroup. This way, we can use the software by its administrative rights without using the superuser.# to access the administrative rights by adding a pi user to the lpadmin sudo usermod -a -G lpadmin pi -
Also, we need to make sure the
CUPSsoftware is accessible to the whole network for developing a home network.Note: The CUPS software will block all the nonlocal host traffic. To make it accept all kinds of traffic, use the following commands.
# command to accept all kinds of traffic sudo cupsctl --remote-any sudo systemctl restart cups -
Finally, any computer on the network can use the print server of the Raspberry Pi. To be aware of the local IP address of the Raspberry Pi print server, use the
hostname -Icommand to get the IP address. -
After getting the IP address, copy and paste it to a web browser and run it. An IP address would look like this in the command prompt below.
```cmake
# IP address of Raspberry Pi print server along with a port number
http://192.168.1.100:123
```
SAMBA for Raspberry Pi Print Server
For using the print server on the Windows operating system, the use of SAMBA correctly is important. SAMBA uses the CUPS print drivers after installing and configuring them properly.
-
Install the
SAMBAsoftware by using the following command.sudo apt install samba -
After installation, open the configuration file and do the following required changes.
sudo nano /etc/samba/smb.confNote:
nanois a text editor to change the configuration file. -
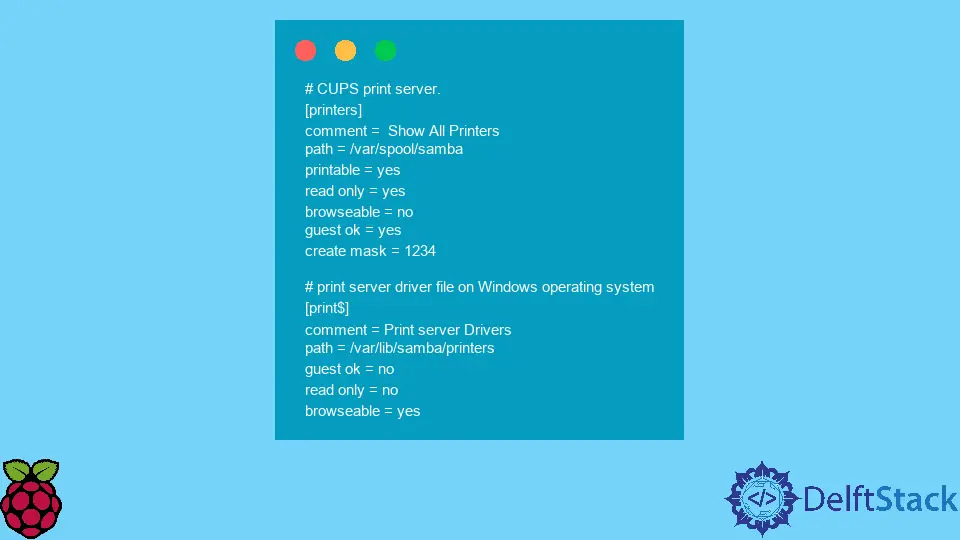
Go to the bottom of your configuration file, and find the keywords
printersandprint$. Update the file accordingly as guided below and save the changes.
```cmake
# CUPS print server.
[printers]
comment =  Show All Printers
path = /var/spool/samba
printable = yes
read only = yes
browseable = no
guest ok = yes
create mask = 1234

# print server driver file on Windows operating system
[print$]
comment = Print server Drivers
path = /var/lib/samba/printers
guest ok = no
read only = no
browseable = yes
```
-
To load the
SAMBAsoftware with new configuration settings, we need to restart it by using the command in the terminal.sudo systemctl restart smbd
Add a Printer to CUPS
To add a print server to CUPS software, we need to get the local IP address by using the command hostname -I to access the web interface. Open the web browser and enter the local IP address shown after entering the command.
Make sure to use the IP address along with the port number. An interface is shown on the screen; click the Administration tab on the website.
Use the CUPS software interface button with the Add printer text.
Note: If your printer is not shown after you click the
Add printerbutton. Make sure you correctly plug the printer into the Raspberry Pi port while it isON. Sometimes restarting the Raspberry Pi device makes it available on the screen.
Once you select the print server from the list (assuming that the Internet is connected), it automatically installs the print server drivers. Sometimes the drivers may not be able to work properly, so it’s better to search drivers according to the model of the device.
Lastly, to share the printer among others, select the option Share this Printer and enable it to share the print servers with other computers.
Once you connect to the print, you can also visit the printer settings page to edit its configuration like media size (A4), color model, color precision, media type, print quality, resolution, and shrink page if necessary to fit borders.
If you cannot find the suitable print server settings, click the Set Default Options inside the print setting page.