DNS Server on Raspberry Pi
- DNS Server on Raspberry Pi
- Setup Static IP Address on Raspberry Pi
- Set Up DNS Server on Raspberry Pi
- Test the DNS Server on Raspberry Pi
This tutorial will discuss using DNS to transform IP addresses into user-friendly domain names on Raspberry Pi and to improve the computing time of DNS requests of a computer.
DNS Server on Raspberry Pi
DNS or domain name system transforms computer-readable IP addresses from a human-readable domain name like 192.168.0.1 to something like webname.com. When we want to open a website, we type its name into the search bar, but the computer does not understand it, and it uses DNS to transform the domain name into an IP address that the computer can understand.
We can use DNS on a Raspberry Pi to transform our IP address into a domain name, and it will also improve the computing time of DNS requests on a computer. We can link our computers or mobile phones with the DNS server on Raspberry Pi, and every time we make a DNS request, the DNS server of Raspberry Pi will determine the IP address of that request and will save the response in the cache memory.
This means that if we request the same domain again, the Raspberry Pi DNS will return the response from the cache, reducing the computing time. Our computer also does the same thing; when we open an application the first time and close it, the computer saves it in the cache memory, and when we run it again, the computer runs the application from the cache memory, which reduces the application opening time.
Setup Static IP Address on Raspberry Pi
Before we install and set up the DNS server on Raspberry Pi, we need to use a static IP address on our Raspberry Pi because a dynamic IP address can change itself, and we need an IP address that stays the same all the time. Follow the steps below to set up a static IP address on Raspberry Pi.
We can use the DHCP client domain, which handles the IP addresses, to force our Raspberry Pi to use a static IP address. We need to change some settings in the DHCPCD configuration file in Raspberry Pi.
First, we need to get some information, like the router’s IP address and Raspberry Pi. To check the router’s IP address, we have to run the below command in the terminal.
ip r | grep default
Output:
default via 10.0.2.2 dev eth0 proto dhcp src 10.0.2.15 metric 202
The first IP address is the router’s IP address, which in this case is 10.0.2.2, which we need to note down because it will be used later on.
Next, we need to get the current IP address of the DNS server using the below command.
sudo nano /etc/resolv.conf
Output:
domain Home
nameserver 127.0.0.1
The above code will open the configuration file, which can be closed using CTRL+x from the keyboard. The IP address in the above code is the IP address of the DNS server, which is 127.0.0.1, and we also have to note it.
Now, we can open the dhcpcd.conf file using the below command to modify it.
sudo nano /etc/dhcpcd.conf
The above command will open the configuration file of DHCPCD, and we have to enter the below lines of code at the end of the file.
interface <eth0 or wlan0>
static ip_address=<static IP>/24
static routers=<router IP>
static domain_name_servers=<dns server IP>
In the first line of the above code, we have to write eth0 for ethernet or wlan0 for WIFI, depending on our Raspberry Pi’s network. In the second line, we have to change the static IP with the IP address we want to assign to the Raspberry Pi.
In the third line, we have to add the router’s IP address, which we retrieved above, which was 10.0.2.2. In the fourth line, we have to add the IP address of the DNS server, which can be the same as we found in the above steps, which is 127.0.0.1 or another DNS IP address like 8.8.8.8 of Google.
After that, we have to save the changes we made to the configuration file using the CTRL+x and then y and then ENTER. We have to reboot our Raspberry Pi using the sudo reboot command so that the new settings will be loaded and the Raspberry Pi will connect with the router using the new static IP address.
Set Up DNS Server on Raspberry Pi
After setting a static IP address, we need to update the Raspberry Pi OS and install the DNS server using the below commands on the terminal.
sudo apt update
sudo apt upgrade
sudo apt install dnsmasq
We need to run the above commands one by one and if it asks for permission, enter y to install a package. Next, we need to open the dnsmasq.conf file to modify some settings using the below commands.
sudo nano /etc/dnsmasq.conf
The above command will open a configuration file, and we need to find and replace some lines. We can use CTRL+W to open the search bar and search the below line of code and replace them.
We can write text inside the search bar and then find them by pressing ENTER.
Find:
#domain-needed
Replace With:
domain-needed
The above command will permit the DNS server to forward the names that do not contain . or .com in them and keep the names inside the local network like localhost.
Find:
#bogus-priv
Replace With:
bogus-priv
The above command will stop the DNS server from sending the reverse queries to the upstream servers, and the IP address of the local network will not be sent to the DNS servers.
Find:
#no-resolv
Replace With:
no-resolv
The above commands will stop the DNS from reading the configuration file for upstream servers.
Find:
#server=/localnet/192.168.0.1
Replace With:
server=8.8.8.8
server=8.8.4.4
The above command will make the DNS server use the Google DNS server for upstream servers.
Find:
#cache-size=150
Replace With:
cache-size=1000
The above commands will increase the cache size, increasing the number of requests the DNS server will store in the cache memory. Now, we have to save the changes we made to the configuration file using CTRL+X and entering y and then ENTER from the keyboard.
We need to restart the DNS server and check its status using the below commands.
sudo systemctl restart dnsmasq
sudo systemctl status dnsmasq
We have to run the above commands one by one in the terminal, and the second command will show something like Active: active (running) along with other information, which means that the DNS server is active and running.
Test the DNS Server on Raspberry Pi
To test the DNS server, we can use the dig tool, which can be installed using the below command.
sudo apt install dnsutils
After installing it, we can use the below command to test our DNS server.
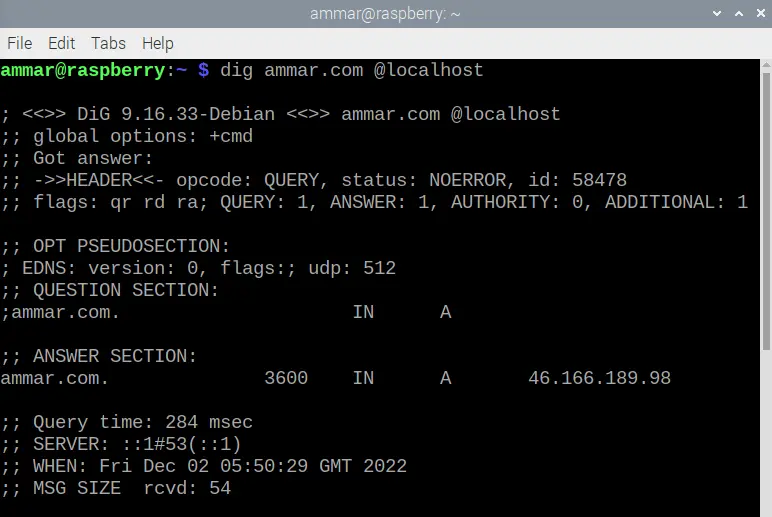
dig ammar.com @localhost
In the above command, we are using the @localhost with the dig command, which will utilize it for DNS lookup and will return the below output.
If we rerun the above command, the query time in the above image will decrease, which means that the previous request was saved in the cache memory.
