How to Setup MySQL in Raspberry Pi
This tutorial will discuss using the MariaDB server built by the original developers of MySQL to set up the MySQL database on a Raspberry Pi.
Setup the MySQL Database on a Raspberry Pi
MySQL is a database system that stores and manages a large amount of data. It is commonly used to store the data of websites and applications.
MySQL is also included in LAMP stacks which include Linux, Apache, MySQL, and PHP. We can use the LAMP stack to drive modern websites and applications.
We can use MySQL in a Raspberry Pi to set up a database for a web server application and use it to store data. For example, we can use the MySQL database to store and manage data of WordPress, a content management system.
We can install MySQL using the terminal of Raspberry Pi OS, but before that, make sure the Raspberry Pi OS is installed on the Raspberry Pi and a keyboard, mouse, and monitor is connected to it. If you have not installed the Raspberry Pi OS, go to this site and install it.
The Raspberry Pi should also be connected to the internet to install MySQL. Follow the steps mentioned below or in this video to install and set up MySQL on our Raspberry Pi.
First, we need to update the installed packages of Raspberry Pi OS using the terminal. We can write the below commands one by one inside the terminal to update Raspberry Pi OS.
sudo apt update
sudo apt upgrade
If an update is available, the terminal will list the update along with its size and ask us if we want to install it. We must enter y to install the update.
Now we will install the MySQL server using the below command on the terminal. The terminal will again ask for permission, and we must enter y again to install the MySQL server.
sudo apt install mariadb-server
After the second step, the MySQL server will be installed on the Raspberry Pi. By default, MySQL is not secured with any password, which means anyone can access it, but we can secure it using the below command on the terminal.
sudo mysql_secure_installation
After running the above command, the terminal will ask to enter a password to secure the MySQL server, which we must remember because it will be used to run MySQL and create databases. The terminal will also list a couple of permissions and will ask us if we want to secure it or not, and we can enter y for yes and n for no.
For more security, we can add y for all the permissions that will remove unwanted server access.
We can now access the MySQL database using the below command on the terminal, which will also ask us to enter the password we just created.
sudo mysql -u root -p
We can now create, delete, or alter our databases and type help or \p for help which will list out some commands and their usage. To quit out of the MySQL command line, we can type quit or use CTRL+D from the keyboard.
For more details about the MySQL database, we can visit the MariaDB site. In the next section, we will discuss creating a MySQL database and its user.
Create a MySQL Database and Its User
We can follow the steps mentioned below to create a database and its user using the terminal of Raspberry Pi OS.
First, we need to enter the MySQL command line using the below command and enter the secure password.
sudo mysql -u root -p
After entering into the MySQL command line, we can use the CREATE DATABASE keyword to create a database. After the keywords, we can enter a name for our database to distinguish it from other databases.
For example, let’s create a database with the name exampleDataBase. See the code below.
CREATE DATABASE exampleDataBase;
After the above command, an empty database will be created.
We can assign a user to the above database using the CREATE USER keyword. For example, let’s create a user using username as the user’s name and changeme as the user’s password using the below code line in the MySQL command line.
CREATE USER 'username'@'localhost' IDENTIFIED BY 'changeme';
We can grant a user’s database access using the GRANT ALL PRIVILEGES ON command. For example, let’s grant all permissions of the database exampleDataBase created above to the user username.
GRANT ALL PRIVILEGES ON exampleDataBase.* TO 'username'@'localhost';
We also have to flush the privilege table using the below command so that the user can access the database.
FLUSH PRIVILEGES;
After the above commands, the username user can access, change, or delete data from the database. For example, let’s create a table in the exampleDataBase database, which is created above.
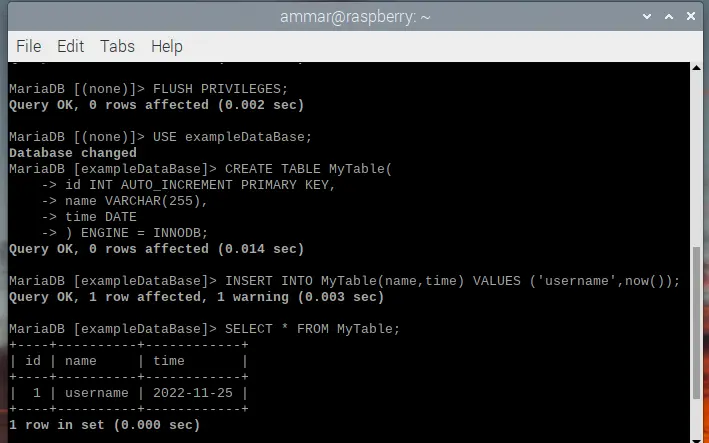
Check the below code and output.
In the above code, we used the USE keyword to set the database we want to use. We used the CREATE TABLE keyword to create a table with an id, name, and time.
The INT keyword will set the id to an integer, and the AUTO_INCREMENT keyword will increment the id automatically inside the table. The PRIMARY KEY keyword is used to set the id as the table’s primary key.
The VARCHAR(255) keyword will set the name to a character variable of 255 characters, and the DATE keyword will set the time to date like object. We have used the INSERT INTO keyword to insert values in our table, and the now() function will return the current date.
We have used the SELECT FROM keyword to select and show data from the table, and the asterisk is used to select the entire table. The above image shows the table, which has only one row and three columns.
We can add more rows to the table using the same procedure. The above procedure of creating and adding data to a table is quite difficult, but we can also use a GUI or graphical user interface like PHPMyAdmin to manage the database.
Check this video to install and set up PHPMyAdmin and MySQL on Raspberry Pi.
