How to Set Up OpenCV on Raspberry Pi 4
Raspberry Pi is a sequence of small single-board computers (SBCs) developed by the Raspberry Pi Foundation in the United Kingdom (UK). It was originally developed to encourage children at school to learn basic computer science skills.
It is widely used in many areas because of its low cost, open design and modularity.
Types and Specifications of Raspberry Pi
There are three main series and several upgrades of Raspberry Pi; they are:
- Raspberry Pi - This SBC features a Broadcom system on a chip (SoC) with an integrated ARM-compatible CPU (Central Processing Unit) and on-chip GPU (Graphics Processing Unit)
- Raspberry Pi Zero - This features reduced input/output (I/O) and general-purpose I/O (GPIO) competence.
- Raspberry Pi Pico - This features an RP2040 SoC with an Integrated ARM-compatible CPU (Central Processing Unit).
Since our topic is related to OpenCV, we will use the latest Raspberry Pi, which is Raspberry Pi 4 Model B.
The Raspberry Pi 4 Model B contains an ARM Cortex-A72 64-bit processor that runs on 1.5GHz, 802.11ac Wi-Fi, Bluetooth 5, 2 USB 2.0 ports, 2 USB 3.0 ports, gigabit Ethernet, and dual HDMI ports.
There used to be memory capacities of 1GB version, but it has been abandoned; now there are only three versions, 2GB, 4GB and 8GB versions, and their prices have been decreased. The Pi 4 also has a USB-C port which adds additional power to the downstream peripherals.
Getting Started with Raspberry Pi
Before starting with the OpenCV installation, we need to do some configurations for the proper and secure installation of OpenCV. This installation process is extensive and intricate, so we have divided it into steps.
It is recommended to use the Raspberry Pi 4 B or the newer models because if we use the older model, the time it will take to install OpenCV will increase drastically since the older models have less processing power than the newer ones.
It is also recommended to use a newer Windows version like Windows 10 or 11; previous Windows versions like 7, 8, and XP would also take more time for the same reason.
Each step mentioned below is essential for the installation purpose, so make sure to go through each step wisely. First, connect your Raspberry Pi to your laptop/PC and then go through the steps below.
-
Expanding the File System
We are expanding the file system for a smoother process of installing OpenCV libraries. So to do this, we need to get to the Raspberry Pi terminal and type the command below.
sudo raspi-configAfter typing this command, a configuration menu will open up, select the option
Advanced Optionsand then selectExpand Filesystem. After selecting the option, it will ask for confirmation to reboot the system, then selectYorYes.It is important to reboot the system after this step so that Raspberry Pi will expand the filesystem then and there.
-
Updating the System
We need to update the system if any latest packages are available; this also helps for a faster and better installation process. For this, open the terminal and write the below code.
sudo apt-get update && sudo apt-get upgradeThis step will take a few minutes to get the Raspberry Pi to the latest version.
-
Installing Snapd and CMake.
We need CMake for compiling OpenCV libraries, but for that, we first need to install Snapd, which contains the CMake package. To do that, write the code given below in the terminal.
sudo apt install snapdNow install CMake using Snapd, and enter the below command.
sudo snap install cmake --classicThis will install CMake. If any error appears while installing CMake, you can increase the GPU Memory.
For this, go to Raspberry Pi Icon, select
Preferences, then click onRaspberry Pi Configuration, and hit Enter. Once the dialog box appears, go toPerformanceand increase the GPU Memory to 256 (if it is less than 256). -
Installing Python 3
To install Python 3 on your Raspberry Pi system, enter the below command in your terminal.
sudo apt-get install python3-dev -
Downloading and Installing OpenCV Packages
For this, it is recommended not to use the latest version because it won’t be stable; we will require a more stable version. So we will download the OpenCV package and configure it on Raspberry Pi using CMake.
We need to download the OpenCV zip file from the GitHub link using the code below.
wget -O opencv.zip https://github.com/opencv/opencv/archive/4.5.0.zipNow we need to download the
opencv-contribzip file. The difference between OpenCV andopencv-contribis that OpenCV has only main module packages whileopencv-contribcontains a full package containing the main modules and contrib/extra modules.We download both zip files so that OpenCV works correctly.
wget -O opencv_contrib.zip https://github.com/opencv/opencv_contrib/archive/4.5.0.zipAnd so after downloading these two zip files, we unzip them separately using the command lines shown below.
unzip opencv.zipunzip opencv_contrib.zipNow both these files are ready to be used.
-
Installing NumPy
OpenCV requires support from NumPy to work, so we install NumPy.
pip install numpy -
Building a directory
When we unzipped the two zip files, two new directories were created. We need to add a new directory called
Buildin theopencv-4.5.0directory.cd ~/opencv-4.5.0 mkdir build cd build -
Compiling CMake and OpenCV
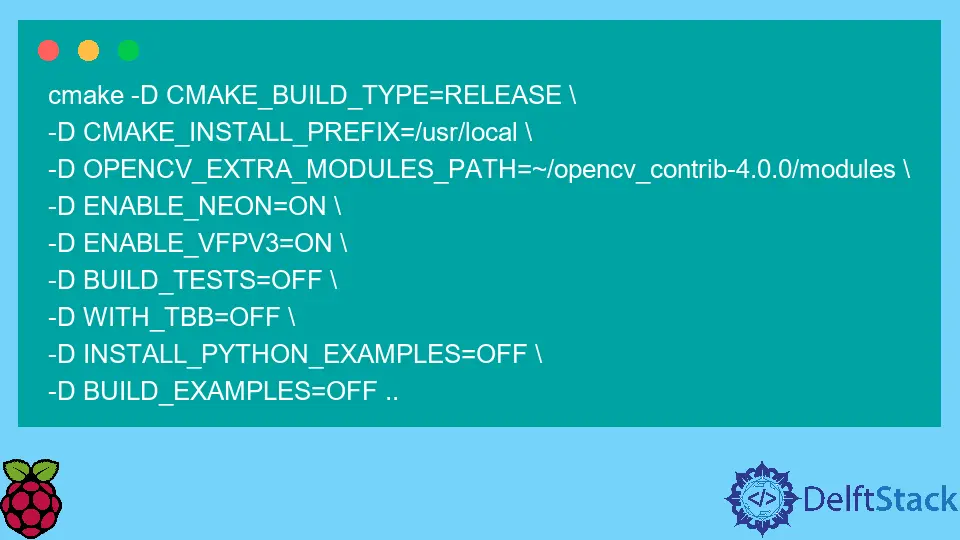
Now we compile CMake for OpenCV, but first, we need to check if we are in the path
~/opencv-4.5.0/build. If the path is right, we can copy and paste the commands given below.cmake -D CMAKE_BUILD_TYPE=RELEASE \ -D CMAKE_INSTALL_PREFIX=/usr/local \ -D OPENCV_EXTRA_MODULES_PATH=~/opencv_contrib-4.0.0/modules \ -D ENABLE_NEON=ON \ -D ENABLE_VFPV3=ON \ -D BUILD_TESTS=OFF \ -D WITH_TBB=OFF \ -D INSTALL_PYTHON_EXAMPLES=OFF \ -D BUILD_EXAMPLES=OFF ..In the end, it shows
Configuration DoneandGenerating Done, which means it got configured correctly without any errors.For compiling OpenCV, we use the code below in the same path.
make -j4This will compile OpenCV completely, but it will take time. However, if this doesn’t compile, then we can use
make -j1; this will take more time to compile thanj4, but it will be stable. -
Installing OpenCV libraries
Install the OpenCV libraries using the following code snippet.
sudo apt-get install libopencv-devpython-opencv -
OpenCV Testing on Raspberry Pi
Finally, in the terminal on the same build path mentioned above, type
pythonand thenimport cv2, as shown below.python import cv2 cv2.__version__If the
cv2is imported and the version appears as expected, the installation and setup are done successfully.
Conclusion
The OpenCV installation and setup involve many different steps. Above, we have seen how to install OpenCV onto the Raspberry Pi using CMake.
You can easily learn, build, work and create OpenCV projects on Raspberry Pi. Though the process was a bit complex, it was worth the wait.

Sahil is a full-stack developer who loves to build software. He likes to share his knowledge by writing technical articles and helping clients by working with them as freelance software engineer and technical writer on Upwork.
LinkedIn