How to Use the OpenCV solvepnp() Function to Solve the PnP Problem

The OpenCV library is an open-source library developed to help with Computer Vision tasks. This library is compatible with Python and can be used to implement and solve different image processing problems.
This tutorial will demonstrate using the solvepnp() function from the OpenCV library in Python. This function is used to solve the pose estimation problem.
Understand the PnP Problem
The PnP problem is very common in Computer Vision and stands for the Perspective n-Points problem. In this issue, we cannot determine the pose of an object with respect to the camera after being provided with the 2D and 3D coordinates.
This can be understood with the example of face tracking during an online exam. The pose of an object with respect can change with the change in direction.
The following two types of motions facilitate this change:
- The first type of motion is translational motion, which can happen along any of the three axes. The object moves in a uniform motion in any particular direction, thereby changing its coordinates.
- The second type of motion is the rotational motion, in which the object can revolve around any of the three axes.
Use the opencv.solvepnp() Function to Solve the PnP Problem
The solvepnp() function from the OpenCV library is used for the pose estimation of a given object with respect to the camera, thus solving the PnP problem. It returns rotational and translational vectors.
It uses the 2D and 3D coordinates of the object with the camera matrix. The coordinates supplied are of the different features of the face.
These features are the nose, corners of the mouth, chin, and both of the eyes.
Let us discuss all the parameters required to use this function.
- The
objectPointsparameter takes the 3D points of all the previously mentioned features. - The
imagePointsparameter is used to specify the 2D points of the features of the object. - The
cameraMatrixis used to specify the intrinsic value of the camera. This matrix is created using the camera’s center point and focal length. - To tackle distortion raised by the camera, we use the
distCoeffsparameter. This vector can be NULL if there is negligible distortion in the camera. - We can use the output result for initial calculations using the
useExtrinsicGuessparameter, which can be true or false. Other than that, there is only theflagsparameter.
The rotational and translational vectors returned by this function can be used to plot the line for the object’s pose.
For example, we will determine the pose of the following image.

The code to determine the pose for this image is shown below.
import cv2
import numpy as np

img = cv2.imread("img.jpg")
size = img.shape
image_points_2D = np.array(
    [
        (196, 141),  # Nose tip
        (190, 202),  # Chin
        (196, 124),  # Left eye corner
        (236, 128),  # Right eye corner
        (186, 175),  # Left mouth
        (214, 177),  # Right mouth
    ],
    dtype="double",
)

figure_points_3D = np.array(
    [
        (0.0, 0.0, 0.0),  # Nose tip
        (0.0, -330.0, -65.0),  # Chin
        (-225.0, 170.0, -135.0),  # Left eye left corner
        (225.0, 170.0, -135.0),  # Right eye right corne
        (-150.0, -150.0, -125.0),  # Left Mouth corner
        (150.0, -150.0, -125.0),  # Right mouth corner
    ]
)

distortion_coeffs = np.zeros((4, 1))
focal_length = size[1]
center = (size[1] / 2, size[0] / 2)
matrix_camera = np.array(
    [[focal_length, 0, center[0]], [0, focal_length, center[1]], [0, 0, 1]],
    dtype="double",
)
success, vector_rotation, vector_translation = cv2.solvePnP(
    figure_points_3D, image_points_2D, matrix_camera, distortion_coeffs, flags=0
)
nose_end_point2D, jacobian = cv2.projectPoints(
    np.array([(0.0, 0.0, 1000.0)]),
    vector_rotation,
    vector_translation,
    matrix_camera,
    distortion_coeffs,
)
for p in image_points_2D:
    cv2.circle(img, (int(p[0]), int(p[1])), 3, (0, 0, 255), -1)
point1 = (int(image_points_2D[0][0]), int(image_points_2D[0][1]))

point2 = (int(nose_end_point2D[0][0][0]), int(nose_end_point2D[0][0][1]))

cv2.line(img, point1, point2, (255, 255, 255), 2)

cv2.imshow("Final", img)
cv2.waitKey(0)
cv2.destroyAllWindows()
Output:
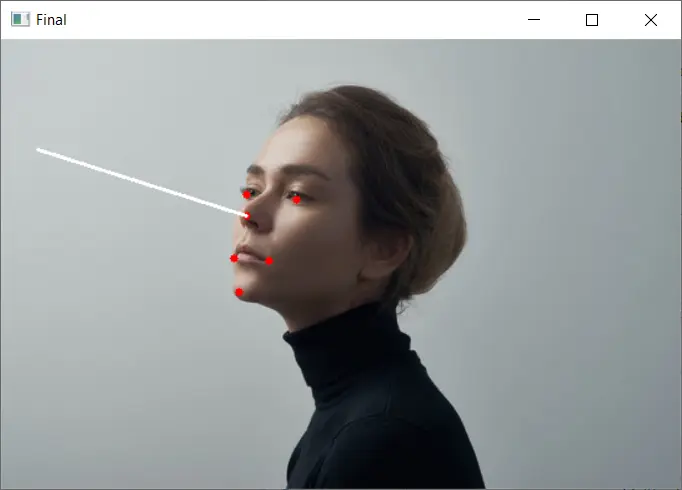
A lot is happening in the code mentioned above. Let us understand it step by step.
First, we read the required image using the imread() function. The points for the facial features are mentioned in 2D and 3D.
The points and camera matrix are provided to the solvepnp() function, which returns the rotational and translational vectors for the 3D coordinates of the pose.
After we visually plot the line for the pose. First, we plot the facial features.
We use the 2D points and plot each point using the circle() function.
projectPoints() is used to determine the projection of the vectors returned by the solvepnp() function on the image plane. We also need to pass the camera parameter in this function to get the projection.
We plot a line from the nose of the face in line with the projected points using the line() function to visualize the pose determined by the solvepnp() method.
Conclusion
This tutorial taught us how to use the solvepnp() function to solve the PnP problem in Computer Vision. We need to know about the parameters required to use this method.
The main parameters are the 2D and 3D points of the facial features of the image and the camera matrix. Using these values, it returns the vectors that determine the 3D points of the pose.
We get a projection of these points in 2D with respect to the camera using the projectPoints() function. Finally, we plot a line to represent the determined pose in the image using these points.

Manav is a IT Professional who has a lot of experience as a core developer in many live projects. He is an avid learner who enjoys learning new things and sharing his findings whenever possible.
LinkedIn