OpenCV Dilate
This article will explain the morphological transformation concepts like erosion and dilation, which we use to add and remove pixels from the boundary of a given object in an image in OpenCV.
Apply Morphological Transformation on an Image Using Erosion and Dilation in OpenCV
The morphological transformations are image-based operations that are performed on binary images. It requires two inputs, one is the original image, and the second one is the kernel.
The kernel decides the nature of the operation. Two basic morphological operators are erosion and dilation, and we also have some of its variations such as opening and closing, etc.
Let’s get an understanding of erosion and dilation using an example.
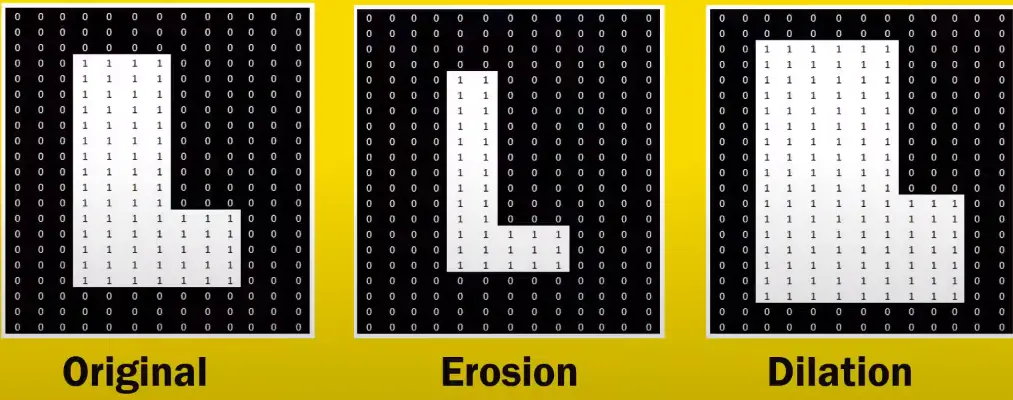
The erosion is just like soil erosion; it erodes the boundaries of a foreground object. Consider this image of L where the white portion is number 1, which can also be treated as number 255 from the OpenCV standard perspective.
The erosion removes the pixel at the boundaries of an object in a given image. After removing the boundaries of this object L in the image, this becomes thin after applying the erosion.
The kernel slides through the image as in 2D convolution in technical terms. A pixel in the original image, either 1 or 0, will be considered 1 only if all the pixel under the kernel is 1; otherwise, it is eroded or made to zero, hence discarding the boundary depending on the size of the kernel.
The dilation is the opposite of erosion; it adds pixels to the boundaries of an object in the given image. We can see that the boundary of L or object L in the image becomes thicker after dilation.
In technical terms, a pixel element is 1 if at least one pixel under the kernel is 1, and its result will increase the white region in the image or the size of the foreground object.
So if you have an image in which you want to remove the noise, you can first apply erosion operation followed by dilation because erosion removes white noises, but it also shrinks our object; that is why we operate dilation, thereby preserving the original image. It is also useful in joining broken parts of the object.

The morphological transformations have variations like opening and closing; opening is a process where we apply erosion followed by dilation. Closing is just the opposite, where we apply dilation followed by erosion.
Let’s implement several operations using OpenCV. We need to import the required libraries.
In this line, we are reading our image using the imread() function and giving the path of the image as an argument and storing it in a variable called imagedata_original.
imagedata_original = cv2.imread("input.png")
In this code, we define the kernel of the 5x5 pixel using the numpy ones() function and the data type of the kernel is unsigned int.
kernel = np.ones((5, 5), np.uint8)
We use the erode() function to apply erosion in the next line. It takes several arguments like the original image, kernel, and iterations.
The iterations suggest how many times you want to run the erosion process. If you increase this number, you are increasing the effect of erosion.
erosion_op = cv2.erode(imagedata_original, kernel, iterations=1)
We will use the dilate() function to apply dilation to an image object. The arguments are similar to those defined in the erode() function.
dilation_op = cv2.dilate(imagedata_original, kernel, iterations=1)
Now we will use the morphologyEx() function to apply the opening operation. This function takes arguments like input image MORPH_OPEN, which signifies the opening operation to be applied, and the kernel which we defined above.
opening_op = cv2.morphologyEx(imagedata_original, cv2.MORPH_OPEN, kernel)
We are giving the next instruction to apply the closing operation to the morphologyEx() function.
closing_op = cv2.morphologyEx(imagedata_original, cv2.MORPH_CLOSE, kernel)
Complete source code:
import cv2
import numpy as np
import matplotlib.pyplot as plot

FIG = plot.figure(figsize=(6, 5))

imagedata_original = cv2.imread("input.png")

FIG.add_subplot(2, 3, 1)
plot.imshow(imagedata_original)
plot.axis("off")
plot.title("original imagge")

kernel = np.ones((5, 5), np.uint8)

erosion_op = cv2.erode(imagedata_original, kernel, iterations=1)
FIG.add_subplot(2, 3, 2)
plot.imshow(erosion_op)
plot.axis("off")
plot.title("Erossion operatiopn")

dilation_op = cv2.dilate(imagedata_original, kernel, iterations=1)
FIG.add_subplot(2, 3, 3)
plot.imshow(dilation_op)
plot.axis("off")
plot.title("Dilation operatiopn")

opening_op = cv2.morphologyEx(imagedata_original, cv2.MORPH_OPEN, kernel)
FIG.add_subplot(2, 3, 4)
plot.imshow(opening_op)
plot.axis("off")
plot.title("Opening operatiopn")

closing_op = cv2.morphologyEx(imagedata_original, cv2.MORPH_CLOSE, kernel)
FIG.add_subplot(2, 3, 5)
plot.imshow(closing_op)
plot.axis("off")
plot.title("Clossing operatiopn")

plot.tight_layout()
plot.show()
Let’s run and see the different outputs with different operations in an image using matplotlib.
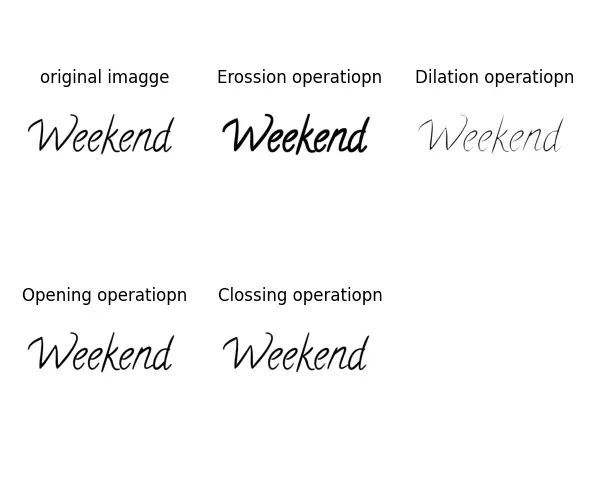
Most people might be confused why the text in the eroded image appeared thick when it removed pixels from the boundary? Why the text for the dilated image appears thin when it adds pixels to the boundary of the object.
This is because OpenCV treated the white portion as an object itself rather than treating black text as an object in the image. So when we apply erosion operation, it removes the white pixels from the boundary of black, which is why the black text boundary gets thick.
The dilation operation adds the white pixels to the boundary of black text; that is why the black text gets thin.

Hello! I am Salman Bin Mehmood(Baum), a software developer and I help organizations, address complex problems. My expertise lies within back-end, data science and machine learning. I am a lifelong learner, currently working on metaverse, and enrolled in a course building an AI application with python. I love solving problems and developing bug-free software for people. I write content related to python and hot Technologies.
LinkedIn