OpenCV Perspective Transform
This tutorial will discuss finding the perspective transform of an image using the getPerspectiveTransform() and warpPerspective() function of OpenCV in Python.
Use the getPerspectiveTransform() and warpPerspective() Function of OpenCV to Find the Perspective Transform of Images
The perspective transform of an image changes the view perspective of the image. For example, we can rotate and zoom certain areas or objects present in the given image.
We can use the getPerspectiveTransform() and warpPerspective() function of OpenCV to find the perspective transform of an object or area of the given image.
The getPerspectiveTransfrom() function is used to find the perspective transform using a set of points from the image. The warPerspective() function applies the transform to the given image.
For example, let’s read an image using the imread() function of OpenCV, find its perspective transform and show it along with the original image for comparison using the imshow() function of OpenCV.
See the code below.
import cv2
import numpy as np

frame = cv2.imread("test.jpg")

pts1 = np.float32([[260, 100], [600, 100], [260, 400], [600, 400]])
pts2 = np.float32([[0, 0], [600, 0], [0, 600], [600, 600]])

matrix = cv2.getPerspectiveTransform(pts1, pts2)
result = cv2.warpPerspective(frame, matrix, (600, 600))

cv2.imshow("frame", frame)
cv2.imshow("result", result)

cv2.waitKey(0)
Output:
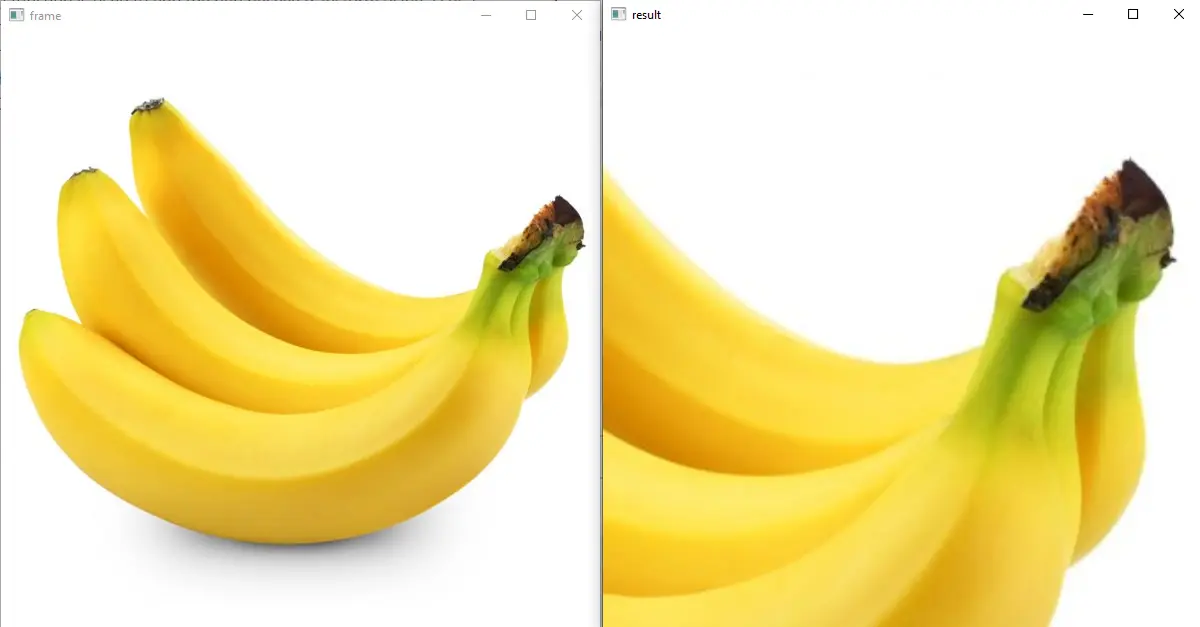
The right side is the input image, and the left side is its perspective transform. We can see that the view perspective of the given image is changed.
The first input of the getPerspectiveTransform() function contains the points from the original image that we want to transform.
The first value is for the column, and the second is for the row. The second input of the function contains the points on which we want to transform the first input points.
We take a small portion of the given image in the above code and transform it into a bigger one.
That is why the resulting image is zoomed in to a specific area defined by the first input of the getPerspectiveTransfrom() function.
The first point at position (260,100) will be transformed to position (0,0). The second point present in variable pts1 will be transformed to the second point present in the pts2 variable.
The first argument of the warpPerspective() function is the image we want to apply the transform.
The second argument is the transformation matrix, and the third argument is the size of the output image. We can also apply the transform to a video using the same functions.
We have to read every frame of the video using a loop and apply the transform on each frame.
For example, let’s capture the video from the webcam using the VideoCapture() function and then use a loop to read every image frame, apply it to transform on it, and show both the original and the resulting result image using the imshow() function.
See the code below.
import cv2
import numpy as np

cap = cv2.VideoCapture(0)

while True:

    ret, frame = cap.read()
    pts1 = np.float32([[260, 100], [600, 100], [260, 400], [600, 400]])
    pts2 = np.float32([[0, 0], [600, 0], [0, 600], [600, 600]])

    matrix = cv2.getPerspectiveTransform(pts1, pts2)
    result = cv2.warpPerspective(frame, matrix, (600, 600))

    cv2.imshow("frame", frame)
    cv2.imshow("result", result)

    if cv2.waitKey(24) == 27:
        break

cap.release()
cv2.destroyAllWindows()
You can test the code with your webcam and change the points for transformation if required.
