How to Detect Line in Python OpenCV
-
Use the
HoughLines()Function of OpenCV to Detect Lines in an Image in Python -
Use the
HoughLinesP()Function of OpenCV to Detect Lines in an Image in Python

This tutorial will discuss detecting lines in an image using the HoughLines() and HoughLinesP() function of OpenCV in Python.
Use the HoughLines() Function of OpenCV to Detect Lines in an Image in Python
The HoughLines() function of OpenCV is used to detect lines present in an image using the standard Hough line transform.
To detect the lines present in an image, we have to read the image using the imread() function and convert it into grayscale if it’s not in grayscale already.
After that, we have to find the edges of the given image using the Canny() function of OpenCV. The first argument of the Canny() function is the given image.
The second and third arguments are the first and second threshold values for the hysteresis procedure. The fourth argument is the aperture size, and the fifth is the gradient value.
The Canny() function’s output contains the edges of the given image according to the threshold. We have to pass the edges inside the HoughLines() function to detect the lines present in the image.
The first argument of the HoughLines() function is the output of the edge detector, and it should be a grayscale image. The second argument is the resolution of the parameters in pixels.
The third argument is the resolution of parameters in radians. The fourth argument is the threshold used as the minimum number of intersections inline detection.
The other arguments are default parameters. After that, we have to use a loop to draw each line one by one on the original image using the line() function of OpenCV.
After that, we can show the original image and the image with detected lines using the imshow() function of OpenCV.
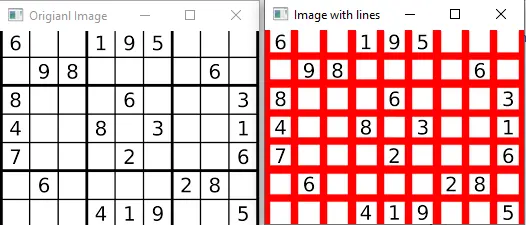
For example, let’s detect the lines present in a sudoku image.
See the code below.
import cv2 as cv
import numpy as np
import math

src_img = cv.imread("test.png")
cv.imshow("Original Image", src_img)

dst_img = cv.Canny(src_img, 50, 200, None, 3)

lines = cv.HoughLines(dst_img, 1, np.pi / 180, 150, None, 0, 0)

for i in range(0, len(lines)):
    rho_l = lines[i][0][0]
    theta_l = lines[i][0][1]
    a_l = math.cos(theta_l)
    b_l = math.sin(theta_l)
    x0_l = a_l * rho_l
    y0_l = b_l * rho_l
    pt1_l = (int(x0_l + 1000 * (-b_l)), int(y0_l + 1000 * (a_l)))
    pt2_l = (int(x0_l - 1000 * (-b_l)), int(y0_l - 1000 * (a_l)))
    cv.line(src_img, pt1_l, pt2_l, (0, 0, 255), 3, cv.LINE_AA)

cv.imshow("Image with lines", src_img)
cv.waitKey(0)
Output:
We can change the arguments of the Canny() and HoughLines() function according to the given image to get the desired result.
The color and line thickness of the detected lines can be changed by changing the fourth and fifth arguments of the line() function.
The color should be a BGR triplet value, and the line thickness should be an integer.
Use the HoughLinesP() Function of OpenCV to Detect Lines in an Image in Python
The HoughLinesP() function uses probabilistic Hough line transform to detect lines. We have to read the given image using the imread() function, convert it into grayscale, and then find its edges using Canny().
After that, we can pass the edges inside the HoughLinesP() function to detect the lines present in the image. The first five arguments of the HoughLinesP() function are the same as the above discussed HoughLines() function.
The sixth and seventh arguments are used to define the minimum and maximum value of the line gap.
For example, let’s detect the lines present in a sudoku image.
See the code below.
import cv2 as cv
import numpy as np
import math

src_img = cv.imread("test.png")
cv.imshow("Original Image", src_img)

dst_img = cv.Canny(src_img, 50, 200, None, 3)

linesP = cv.HoughLinesP(dst_img, 1, np.pi / 180, 50, None, 50, 10)

for i in range(0, len(linesP)):
    lin = linesP[i][0]
    cv.line(src_img, (lin[0], lin[1]), (lin[2], lin[3]), (0, 0, 255), 3, cv.LINE_AA)

cv.imshow("Image with lines", src_img)
cv.waitKey(0)
Output:
In this case, the result of the two functions is the same, but it can vary according to the given image. We can change the arguments of the Canny() and HoughLinesP() function according to the given image to get the desired result.
The color and line thickness of the detected lines can be changed by changing the fourth and fifth arguments of the line() function. The color should be a BGR triplet value, and the line thickness should be an integer.
