HOWTO · OpenCV
OpenCV Hough Circles
Detect circles in grayscale images with OpenCV's HoughCircles() in Python, draw the results, and tune the detection parameters.
On this page
Use OpenCV’s HoughCircles() in Python to find circular shapes, draw their outlines and centers, and adjust the settings when detections do not fit your image.
What HoughCircles() Detects
HoughCircles() searches a grayscale image for circle candidates using a Hough-based method. The method accumulates evidence for possible circle centers and radii; image noise, contrast, and parameter choices affect which candidates are returned. This function is for circles, not the line-segment detection performed by OpenCV’s probabilistic Hough line transform.
OpenCV supports cv2.HOUGH_GRADIENT and, in versions that provide it, cv2.HOUGH_GRADIENT_ALT. The older article’s other Hough mode names are not supported choices for this function. The examples below use cv2.HOUGH_GRADIENT so the threshold settings have one clear interpretation.
Prepare a Grayscale Image
Pass an 8-bit, single-channel grayscale image to HoughCircles(). For a color image, load it in BGR order and convert it with cv2.cvtColor(image, cv2.COLOR_BGR2GRAY). Check that cv2.imread() returned an image before converting or processing it; a misspelled path or unsupported file can make it return None. If the source is already grayscale, load it with cv2.IMREAD_GRAYSCALE.
Understand the HoughCircles() Parameters
The call takes the grayscale image, a method, dp, and minDist, followed by optional method-specific thresholds and radius limits. dp is the inverse ratio between image and accumulator resolution: 1 uses the image resolution, while 2 uses half resolution in each dimension. A larger value can reduce work but make center estimates coarser. minDist is the minimum pixel distance between detected centers; setting it too small can retain several candidates for one circle.
For cv2.HOUGH_GRADIENT, param1 is the higher threshold used by the internal Canny edge detector, and param2 is the accumulator threshold for accepting a center. Lowering param2 usually admits more candidates, including false detections; raising it is stricter. minRadius and maxRadius bound the search in pixels. A maxRadius of 0 means no upper radius limit. The ALT method gives param2 a different meaning: it is a circle-perfectness measure, so do not transfer a threshold tuned for the standard gradient method. Consult the documentation for the OpenCV version in use before selecting ALT.
See the OpenCV HoughCircles() API reference for the signature, supported methods, and parameter details.
Detect and Draw Circles in Python
The following small Python example is self-contained and shows how the floating-point (x, y, radius) values returned by HoughCircles() become integer pixel coordinates. Its output is deterministic; it does not perform image detection.
detected = [(119.6, 120.3, 49.8)]
for x, y, radius in detected:
    center = (round(x), round(y))
    pixel_radius = round(radius)
    print(f"center={center}, radius={pixel_radius}")
center=(120, 120), radius=50
Install opencv-python and NumPy, then run this script with an input image path and an optional output path. It loads the source in color so the annotations do not alter the grayscale detection input. The import guard lets the script exit cleanly when those packages are unavailable; the runtime evidence below validates only the separate tuple-rounding snippet above, not OpenCV detection.
import sys

try:
    import cv2
    import numpy as np
except ImportError:
    print("Install opencv-python and NumPy to run circle detection.")
    sys.exit(0)

input_path = sys.argv[1] if len(sys.argv) > 1 else "input.jpg"
output_path = sys.argv[2] if len(sys.argv) > 2 else "circles-detected.jpg"

image = cv2.imread(input_path, cv2.IMREAD_COLOR)
if image is None:
    print(f"Could not load input image: {input_path}")
    sys.exit(0)

gray = cv2.cvtColor(image, cv2.COLOR_BGR2GRAY)
circles = cv2.HoughCircles(
    gray,
    cv2.HOUGH_GRADIENT,
    dp=1.2,
    minDist=50,
    param1=100,
    param2=30,
    minRadius=35,
    maxRadius=65,
)

if circles is None:
    print("No circles detected; saving the unannotated image.")
else:
    for x, y, radius in np.round(circles[0]).astype(int):
        cv2.circle(image, (x, y), radius, (0, 255, 0), 2)
        cv2.circle(image, (x, y), 2, (0, 0, 255), 3)

if not cv2.imwrite(output_path, image):
    print(f"Could not save output image: {output_path}")
    sys.exit(0)

print(f"Saved annotated image to: {output_path}")
The standard method and threshold values in the call are starting settings; adjust the radius bounds and thresholds for your image as described below. OpenCV uses BGR colors, so (0, 255, 0) draws green outlines and (0, 0, 255) draws red centers. The full script handles an unavailable dependency, an unreadable input, no detections, and a failed save without indexing a missing result.
The supplied result visual below shows green outlines and red center marks.
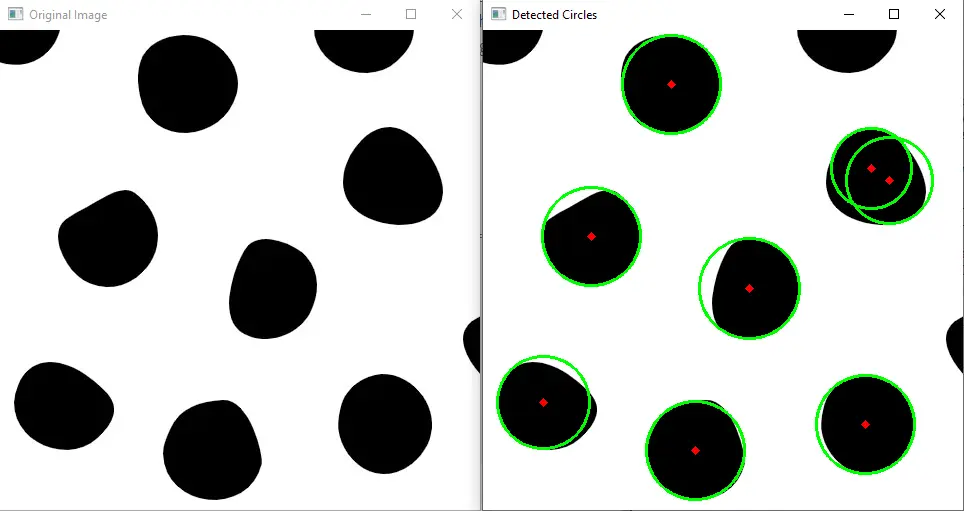
The example visual compares an input with an annotated detection result. The detections shown depend on the image and settings.
Tune Detection for Your Image
Start with radius bounds close to the circles you expect and a minDist that reflects how near distinct centers can be. If circles are missed, try lowering param2; if extra circles appear, raise it. Adjust param1 to change edge sensitivity, and use a smaller dp when center precision matters. Change one setting at a time and compare the saved result with the source. No single set of values works for every image.
Interpret the Output and Handle Common Problems
No detections can mean weak edges, unsuitable radius bounds, or an overly strict center threshold. Widen the radius range or lower param2 gradually, then inspect whether the added candidates are plausible. Duplicate detections often indicate that minDist is too small; increase it to suppress nearby centers. If circles are cut off or obscured, the visible contour may not provide enough evidence for a stable radius. Confirm that the input is grayscale and that the result is not None before indexing it.
For edge detection used in related preprocessing, see OpenCV Canny edge detection.