How to Compare Images in OpenCV
-
Use the
norm()Function of OpenCV to Compare Images -
Use the
compareHist()Function of OpenCV to Compare Images -
Arguments of the
calcHist()andnormalize()Functions of OpenCV

This tutorial will discuss comparing images using the norm() and compareHist() functions of OpenCV.
Use the norm() Function of OpenCV to Compare Images
If the two images that we want to compare have the same size and orientation, we can use the norm() function of OpenCV. This function finds errors present in identical pixels of the two images.
We have to find the L2 error, a.k.a, the squared error sum’s square root, and divide it with the total number of pixels present in the image to find the similarity between them.
We get the total number of pixels by multiplying the number of rows by the number of columns present in one of the given images.
For example, let’s create two identical images using the zeros() function of NumPy and find their similarity using the norm() function. See the code below.
import cv2
import numpy as np

height = 312
width = 312
A = np.zeros((height, width, 3), np.uint8)

B = np.zeros((height, width, 3), np.uint8)

errorL2 = cv2.norm(A, B, cv2.NORM_L2)
similarity = 1 - errorL2 / (height * width)
print("Similarity = ", similarity)

cv2.imshow("A", A)
cv2.imshow("B", B)
cv2.waitKey(0)
Output:
Similarity = 1.0
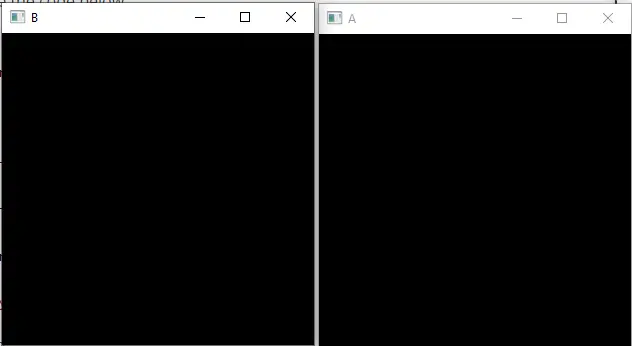
As we can see, both images are identical; that’s why the similarity is 1 or 100 percent.
Now let’s put some color in one image and compare it with the other.
For example, let’s set the color of half the image to red color and then compare it with the other image. See the code below.
import cv2
import numpy as np

height = 312
width = 312
A = np.zeros((height, width, 3), np.uint8)

B = np.zeros((height, width, 3), np.uint8)
B[0 : width // 2, :, :] = (0, 0, 255)

errorL2 = cv2.norm(A, B, cv2.NORM_L2)
similarity = 1 - errorL2 / (height * width)
print("Similarity = ", similarity)

cv2.imshow("A", A)
cv2.imshow("B", B)
cv2.waitKey(0)
Output:
Similarity = 0.4220761884533025
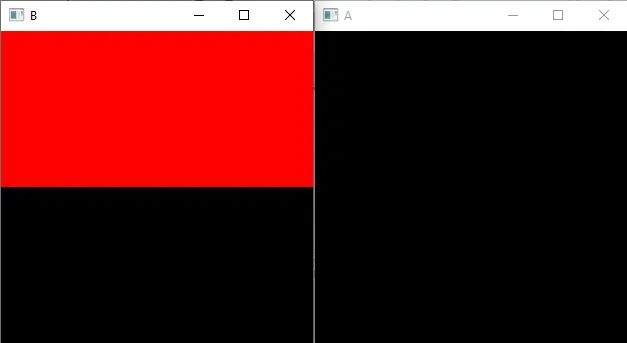
The similarity has decreased due to the red color in one image.
This method is only useful if the two images have the same size and orientation; otherwise, this method is not useful.
Use the compareHist() Function of OpenCV to Compare Images
We can find the similarity between two images using the compareHist() function of OpenCV. The compareHist() function compares the histogram of two images according to their colors.
This method compares images only based on their color, so it is useful in places where we don’t care about the shape of the objects or their orientation.
For example, a tree and a forest will have 100 percent similarity because both images have many green colors.
To compare two images using the compareHist() function, we must convert the images to HSV using the cvt.Color() function of OpenCV and then find the histogram of the images using the calcHist() function.
After that, we can use the normalize() function to normalize the histograms for comparison. Then, we must pass the normalized histogram of both images inside the compareHist() function along with the comparison method.
The compareHist() function will return the similarity as a floating-point number. If the similarity is 1, that means the images are 100 percent identical, and if it is close to 0, that means both the images are not similar.
For example, let’s use an image containing multiple fruits in it as a base image and use two more test images that also contain a single fruit in them.
See the code below.
import cv2 as cv
import numpy as np

base = cv.imread("Base.jpg")
test = cv.imread("test.jpg")
test2 = cv.imread("test2.jpg")

hsv_base = cv.cvtColor(base, cv.COLOR_BGR2HSV)
hsv_test = cv.cvtColor(test, cv.COLOR_BGR2HSV)
hsv_test2 = cv.cvtColor(test2, cv.COLOR_BGR2HSV)

h_bins = 50
s_bins = 60
histSize = [h_bins, s_bins]
h_ranges = [0, 180]
s_ranges = [0, 256]
ranges = h_ranges + s_ranges
channels = [0, 1]

hist_base = cv.calcHist([hsv_base], channels, None, histSize, ranges, accumulate=False)
cv.normalize(hist_base, hist_base, alpha=0, beta=1, norm_type=cv.NORM_MINMAX)
hist_test = cv.calcHist([hsv_test], channels, None, histSize, ranges, accumulate=False)
cv.normalize(hist_test, hist_test, alpha=0, beta=1, norm_type=cv.NORM_MINMAX)
hist_test2 = cv.calcHist(
    [hsv_test2], channels, None, histSize, ranges, accumulate=False
)
cv.normalize(hist_test2, hist_test2, alpha=0, beta=1, norm_type=cv.NORM_MINMAX)

compare_method = cv.HISTCMP_CORREL

base_base = cv.compareHist(hist_base, hist_base, compare_method)
base_test = cv.compareHist(hist_base, hist_test, compare_method)
base_test2 = cv.compareHist(hist_base, hist_test2, compare_method)

print("base_base Similarity = ", base_base)
print("base_test Similarity = ", base_test)
print("base_test2 Similarity = ", base_test2)

cv.imshow("base", base)
cv.imshow("test1", test)
cv.imshow("test2", test2)
cv.waitKey(0)
Output:
base_base Similarity =  1.0
base_test Similarity =  0.9850943125966266
base_test2 Similarity =  -0.00323646777704442
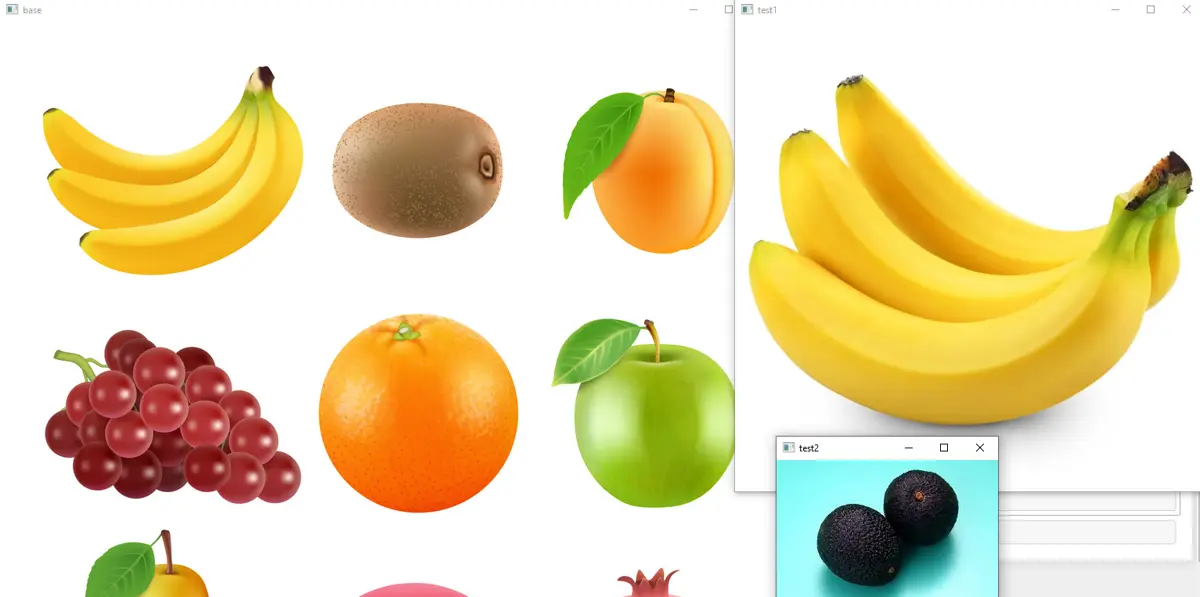
As seen in the output, the similarity of the base image with the base image is 1 or 100 percent because both images are the same.
The similarity of the test image with the base image is 0.98 or 98 percent because the test image contains bananas also present in the base image.
The similarity of the test2 image with the base image is close to 0 because the fruit and color present in the test2 image are not present in the base image.
Arguments of the calcHist() and normalize() Functions of OpenCV
In the code above, the first argument of the calcHist() function is the image in the HSV color space. The second argument is the channels of the given image that we want to use to find the histogram.
The third argument is used to pass a mask, and it is useful if we want to find the histogram of a portion of the image rather than the entire image. The fourth argument is the histogram’s size, which contains the height and size of the histogram bins.
The fifth argument is the range of hue and saturation from the HSV color space.
The normalize() function’s first argument is the source image that we want to normalize.
The second argument is the destination image, creating an output image with our desired dimensions or size. The third argument is the lower value of range in which we want to normalize an image.
The fourth argument is the upper value of the range in which we want to normalize an image. The fifth argument is the type of normalization like cv2.NORM_INF, cv2.NORM_L1, and cv2.NORM_MINMAX.
Every normalization type uses its formula to calculate the normalization. The sixth argument is used to set the data type of the output image.
The seventh argument is used to create a mask, and it is useful when we don’t want to normalize the whole image. Instead, we only want to normalize a portion of the image.
We can define that portion in the mask so that normalization will only be performed on the masked portion.
We used the correlation method in the compareHist() function, but there are also other methods that we can use to compare histograms.
Click this link for more details about the histogram methods.
