How to Plot Waterfall Plot in Matplotlib
- Create 2D Waterfall Plot With Matplotlib in Python
- Create 3D Waterfall Plot With Matplotlib in Python

This tutorial will tackle how you can create a waterfall plot or chart in Python. We will use the Matplotlib and waterfall_chart library for two dimensions and three-dimension waterfall plots.
Create 2D Waterfall Plot With Matplotlib in Python
The waterfall chart is common in finance, but the waterfall is not so effective when you have part-to-whole relationships.
Let’s say you want to show our project cost breakdown. How it looks like in a table takes a bit of time for people to go through the table and compare the numbers.
Take note that the waterfall charts do not come with Python default packages. First, we need to install the waterfallcharts package.
pip install waterfallcharts
If you get any error during installation, upgrade your pip using the following command.
python -m pip install --upgrade pip
We need to import the required libraries to create a waterfall chart or plot.
import matplotlib.pyplot as plot
import waterfall_chart as waterfall
The rcParams parameter takes the key-value pair. Using this parameter is to access figure elements like the figure size and face color.
plot.rcParams["figure.figsize"] = (8, 6)
plot.rcParams["figure.facecolor"] = "yellow"
Then we create a data set for XYZ company. We are going to visualize the sale of XYZ company with corresponding months.
x1, y1 = ["Jan", "Feb", "March", "April", "May", "jun", "July", "Aug"], [
    10,
    25,
    30,
    50,
    -10,
    15,
    -5,
    10,
]
waterfall.plot(
    x1,
    y1,
)
Full Code - 2D waterfall plot:
import matplotlib.pyplot as plot
import waterfall_chart as waterfall

# Set set width and height and face color as yellow
plot.rcParams["figure.figsize"] = (8, 6)
plot.rcParams["figure.facecolor"] = "yellow"
# dependant and independent variables
x1, y1 = ["Jan", "Feb", "March", "April", "May", "jun", "July", "Aug"], [
    10,
    25,
    30,
    50,
    -10,
    15,
    -5,
    10,
]
waterfall.plot(
    x1,
    y1,
)
# Set x labels with 45 rotation
plot.xticks(rotation=45)

plot.title("2D Waterfall plot")
# Add the padding and merging for visual elements
plot.tight_layout()
plot.show()
Output:
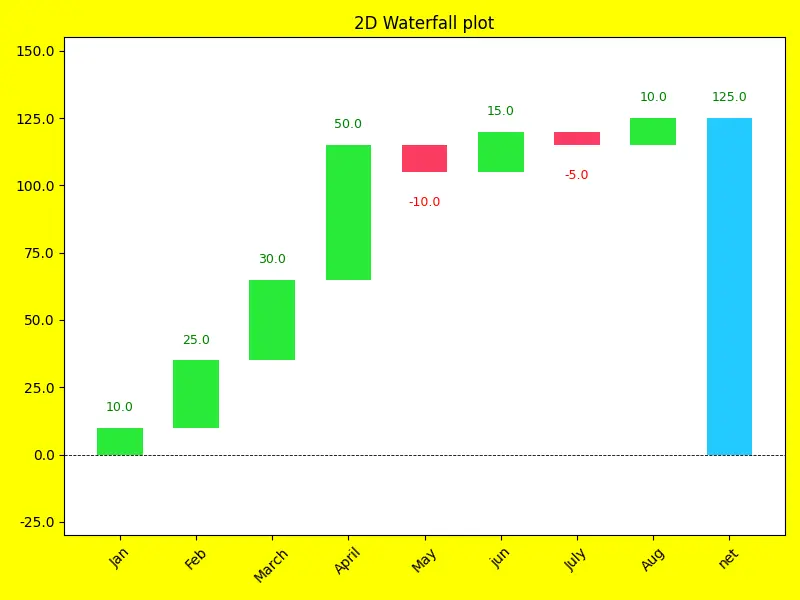
The profit raised with a green plot and lost means the minus points go with the red plot, and the net sale of XYZ company goes with a blue plot.
Create 3D Waterfall Plot With Matplotlib in Python
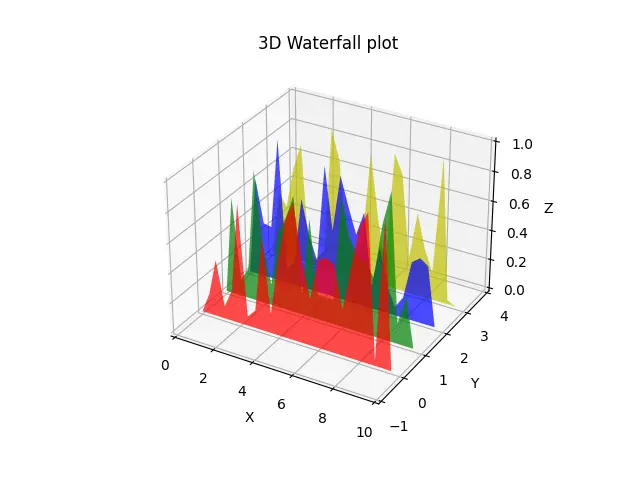
In the previous example, we’ve learned how to create a 2D waterfall plot. This section will demonstrate creating a 3D waterfall plot using the PolyCollection class from the Matplotlib library.
We will import the following required libraries to create a 3D waterfall plot.
from matplotlib.collections import PolyCollection
import matplotlib.pyplot as plt
from matplotlib import colors as mcolors
import numpy as np
If we want to create a 3D plot, we need to call the axes() method from pyplot.
axes = plt.axes(projection="3d")
Now we generate some random data sets for three dimensions. The x1 variable stores the given range using the arange() numpy method, and the y1 variable will generate a random integer number in every iteration using the Numpy random.rand() method.
x1 = np.arange(0, 10, 0.4)
verts = []
z1 = [0.0, 1.0, 2.0, 3.0]
for z in z1:
    y1 = np.random.rand(len(x1))
    y1[0], y1[-1] = 0, 0
    verts.append(list(zip(x1, y1)))
The PolyCollection() function takes the first parameter as a list of data points, and the second parameter is facecolors that help us display specific colors. We have already imported colors as mcolors from Matplotlib, and we have defined our custom function called colors.
The colors() function is called with a color value parameter and this function returns the to_rgba() method with color and alpha parameters.
def colors(arg):
    return mcolors.to_rgba(arg, alpha=0.6)


poly = PolyCollection(
    verts, facecolors=[colors("r"), colors("g"), colors("b"), colors("y")]
)
This is just a limit or a range of data points for three dimensions.
axes.set_xlim3d(0, 10)
axes.set_ylim3d(-1, 4)
axes.set_zlim3d(0, 1)
Full Code - 3D waterfall plot:
from matplotlib.collections import PolyCollection
import matplotlib.pyplot as plt
from matplotlib import colors as mcolors
import numpy as np

axes = plt.axes(projection="3d")


def colors(arg):
    return mcolors.to_rgba(arg, alpha=0.6)


x1 = np.arange(0, 10, 0.4)
verts = []
z1 = [0.0, 1.0, 2.0, 3.0]
for z in z1:
    y1 = np.random.rand(len(x1))
    y1[0], y1[-1] = 0, 0
    verts.append(list(zip(x1, y1)))

poly = PolyCollection(
    verts, facecolors=[colors("r"), colors("g"), colors("b"), colors("y")]
)
poly.set_alpha(0.7)
axes.add_collection3d(poly, zs=z1, zdir="y")

axes.set_xlabel("X")
axes.set_xlim3d(0, 10)
axes.set_ylabel("Y")
axes.set_ylim3d(-1, 4)
axes.set_zlabel("Z")
axes.set_zlim3d(0, 1)
axes.set_title("3D Waterfall plot")

plt.show()
Output:

Hello! I am Salman Bin Mehmood(Baum), a software developer and I help organizations, address complex problems. My expertise lies within back-end, data science and machine learning. I am a lifelong learner, currently working on metaverse, and enrolled in a course building an AI application with python. I love solving problems and developing bug-free software for people. I write content related to python and hot Technologies.
LinkedIn