Matplotlib 瀑布图

本教程将介绍如何在 Python 中创建瀑布图或图表。我们将使用 Matplotlib 和 waterfall_chart 库来绘制二维和三维瀑布图。
在 Python 中使用 Matplotlib 创建 2D 瀑布图
瀑布图在金融中很常见,但当你有部分到整体的关系时,瀑布图就不是那么有效了。
假设你想展示我们的项目成本明细。它在表格中的样子需要一些时间让人们浏览表格并比较数字。
请注意,瀑布图不附带 Python 默认包。首先,我们需要安装 waterfallcharts 包。
pip install waterfallcharts
如果你在安装过程中遇到任何错误,请使用以下命令升级你的 pip。
python -m pip install --upgrade pip
我们需要导入所需的库来创建瀑布图或绘图。
import matplotlib.pyplot as plot
import waterfall_chart as waterfall
rcParams 参数采用键值对。使用此参数可以访问图形元素,例如图形大小和面部颜色。
plot.rcParams["figure.figsize"] = (8, 6)
plot.rcParams["figure.facecolor"] = "yellow"
然后我们为 XYZ 公司创建一个数据集。我们将可视化 XYZ 公司的销售与相应的月份。
x1, y1 = ["Jan", "Feb", "March", "April", "May", "jun", "July", "Aug"], [
    10,
    25,
    30,
    50,
    -10,
    15,
    -5,
    10,
]
waterfall.plot(
    x1,
    y1,
)
完整代码 - 2D 瀑布图:
import matplotlib.pyplot as plot
import waterfall_chart as waterfall

# Set set width and height and face color as yellow
plot.rcParams["figure.figsize"] = (8, 6)
plot.rcParams["figure.facecolor"] = "yellow"
# dependant and independent variables
x1, y1 = ["Jan", "Feb", "March", "April", "May", "jun", "July", "Aug"], [
    10,
    25,
    30,
    50,
    -10,
    15,
    -5,
    10,
]
waterfall.plot(
    x1,
    y1,
)
# Set x labels with 45 rotation
plot.xticks(rotation=45)

plot.title("2D Waterfall plot")
# Add the padding and merging for visual elements
plot.tight_layout()
plot.show()
输出:
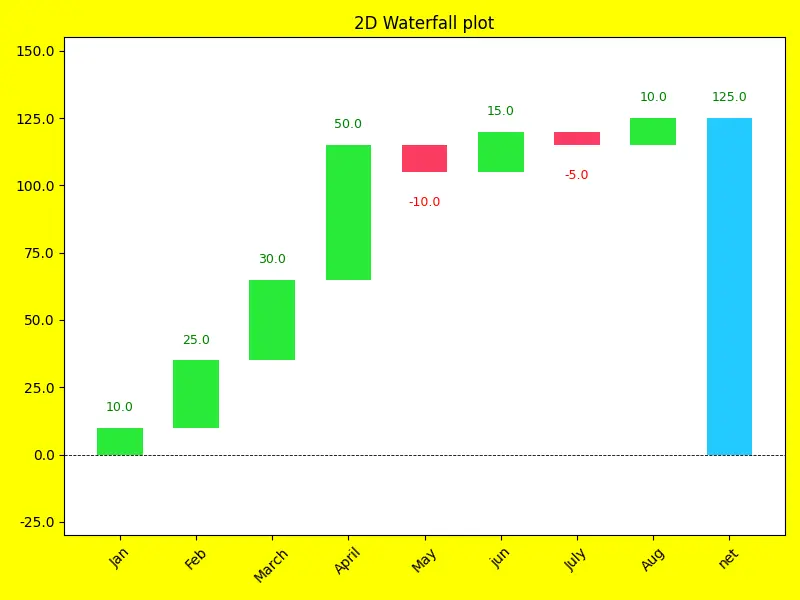
用绿色标出的利润增加和损失意味着负分与红色标出,而 XYZ 公司的净销售额与蓝色标出。
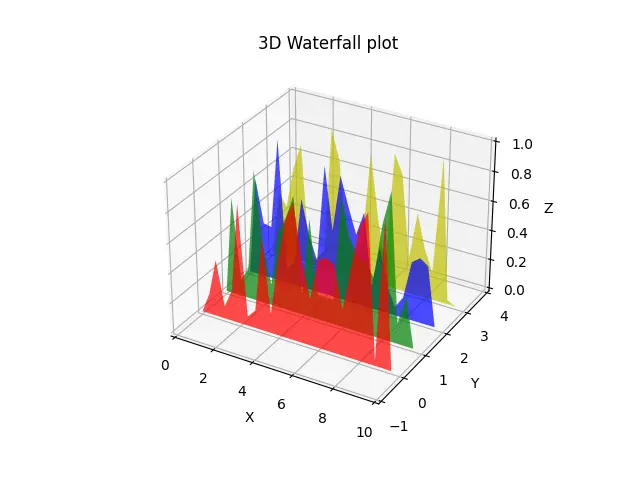
在 Python 中使用 Matplotlib 创建 3D 瀑布图
在前面的示例中,我们学习了如何创建 2D 瀑布图。本节将演示使用 Matplotlib 库中的 PolyCollection 类创建 3D 瀑布图。
我们将导入以下所需的库来创建 3D 瀑布图。
from matplotlib.collections import PolyCollection
import matplotlib.pyplot as plt
from matplotlib import colors as mcolors
import numpy as np
如果我们想创建一个 3D 绘图,我们需要从 pyplot 调用 axes() 方法。
axes = plt.axes(projection="3d")
现在我们为三个维度生成一些随机数据集。x1 变量使用 arange() numpy 方法存储给定范围,y1 变量将使用 random.rand() numpy 方法在每次迭代中生成一个随机整数。
x1 = np.arange(0, 10, 0.4)
verts = []
z1 = [0.0, 1.0, 2.0, 3.0]
for z in z1:
    y1 = np.random.rand(len(x1))
    y1[0], y1[-1] = 0, 0
    verts.append(list(zip(x1, y1)))
PolyCollection() 函数将第一个参数作为数据点列表,第二个参数是帮助我们显示特定颜色的 facecolors。我们已经从 Matplotlib 导入了颜色为 mcolors,并且我们定义了我们的自定义函数 colors。
colors() 函数使用颜色值参数调用,该函数返回带有颜色和 alpha 参数的 to_rgba() 方法。
def colors(arg):
    return mcolors.to_rgba(arg, alpha=0.6)


poly = PolyCollection(
    verts, facecolors=[colors("r"), colors("g"), colors("b"), colors("y")]
)
这只是三个维度的数据点的限制或范围。
axes.set_xlim3d(0, 10)
axes.set_ylim3d(-1, 4)
axes.set_zlim3d(0, 1)
完整代码 - 3D 瀑布图:
from matplotlib.collections import PolyCollection
import matplotlib.pyplot as plt
from matplotlib import colors as mcolors
import numpy as np

axes = plt.axes(projection="3d")


def colors(arg):
    return mcolors.to_rgba(arg, alpha=0.6)


x1 = np.arange(0, 10, 0.4)
verts = []
z1 = [0.0, 1.0, 2.0, 3.0]
for z in z1:
    y1 = np.random.rand(len(x1))
    y1[0], y1[-1] = 0, 0
    verts.append(list(zip(x1, y1)))

poly = PolyCollection(
    verts, facecolors=[colors("r"), colors("g"), colors("b"), colors("y")]
)
poly.set_alpha(0.7)
axes.add_collection3d(poly, zs=z1, zdir="y")

axes.set_xlabel("X")
axes.set_xlim3d(0, 10)
axes.set_ylabel("Y")
axes.set_ylim3d(-1, 4)
axes.set_zlabel("Z")
axes.set_zlim3d(0, 1)
axes.set_title("3D Waterfall plot")

plt.show()
输出:

Hello! I am Salman Bin Mehmood(Baum), a software developer and I help organizations, address complex problems. My expertise lies within back-end, data science and machine learning. I am a lifelong learner, currently working on metaverse, and enrolled in a course building an AI application with python. I love solving problems and developing bug-free software for people. I write content related to python and hot Technologies.
LinkedIn