How to Fix the Unable to Install Java There Are Errors in the Following Switches
Today’s tutorial contains instructions to resolve an error stating, Unable to install Java. There are errors in the following switches when we try to open a .jar file.
Unable to install Java. There are errors in the following switches Error Demonstration, Its Causes and Solutions
Let’s start with the error demonstration and understand when we get this error. We downloaded one file for a game that needs Java to run.
The file was saved as a WinRAR file when we downloaded it.
So, we right-clicked this file and selected Open with > Java Platform SE Binary. We selected this option because it was the only Java add-on to choose.
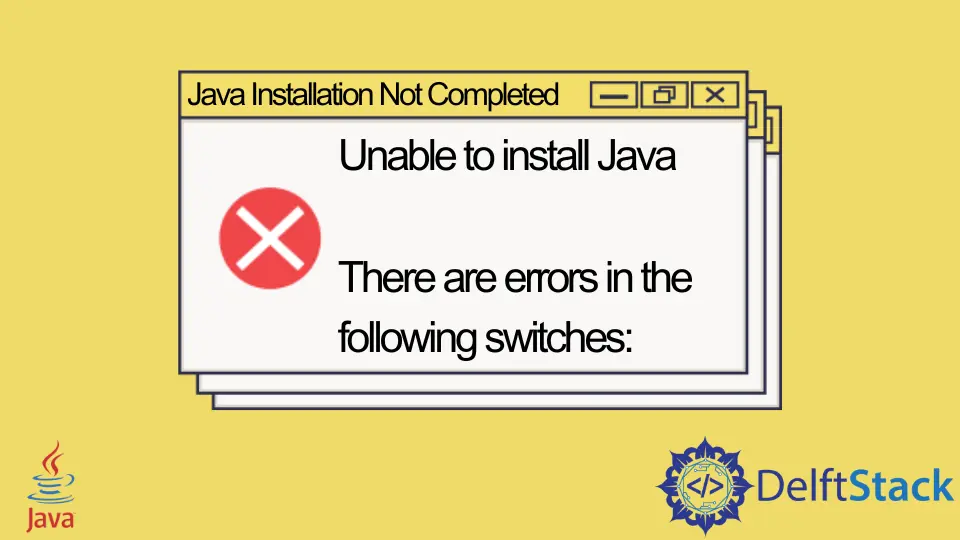
As soon as we select that, an error message pops up, which says the following.
Error Description:
Java Installation Not Completed.
Unable to install Java.
There are errors in the following switches:
("C:\Users\Admin\Desktop\filename.jar").
Check that the commands are valid and try again.
Possible Reasons for this Error
We need to understand the error before trying to figure out its causes. The error states Java Installation Not Completed, though we have already installed Java.
So, what is causing this error? Some of the reasons are listed below.
- We face this error when we have installed multiple versions of Java on our machine.
- This error can also occur if the
.jarassociation has been hijacked. - Sometimes, we get this error if any of our files are corrupted.
So, how to resolve this? Let’s learn about all possible solutions one by one below.
Solution 1: To Open .jar Files, Set Java Platform SE Binary as Default Program
-
Right-click on a required
.jarfile, selectOpen with>Choose Another App.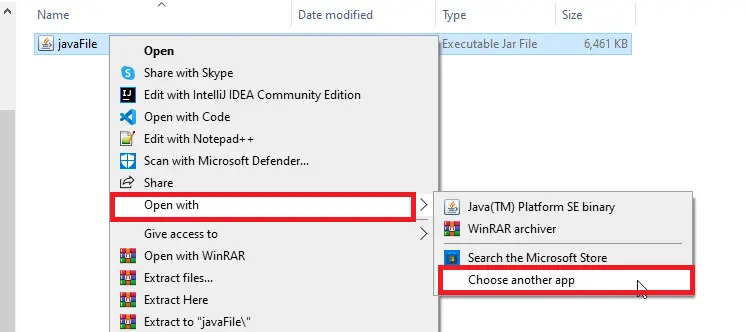
-
Click on
More Appsto expand, and check the option sayingAlways use this app to open .jar files. Then, scroll and click onLook for another app on this PC.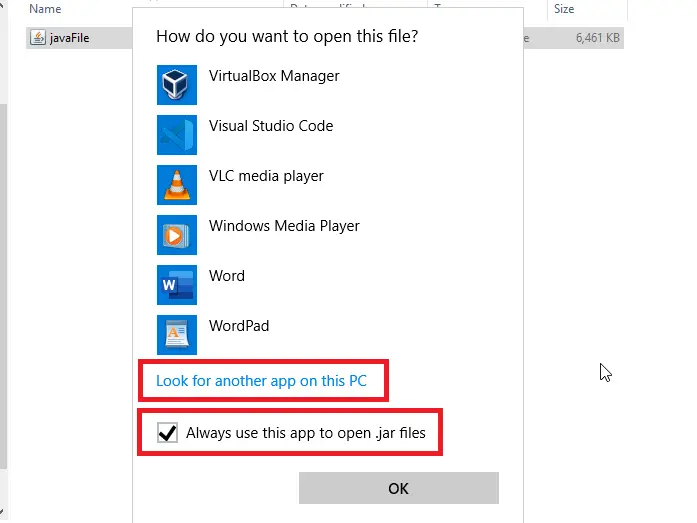
-
Now, navigate to a folder where you have installed Java. This location will vary based on what version of Java you have installed.
Navigate to the
C:\Program Files\Java\jreVersion\binlocation if you have installed Java 64-bit. Go to theC:\Program Files(x86)\Java\jreVersion\binif you have installed the 32-bit version of Java. -
Now, look for the
Java Platform SE Binarynamedjavaw.exefile and clickOpen.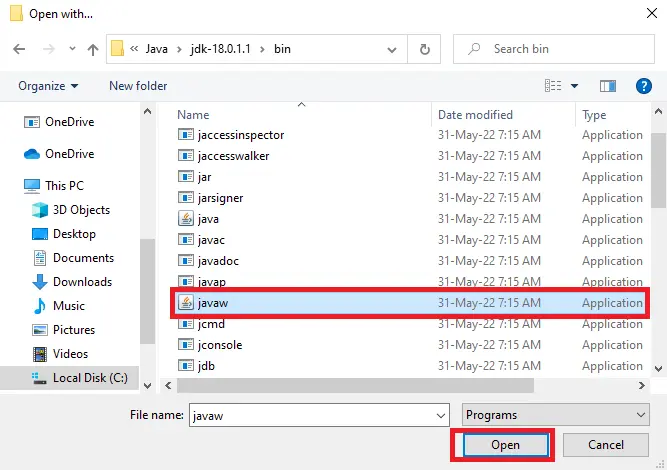
-
From now on, the
.jarfile must be open without issues. If you still have that irritating error, follow the instructions in the following solution.
Solution 2: Download the Jarfix.exe File, Run It to Repair an Invalid Java Files Association
- Download a tool named
Jarfix.exe. - Next, double-click on the file and run it to restore a
.jarfile association. You will see the following screen after the successful installation ofjarfix.exe.
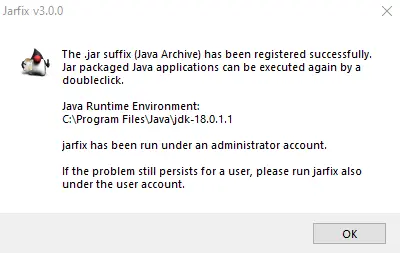
Once it is installed, the error must be gone. If any of the above methods do not fit your case, then go for the final solution below.
Solution 3: Uninstall Java and Re-install on Your Machine
-
Download a tool to uninstall Java and run it.
-
Select
Agree to the Termsthat you will see on the first screen. In case you are promoted withthere is only one up-to-date Java version detected. Are you sure to continue?hitYes. -
Once it is downloaded, double-click on it and select
Agree. -
Select all versions of Java and click
Nextas given below.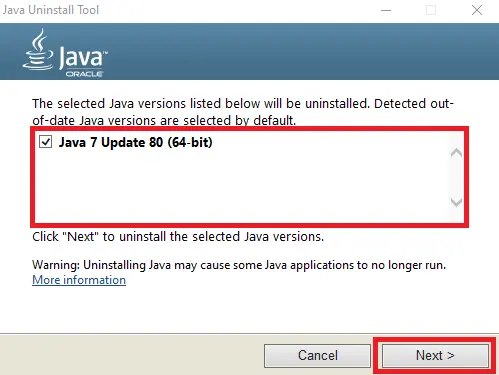
-
Click
Yesto clear the cache; you may also navigate to a web page to read about the Java development cache.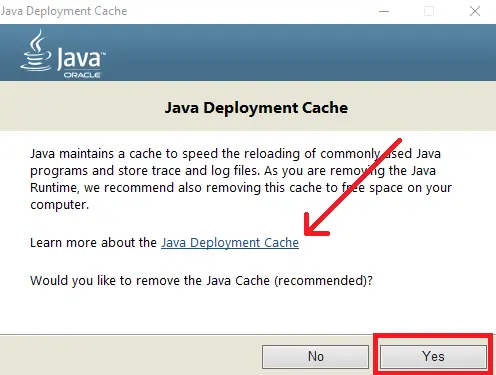
-
Once Java is uninstalled, click on the
Get Javabutton to navigate to the page for downloading the latest version of Java and installing it. You can download Java versionsx32andx64based on your needs and requirements.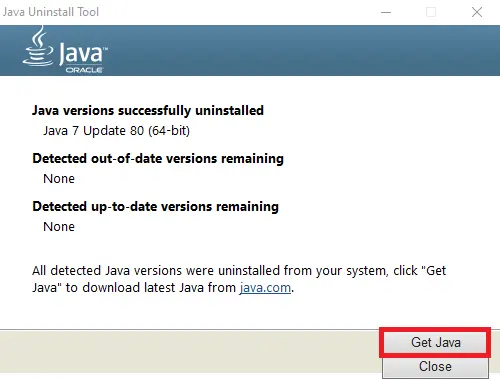
-
Finally, open the
.jarfile to continue your work.

Related Article - Java Error
- How to Fix the Error: Failed to Create the Java Virtual Machine
- How to Fix the Missing Server JVM Error in Java
- How to Fix the 'No Java Virtual Machine Was Found' Error in Eclipse
- How to Fix Javax.Net.SSL.SSLHandShakeException: Remote Host Closed Connection During Handshake
- How to Fix the Error: Failed to Create the Java Virtual Machine
- How to Fix Java.Lang.VerifyError: Bad Type on Operand Stack