How to Save File Dialog in C#

This trivial guide is about using the SaveFileDialog class in C# to save the file from your C# app to the Windows file storage.
SaveFileDialog Class in C#
Users can browse the file system and choose which files to save using the SaveFileDialog component. The dialogue box gives back the name and path of the file that the user selected there.
To write the files to the disc, you must write the code.
Steps for Using the SaveFileDialog Class
-
The first step is to create a Windows Form Application and add a
SaveFileDialogcontrol.Using the
SaveFileDialogclass in code at run-time or the Forms designer at design-time, we may create aSaveFileDialogcontrol. ASaveFileDialogdoes not have and is not required to have visual properties like other Windows Forms controls.We can create a
SaveFileDialogcontrol through either of design view or the explicit code. Let’s have a look at both methods:- Create
SaveFileDialogthrough code. The code to create aSaveFileDialogis:
SaveFileDialog saveDialog = new SaveFileDialog();The above code will create a
SaveFileDialogbox object. Now, to display this dialog, we use theShowDialogmethod:saveDialog.showDialog();- Create
SaveFileDialogthrough Design. Drag and drop aSaveFileDialogcontrol from the Toolbox to a Form in Visual Studio to create a SaveFileDialog control at design time.
The figure below depicts the
SaveFileDialogafter being dropped by drag and drop onto a Form.
- Create
-
The second step is to set some properties of the
SaveFileDialog. There are different properties available that can be used according to your coding requirements.Setting properties through the Properties Window is the simplest option. The figure below depicts how the Properties window looks.
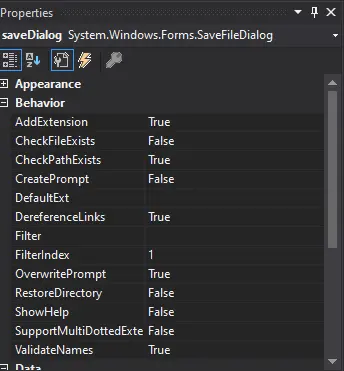
Different properties can be set in this window. Let’s discuss some of these properties: -
Initial DirectoryThe
Initial Directoryproperty specifies the default directory to be opened when the dialog box appears for saving the file. This property can be set from the property window shown above or through the code like this:saveDialog.InitialDirectory = @"D:/New Folder";TitleThe
Titleproperty sets the title to be displayed on the dialog box that appears for saving the file:saveDialog.Title = "Save Your File Here";FilterThe
filterproperty on a save file dialogue restricts the kinds of files that can be saved using a save file dialogue. For instance, we can specify the Filter option only to save binary .bin files if you wish users to be restricted to them.saveDialog.Filter = "bin files (*.bin)|*.bin|All files (*.*)|*.*";These are some properties that can be set for saving the file. There are numerous others, but we will discuss these important ones in this article.
-
After you have set the properties, you can write the code to save the file to disc. For this, the
OpenFilemethod is used. This method returns aStreamobject that can be used to save the file onto a disc.Stream fileStream; if (saveDialog.ShowDialog() == DialogResult.OK) { if ((fileStream = saveDialog.OpenFile()) != null) { // You can write the code to write the file here. fileStream.Close(); } }
Let’s now sum up the complete code here to save a file:
using System;
using System.Collections.Generic;
using System.ComponentModel;
using System.Data;
using System.Drawing;
using System.IO;
using System.Linq;
using System.Text;
using System.Threading.Tasks;
using System.Windows.Forms;
namespace WinFormsApp1 {
public partial class Form1 : Form {
public Form1() {
InitializeComponent();
}
private void button1_Click(object sender, EventArgs e) {
SaveFileDialog saveDialog = new SaveFileDialog();
saveDialog.InitialDirectory = @"C:\Users\user01\OneDrive\Documents";
saveDialog.Title = "Save Your File Here";
saveDialog.Filter = "bin files (*.bin)|*.bin|All files (*.*)|*.*";
Stream fileStream;
if (saveDialog.ShowDialog() == DialogResult.OK) {
  if ((fileStream = saveDialog.OpenFile()) != null) {
    // You can write the code to write the file here.
    fileStream.Close();
  }
}
}
}
}
We have written this code on the click event of a button so that when a button is clicked, the save dialog will open. This will generate the following output:
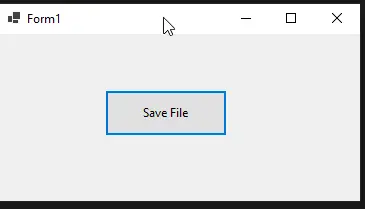
When we click on the Save File button, the following popup dialog box will appear:
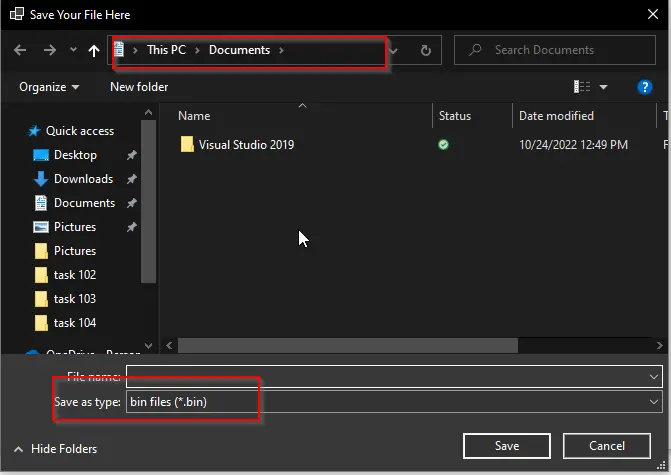
You can see in the dialog box that the location is set to the “Documents” Folder, and the file type is set to “Bin files.”
Conclusion
Users can start the Windows Save File Dialog and save files using a SaveFileDialog control. This article discussed using a Windows Save File Dialog and configuring its properties in a Windows Forms application.