How to Assign Static IP to Raspberry Pi
- Network Configuration Basics on Raspberry Pi OS
-
Assign Static IP Address to Raspberry Pi Ethernet Interface Using
dhcpcdCommand
This article will introduce several methods for assigning a static IP address to Raspberry Pi OS.
Network Configuration Basics on Raspberry Pi OS
Usually, before you configure a static IP address for the network interface, you’d need to find out what interfaces are available in the system and their names. In this case, we will focus on Ethernet interfaces and IPv4 addresses first.
You can list all available interfaces using the ip a command from CLI. It will display the output as demonstrated below, where each interface is numbered and named with names such as lo, eth0, etc. eth0 denotes the first Ethernet interface and currently has an IP address (192.168.0.24) assigned to it.
Note that it also has the standard netmask 255.255.255.0. Remember that we essentially need the eth0 part from this command output in the following steps to configure a static IP address.
ip a
Sample Output:
1: lo: <LOOPBACK,UP,LOWER_UP> mtu 65536 qdisc noqueue state UNKNOWN group default qlen 1000
    link/loopback 00:00:00:00:00:00 brd 00:00:00:00:00:00
    inet 127.0.0.1/8 scope host lo
       valid_lft forever preferred_lft forever
---
2: eth0: <BROADCAST,MULTICAST,UP,LOWER_UP> mtu 1500 qdisc pfifo_fast state UP group default qlen 1000
    link/ether 00:16:3e:e2:52:1c brd ff:ff:ff:ff:ff:ff
    inet 192.168.0.12/24 brd 192.168.0.255 scope global
---
Alternatively, you can run the ifconfig command to display currently active interfaces in the system. The output includes similar information to the previous command. Note that we have contracted output texts in this article and only focus on the parts relevant to the task at hand.
ifconfig
Sample Output:
eth0: flags=4163<UP,BROADCAST,RUNNING,MULTICAST>  mtu 1500
        inet 192.168.0.12  netmask 255.255.255.0  broadcast 172.16.0.255
        inet6 fe80::7df4:d6b9:171:f302  prefixlen 64  scopeid
---

lo: flags=73<UP,LOOPBACK,RUNNING>  mtu 65536
        inet 127.0.0.1  netmask 255.0.0.0
        inet6 ::1  prefixlen 128  scopeid 0x10<host>
---
Assign Static IP Address to Raspberry Pi Ethernet Interface Using dhcpcd Command
Raspberry Pi OS utilizes the dhcpcd client to configure TCP/IP for all its interfaces. dhcpcd is a daemon process always running in the background. Still, it also denotes the command line tool which can interact with the daemon process.
At first, we will need to deconfigure the eth0 interface since it has already been configured using dynamic allocation, as we saw in the previous outputs. However, this might not be the case for you if you don’t have the Raspberry Pi connected to the network where the router is running a DHCP server.
You can skip this step in the latter case, but verify that your Ethernet interface is not configured first using the previous commands.
The given interface (e.g. eth0) can be deconfigured using dhcpcd -k [interface] command or alternatively using dhcpcd --release [interface].
Note that you must specify interface argument to either of these commands, or dhcpcd will exit as no interfaces are left running.
Also, you will likely need to include the sudo prefix to elevate privileges for all dhcpcd commands if you are logged in as the default pi user.
sudo dhcpcd -k eth0
Next, you can confirm that the eth0 has been deconfigured by executing the ip a or ifconfig command. If the previous operation was successful, we could specify the static IP configuration in the dhcpcd.conf file, located in the /etc directory.
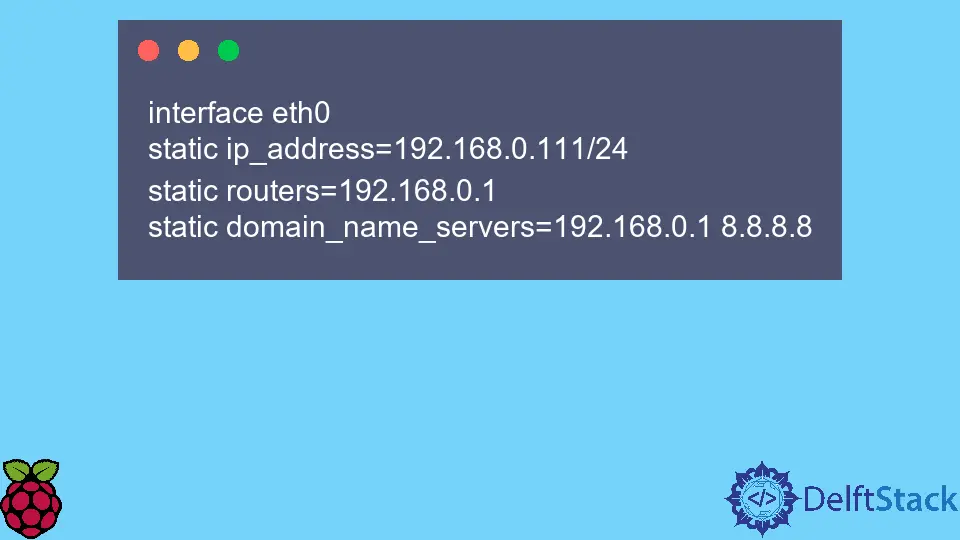
This file usually includes sample static IP configuration lines, so you might need to uncomment those and modify only addresses. Otherwise, insert the following lines at the end of the configuration file and specify the local addresses based on your local network settings.
interface eth0
static ip_address=192.168.0.111/24
static routers=192.168.0.1
static domain_name_servers=192.168.0.1 8.8.8.8
Notice that the command DHCP configuration includes the default gateway address and DNS servers in addition to the static IP address/netmask. In the previous snippet, we assigned 192.168.0.111 static IP address to the eth0 interface. Now, we need these changes to take effect immediately, so we run the following command.
sudo dhcpcd -n eth0
This command will force the dhcpcd process to reload its configuration file and rebind the eth0 interface. If you don’t specify the interface name to the previous command, it will rebind all interfaces.
Another scenario for setting a static IP address for the Raspberry PI involves modifying the dhcpcd.conf file and then restarting the system, which will work. Still, you waste some time waiting for a reboot. Also, mind that if you’re connected to the Raspberry Pi using SSH or other remote connection, the dhcpcd -k command will render your session unusable.

Founder of DelftStack.com. Jinku has worked in the robotics and automotive industries for over 8 years. He sharpened his coding skills when he needed to do the automatic testing, data collection from remote servers and report creation from the endurance test. He is from an electrical/electronics engineering background but has expanded his interest to embedded electronics, embedded programming and front-/back-end programming.
LinkedIn FacebookRelated Article - Raspberry Pi
- How to Setup a Raspberry Pi File Server
- How to Setup MySQL in Raspberry Pi
- DNS Server on Raspberry Pi
- How to Use Dropbox on Raspberry Pi
- How to Use Plex Media Player on Raspberry Pi
- Chromium OS on Raspberry Pi