How to Read Text From Images Using Tesseract in Python
We will introduce how to create a program that can read text from images using Tesseract in Python.
Tesseract in Python
We use Tesseract in Python when working on systems with functions in which we need to read texts from images. It provides powerful functions that help us read text from images more accurately and efficiently.
This article will also introduce extracting text from an image using the popular OpenCV library.
Tesseract is a computer-based system for optical character recognition (OCR) and other image-to-text processes. It is primarily used for text recognition in languages that do not use the Latin alphabet.
The system is used for various purposes, including text and data mining, education, translation, and machine translation.
Tesseract is also the name of the Open Source version of the software. It is often used in natural language processing and machine learning for text classification and other text-related tasks.
First, let us install the Tesseract tool in Python using the following line of code.
pip install pytesseract
Once we have installed the Tesseract tool, we will install other important libraries that we will use in our examples to read text from images. First, we will install OpenCV with the following command.
pip install opencv-python
Now we will install the ArgParse library that we will use to create a user-friendly command-line interface. We can easily install it using the following command.
pip install argparse
We will now install the Pillow library, a Python imaging library. This library will add the image processing capabilities to our python interpreter.
We can install this library using the command shown below.
pip install Pillow
Read Text From Images Using Tesseract in Python
Now, let us use Tesseract to read text from images in Python. We need to follow the following steps to make it work.
First of all, we will import or load the image from our gallery from which we want to read the text, and if we do not have it, we can download it from Chrome and then load it.
Once we have imported our images, we will convert the loaded image into a binary file. In the last step, we will send the binary file to Tesseract, which will look for text on them and return the text from the images.
We will import all of the libraries we installed earlier.
# python
import cv2
import os
import argparse
import pytesseract
from PIL import Image
We will construct the argument parser using the ArgParse function ArgumentParser() as shown below.
# python
imgArg = argparse.ArgumentParser()
imgArg.add_argument("-i", "--image", required=True, help="Enter path of image folder")
imgArg.add_argument(
    "-p", "--pre_processor", default="thresh", help="the preprocessor usage"
)
arguments = vars(imgArg.parse_args())
We will now read the image with the text using the OpenCV library with the following code.
# python
imageRead = cv2.imread(arguments["image"])
Now, we will convert the image into Grayscale using the OpenCV library, as shown below.
# python
imgGray = cv2.cvtColor(imageRead, cv2.COLOR_BGR2GRAY)
Then, we will use the if-else statement to check whether the image is threshed or blurred. If it is, we can change the thresh and blur as shown below.
# python
if arguments["pre_processor"] == "thresh":
    cv2.threshold(gray, 0, 255, cv2.THRESH_BINARY | cv2.THRESH_OTSU)[1]
if arguments["pre_processor"] == "blur":
    cv2.medianBlur(gray, 3)
As shown below, we will add an image to the memory using the OpenCV and Tesseract libraries.
# python
nameImg = "{}.jpg".format(os.getpid())
cv2.imwrite(nameImg, gray)
imgText = pytesseract.image_to_string(Image.open(nameImg))
os.remove(nameImg)
print(imgText)
Now, we will show the image output using the following code.
# python
cv2.imshow("Images Uploaded", imageRead)
cv2.imshow("Images Converted In Grayscale", imgGray)
cv2.waitKey(0)
Now, let’s run the above code with the following code and check how it works and how well it reads text from images.
# python
python main.py --image img/read.jpg
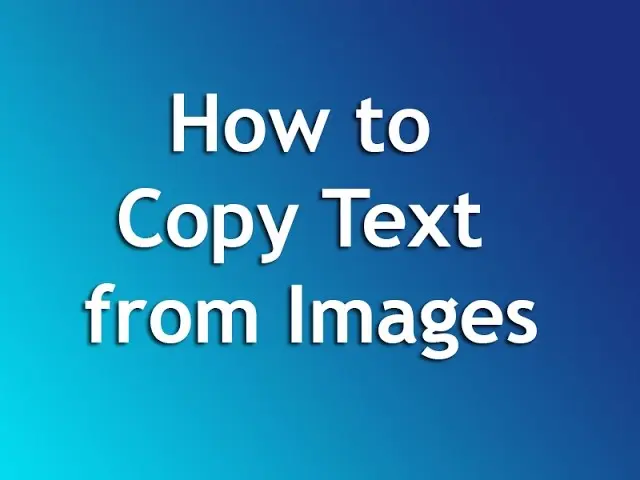
The image we sent is shown below:
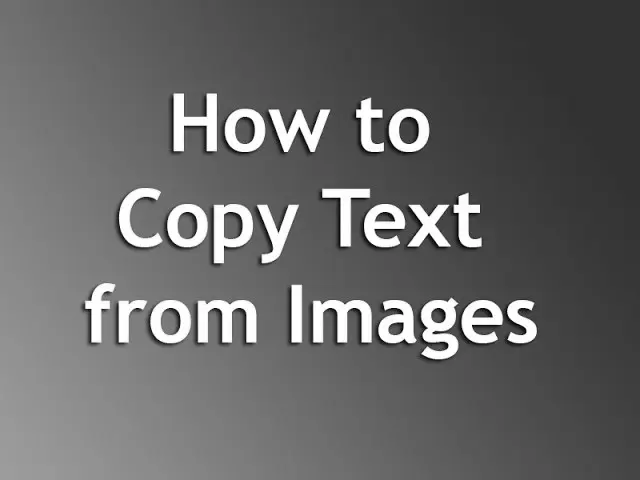
Once the image is processed, it will be saved in Grayscale as displayed below:
We will have the following output in the command prompt:
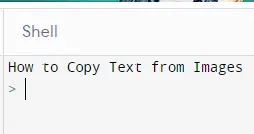
As you can see in the above example, we can easily use the images and read their text. And we can store them if we want or display them in the console.

Rana is a computer science graduate passionate about helping people to build and diagnose scalable web application problems and problems developers face across the full-stack.
LinkedIn