How to Fix Error:Java: Javactask: Source Release 1.8 Requires Target Release 1.8
While using IntelliJ for Java, it is a common problem that we cannot compile Java programs.
This tutorial provides a solution to this error.
Error:Java: Javactask: Source Release 1.8 Requires Target Release 1.8
If you cannot compile a Java program in IntelliJ, most of the time, the problem is that the source release is not matched to the target release.
We must match the source release to the target release to solve this problem. Here are the solutions for different platforms of IntelliJ.
Solution for Windows
Follow the steps below to solve Windows’ source release requires target release error.
-
Go to the
Filemenu of IntelliJ. -
Select
Settingsfrom theFilemenu. -
Select
Build, Execution, Deploymentfrom theSettingsmenu. -
Select
CompilerfromBuild, Execution, Deployment. -
Select
Java CompilerfromCompiler. -
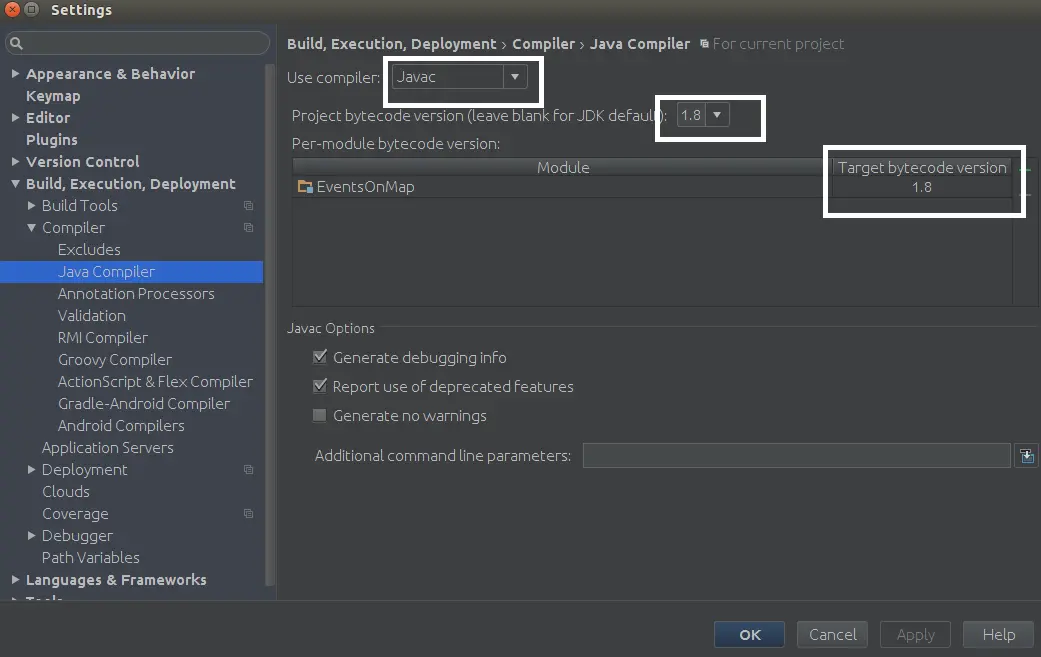
Now, on the
Java Compilerpage, selectJavacinUse compiler. -
Select your version in the
Project bytecode version. Make sure it is similar to theTarget bytecode version. -
For example, for
Project bytecode version 1.8, theTarget bytecode versionwill also be1.8. -
Click
Apply, thenOk, and you are good to go. See the screenshot for this method.
The shortcut to open the Java compiler directly is to press Ctrl+Shift+A and then type Java compiler and finally press Enter.
Solution for MacOS
Follow the steps below to solve the source release requires target release error on macOS.
-
Go to the IntelliJ menu.
-
Select
Preferences. -
Select
Build, Execution, DeploymentfromPreferences. -
Select
Java CompilerfromBuild, Execution, Deployment. -
Now, on the
Java Compilerpage, selectJavacinUse compiler. -
Select your version in the
Project bytecode version. Make sure it is similar to theTarget bytecode version. -
For example, for
Project bytecode version 1.8, theTarget bytecode versionwill also be1.8. -
Click
Apply, thenOk, and you are good to go.
Solution for Maven
For Maven, we need to add the compiler to pom.xml in the top-level project node. Open your pom.xml and add the code below.
<build>
    <plugins>
        <plugin>
            <groupId>org.apache.maven.plugins</groupId>
            <artifactId>maven-compiler-plugin</artifactId>
            <configuration>
                <source>1.8</source>
                <target>1.8</target>
            </configuration>
        </plugin>
    </plugins>
</build>
Once you add the plugin to pom.xml, save it, and you are ready.

Sheeraz is a Doctorate fellow in Computer Science at Northwestern Polytechnical University, Xian, China. He has 7 years of Software Development experience in AI, Web, Database, and Desktop technologies. He writes tutorials in Java, PHP, Python, GoLang, R, etc., to help beginners learn the field of Computer Science.
LinkedIn FacebookRelated Article - Java Error
- How to Fix the Error: Failed to Create the Java Virtual Machine
- How to Fix the Missing Server JVM Error in Java
- How to Fix the 'No Java Virtual Machine Was Found' Error in Eclipse
- How to Fix Javax.Net.SSL.SSLHandShakeException: Remote Host Closed Connection During Handshake
- How to Fix the Error: Failed to Create the Java Virtual Machine
- How to Fix Java.Lang.VerifyError: Bad Type on Operand Stack