The scrollTo Function in AngularJs
-
The
scrollToFunction UsingElementByIdin AngularJs -
ScrollTopFunction Withng-scrolltopin AngularJs -
ScrollTopButton With Bootstrap in AngularJs - Conclusion

The scrollTo function is used to scroll back up to the top of a long web page, and we can also use it to navigate to a particular section of a webpage.
Now let us look at ways to do this in Angular.
The scrollTo Function Using ElementById in AngularJs
In this example, we want to create a function that takes us to a particular page section. We will do that by using the ElementById function, so when the button is clicked, the function takes us to the section of the page where the element is defined.
We start by creating a project folder. Next, we navigate the app.component.html file to create the project structure with these codes.
Code Snippet - app.component.html:
<button (click)="scrollToElement(target)">Scroll to Element</button>
<router-outlet></router-outlet>
<div id="elId" #target>Your target</div>
What we did here is to create a webpage structure, the button that we will click to activate the scrollTo function. You will see that we have defined "Your target" inside a div with an id.
We have to create a function such that when we click the "Scroll to Element" button, it takes us to "Your target". We will create a service file that will handle this function and name the file scroll.service.ts.
Code Snippet - scroll.service.ts:
import { Injectable } from "@angular/core";
import { Router } from "@angular/router";

@Injectable({
  providedIn: "root"
})
export class ScrollService {
  constructor(private router: Router) {}
  scrollToElementById(id: string) {
    const element = this.__getElementById(id);
    this.scrollToElement(element);
  }
  private __getElementById(id: string): HTMLElement {
    console.log("element id : ", id);
    const element = document.getElementById(id)!;
    return element;
  }
  scrollToElement(element: HTMLElement) {
    element.scrollIntoView({ behavior: "smooth" });
  }
}
We created the scrollToElementById function and defined the id that will be scrolled to as an element with the type "string".
Next, we head onto the app.component.ts file to define some more functions for the scrollTo function.
Code Snippet - app.component.ts:
import { Component } from '@angular/core';
import { ScrollService } from '../_services/scroll.service';

@Component({
  selector: 'app-root',
  templateUrl: './app.component.html',
  styleUrls: ['./app.component.css']
})
export class AppComponent {
  title = 'scrollone';
  constructor(private scrollService: ScrollService) {}
  scrollToId(id: string) {
    console.log("element id : ", id);
    this.scrollService.scrollToElementById(id);
  }
  scrollToElement(element: HTMLElement) {
    this.scrollService.scrollToElement(element);
  }
}
We imported the scroll.service.ts file to the app.component.ts file because most functions will occur inside the scroll.service.ts file.
The final part is the app.module.ts file, where we will import the modules necessary for the app’s functionality.
Code Snippet - app.module.ts:
import { NgModule } from "@angular/core";
import { BrowserModule } from "@angular/platform-browser";
import { FormsModule } from "@angular/forms";
import { AppComponent } from "./app.component";
import { RouterModule, Route } from "@angular/router";
import { ScrollService } from "../_services/scroll.service";

const routes = <Route[]>[];

@NgModule({
  imports: [BrowserModule, FormsModule, RouterModule.forRoot(routes)],
  declarations: [AppComponent],
  providers: [ScrollService],
  bootstrap: [AppComponent]
})
export class AppModule {}
Output:
ScrollTop Function With ng-scrolltop in AngularJs
We want to create a function that once we get to the bottom of the page, we will click an icon that scrolls the page back to the top; we will use the ng-scroll dependency to design this. After creating a new project folder, navigate to the project folder and install the dependency with npm i ng-scrolltop.
Code Snippet - app.component.ts:
import { Component } from '@angular/core';

const HEADER_WINDOW = 'Try to scroll down the page to see the icon:';
const HEADER_ELEMENT = 'Try to scroll down inside the box to see the icon:';

@Component({
  selector: 'app-root',
  template: `
  <p>{{header}}</p>
  <div id="my-scrolling-element-id"
    [ngClass]="{'element': isElement}">
    <long-list></long-list>
  </div>
  <scrolltop
    [bottom]="iconBottom"
    [background]="iconColor"
    [fill]="iconFill"
    [size]="iconSize"
    [sizeInner]="iconSizeInner"
    [elementId]="elementId">
  </scrolltop>
    `,
    styles: [`
  li {
    line-height: 2em;
  }
  div.element {
    height: 80vh;
    overflow-y: scroll;
    border: 1px solid gray;
  }
  button {
    font-size: 130%;
    padding: 10px;
    background-color: #007bff;
  }
  button:hover {
    cursor: pointer;
  }
    `],
})

export class AppComponent {
  title = 'scrolltwo';
  which = 'window';

  get isElement() { return this.which === 'element'; }
  get iconBottom() {
    return this.isElement ? '45px' : '12px';
  }
  get iconColor() {
    return this.isElement ? 'yellow' : '#333';
  }
  get iconFill() {
    return this.isElement ? 'red' : 'white';
  }
  get iconSize() {
    return this.isElement ? '60px' : '48px';
  }
  get iconSizeInner() {
    return this.isElement ? '32' : '24';
  }
  get elementId() {
    return this.isElement ? 'my-scrolling-element-id' : '';
  }
  get header() {
    return this.isElement ? HEADER_ELEMENT : HEADER_WINDOW;
  }
  constructor() { }
  toggle() {
    this.which = this.isElement ? 'window' : 'element';
  }
}
This code above creates the page’s structure and function, the first deals with the page structure and stylings. The other defines the icon settings and expected behavior, i.e., we want it to scroll the page to the top.
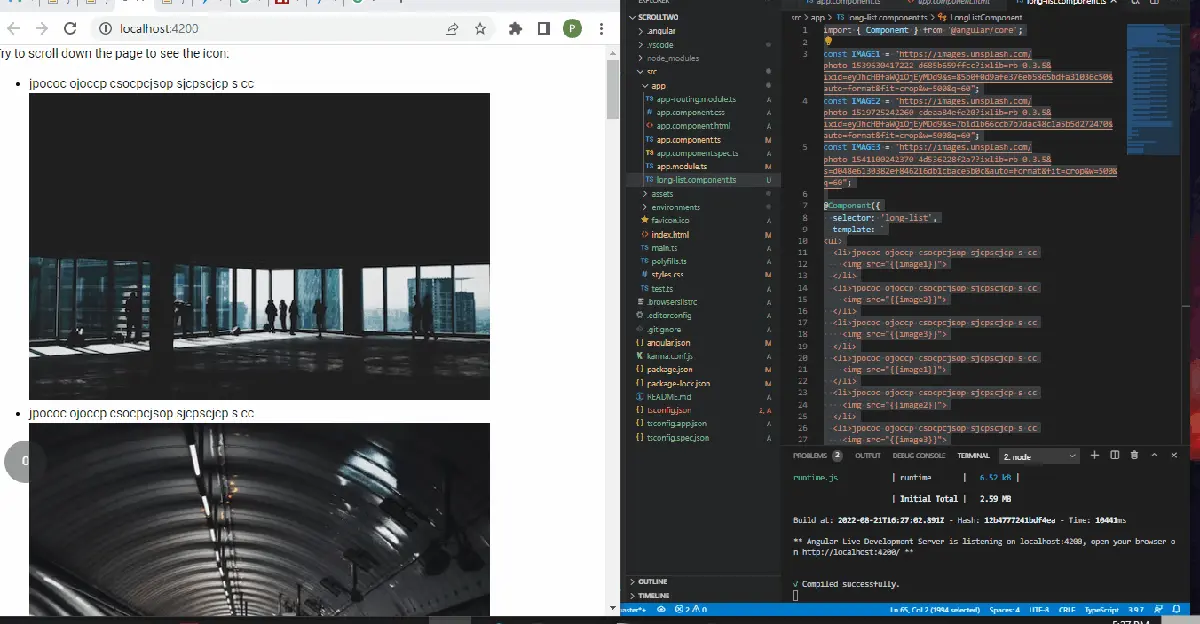
Having defined the function into the 'window' component, we then use to toggle() function to activate the icon. Next, we create content that will be long enough to enable us to scroll through the page, and we want to use images, so we will create a new file and name it long-list.component.ts.
Code Snippet - long-list.component.ts:
import { Component } from '@angular/core';

const IMAGE1 = "https://images.unsplash.com/photo-1539630417222-d685b659ffcc?ixlib=rb-0.3.5&ixid=eyJhcHBfaWQiOjEyMDd9&s=85b0f0d9afe376eb5865bdfa31036c50&auto=format&fit=crop&w=500&q=60";
const IMAGE2 = "https://images.unsplash.com/photo-1519725242260-cdeaa84efe20?ixlib=rb-0.3.5&ixid=eyJhcHBfaWQiOjEyMDd9&s=7b1d1b66ccb7b7dac48c1a5b5d272470&auto=format&fit=crop&w=500&q=60";
const IMAGE3 = "https://images.unsplash.com/photo-1541100242370-4d536228f2a7?ixlib=rb-0.3.5&s=d048e6130382ef846216db1cbace5b0c&auto=format&fit=crop&w=500&q=60";

@Component({
  selector: 'long-list',
  template: `
<ul>
  <li>jpococ ojoccp csocpcjsop sjcpscjcp s cc
    <img src="{{image1}}">
  </li>
  <li>jpococ ojoccp csocpcjsop sjcpscjcp s cc
    <img src="{{image2}}">
  </li>
  <li>jpococ ojoccp csocpcjsop sjcpscjcp s cc
    <img src="{{image3}}">
  </li>
  <li>jpococ ojoccp csocpcjsop sjcpscjcp s cc
    <img src="{{image1}}">
  </li>
  <li>jpococ ojoccp csocpcjsop sjcpscjcp s cc
    <img src="{{image2}}">
  </li>
  <li>jpococ ojoccp csocpcjsop sjcpscjcp s cc
    <img src="{{image3}}">
  </li>
  <li>jpococ ojoccp csocpcjsop sjcpscjcp s cc
    <img src="{{image1}}">
  </li>
  <li>jpococ ojoccp csocpcjsop sjcpscjcp s cc
    <img src="{{image2}}">
  </li>
  <li>jpococ ojoccp csocpcjsop sjcpscjcp s cc
    <img src="{{image3}}">
  </li>
  <li>jpococ ojoccp csocpcjsop sjcpscjcp s cc
    <img src="{{image1}}">
  </li>
  <li>jpococ ojoccp csocpcjsop sjcpscjcp s cc
    <img src="{{image2}}">
  </li>
  <li>jpococ ojoccp csocpcjsop sjcpscjcp s cc
    <img src="{{image3}}">
  </li>
  <li>jpococ ojoccp csocpcjsop sjcpscjcp s cc</li>
  <li>jpococ ojoccp csocpcjsop sjcpscjcp s cc</li>
  <li>jpococ ojoccp csocpcjsop sjcpscjcp s cc</li>
</ul>
  `,
  styles: [`
img {
  width: 80%;
}
  `],
})
export class LongListComponent {
  constructor() { }
  image1 = IMAGE1;
  image2 = IMAGE2;
  image3 = IMAGE3;
}
We are fetching the images from a web link. We start by defining the links and setting them up in an array.
You will notice we replicated the three images, and this is to make the webpage longer. We must import the necessary modules inside the app.module.ts file.
Code Snippet - app.module.ts:
import { NgModule } from '@angular/core';
import { BrowserModule } from '@angular/platform-browser';
import { BrowserAnimationsModule } from '@angular/platform-browser/animations';
import { NgScrolltopModule } from 'ng-scrolltop';
import { AppComponent } from './app.component';
import { LongListComponent } from './long-list.component';

@NgModule({
  imports: [
    BrowserModule,
    BrowserAnimationsModule,
    NgScrolltopModule,
  ],
  providers: [
  ],
  declarations: [
    AppComponent,
    LongListComponent,
  ],
  bootstrap: [AppComponent]
})
export class AppModule { }
Output:
ScrollTop Button With Bootstrap in AngularJs
We will create a new project, and inside the project directory, we will install the bootstrap package.
ng add @ng-bootstrap/ng-bootstrap
After successful installation, go to the app.component.html file to write the following.
Code Snippet- app.component.html:
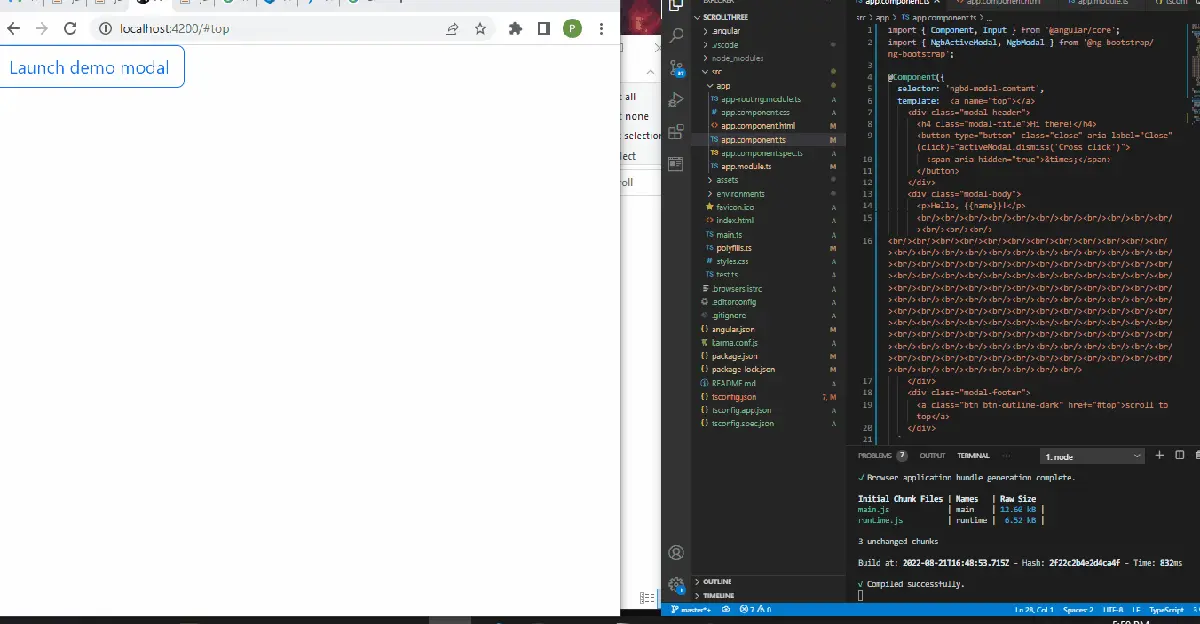
<button class="btn btn-lg btn-outline-primary" (click)="open()">Launch demo modal</button>
We are using the button class provided by bootstrap, so we have defined it here. Next, we navigate to the app.component.ts file to create structure and behavior for the button.
Code Snippet- app.component.ts:
import { Component, Input } from '@angular/core';
import { NgbActiveModal, NgbModal } from '@ng-bootstrap/ng-bootstrap';
@Component({
selector: 'ngbd-modal-content',
template: `<a name="top"></a>
<div class="modal-header">
<h4 class="modal-title">Hi there!</h4>
<button type="button" class="close" aria-label="Close" (click)="activeModal.dismiss('Cross click')">
<span aria-hidden="true">×</span>
</button>
</div>
<div class="modal-body">
<p>Hello, {{name}}!</p>
<br/><br/><br/><br/><br/><br/><br/><br/><br/><br/><br/><br/><br/><br/>
<br/><br/><br/><br/><br/><br/><br/><br/><br/><br/><br/><br/><br/><br/><br/><br/><br/><br/><br/><br/><br/><br/><br/><br/><br/><br/><br/><br/><br/><br/><br/><br/><br/><br/><br/><br/><br/><br/><br/><br/><br/><br/><br/><br/><br/><br/><br/><br/><br/><br/><br/><br/><br/><br/><br/><br/><br/><br/><br/><br/><br/><br/><br/><br/><br/><br/><br/><br/><br/><br/><br/><br/><br/><br/><br/><br/><br/><br/><br/><br/><br/><br/><br/><br/><br/><br/><br/><br/><br/><br/><br/><br/><br/><br/><br/><br/><br/><br/><br/><br/><br/><br/><br/><br/><br/><br/><br/><br/><br/><br/><br/><br/><br/><br/><br/><br/><br/><br/><br/><br/><br/><br/><br/><br/><br/><br/><br/><br/><br/><br/><br/><br/><br/><br/><br/><br/><br/><br/><br/><br/>
</div>
<div class="modal-footer">
<a class="btn btn-outline-dark" href="#top">scroll to top</a>
</div>
`
})
export class NgbdModalContent {
@Input() name;
constructor(public activeModal: NgbActiveModal) {}
}
@Component({
selector: 'app-root',
templateUrl: './app.component.html',
styleUrls: ['./app.component.css']
})
export class AppComponent {
title = 'scrollthree';
constructor(private modalService: NgbModal) {}
open() {
const modalRef = this.modalService.open(NgbdModalContent);
modalRef.componentInstance.name = 'World';
}
}
In the above code, we created the page structure, and because we want a long page to enable us to see the scroll in action, we added line breaks <br></br>. Next, we created a config for the open() function, which activates the button we created in the app.component.html file.
Then we go into the app.module.ts file to import the required modules.
Code Snippet- app.module.ts:
import { NgModule } from '@angular/core';
import { BrowserModule } from '@angular/platform-browser';
import { AppRoutingModule } from './app-routing.module';
import { AppComponent, NgbdModalContent } from './app.component';
import { NgbModule } from '@ng-bootstrap/ng-bootstrap';

@NgModule({
  declarations: [
    AppComponent, NgbdModalContent
  ],
  imports: [
    BrowserModule,
    AppRoutingModule,
    NgbModule
  ],
  providers: [],
  bootstrap: [AppComponent]
})
export class AppModule { }
Output:
Conclusion
It’s all about convenience with the scrollTo function. Since people can navigate wherever they want with the press of a button, it makes website users love to visit your site.

Fisayo is a tech expert and enthusiast who loves to solve problems, seek new challenges and aim to spread the knowledge of what she has learned across the globe.
LinkedIn