How to Update Array Values in React useState Hook
-
Update Array Values in React
useStateHook WithuseEffect -
Update Array Values in React
useStateHook With theonClickEvent -
Update Array Values in React
useStateHook With Mouse Events - Conclusion

For a programmer that wishes to create an extended list of options on her web app that customers will choose from, using the dropdown menu is one of the most efficient ways to do this. If we want a customer to choose from the list of 10 countries and use the radio button option, it will make the website look congested and render slower.
But the dropdown option makes the website looks simple; even for a list of 50 countries, users won’t even know such a list is embedded on the website until he clicks the option.
It also helps users to select the option they want accurately. They could also select their option quicker, as the dropdown menu allows for an alphabetical shortcut.
The flexibility of the React framework avails us of different but top-notch methods for carrying this out. Let us digest some of these methods.
Update Array Values in React useState Hook With useEffect
When we apply the useEffect function in React, it assists in transitioning the state of our component from its original state to another state.
In this example, when the page is rendered, that is the original state of the rendered component. Then when we click to pick an item from the dropdown, the component has moved to another state; that is the work of useEffect.
Now, we will move to the index.js file of our project folder and write these codes:
Code Snippet - index.js:
import React, { useState, useEffect } from "react";
import ReactDOM from "react-dom";
import './index.css';
import App from './App';
import reportWebVitals from './reportWebVitals';

const StateSelector = () => {
  const initialValue = [{ id: 0, value: " --- Select a State ---" }];

  const allowedState = [
    { id: 1, value: "Alabama" },
    { id: 2, value: "Georgia" },
    { id: 3, value: "Tennessee" }
  ];

  const [stateOptions, setStateValues] = useState(initialValue);

  console.log(initialValue.length);
  useEffect(() => {
    setStateValues(allowedState);
  }, []);

  return (
    <div>
      <label>Select a State:</label>
      <select>
        {stateOptions.map((localState, index) => (
          <option key={localState.id}>{localState.value}</option>
        ))}
      </select>
    </div>
  );
};

const rootElement = document.getElementById("root");
ReactDOM.render(<StateSelector />, rootElement);
Output:
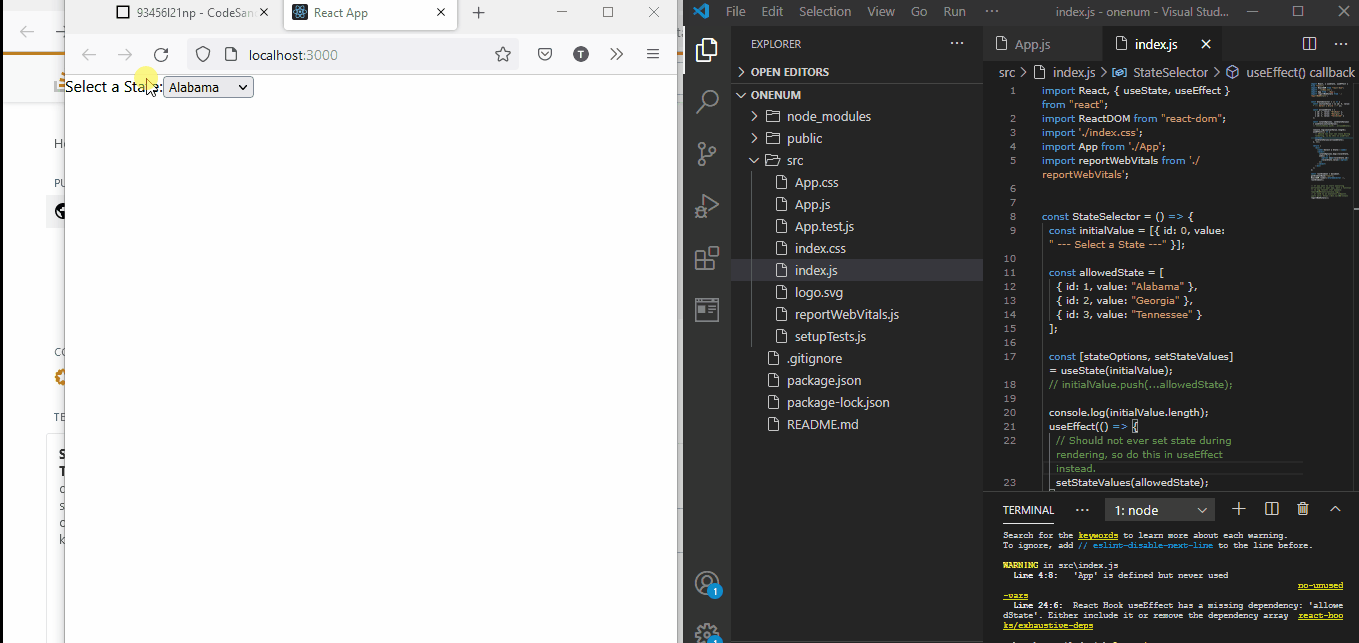
This example shows that the original page is rendered and displays Select a State. The lists in the dropdown are the new states we want the component to move through.
That is where we then define this instruction when we assign the useEffect to set the state of the value of the allowedState array.
Update Array Values in React useState Hook With the onClick Event
This method utilizes the onClick event listener to move the component from its initial state, Choose One, to a new state.
To begin, we need to create a new file, Dropdown.js, inside the src folder of our project folder. This is where we will define the function of the onClick event listener.
We then open the Dropdown.js file in our editor and write some codes:
Code Snippet - Dropdown.js:
import { useState } from "react";

function Dropdown({ selected, setSelected }) {
  const [isActive, setIsActive] = useState(false);
  const options = ["Me", "You", "Us"];
  return (
    <div className="dropdown">
      <div className="dropdown-btn" onClick={(e) => setIsActive(!isActive)}>
        {selected}
        <span className="fas fa-caret-down"></span>
      </div>
      {isActive && (
        <div className="dropdown-content">
          {options.map((option) => (
            <div
              onClick={(e) => {
                setSelected(option);
                setIsActive(false);
              }}
              className="dropdown-item"
            >
              {option}
            </div>
          ))}
        </div>
      )}
    </div>
  );
}

export default Dropdown;
The moment we click on the dropdown, the onClick becomes active and immediately accesses the option component that we have mapped to the event listener.
Next, we need to import the Dropdown.js file into the App.js of our project folder so that it can get rendered.
Code Snippet - App.js
import "./App.css";
import Dropdown from "./Dropdown";
import { useState } from "react";

export default function App() {
  const [selected, setSelected] = useState("Choose One");
  return (
    <div className="App">
      <Dropdown selected={selected} setSelected={setSelected} />
      <br />
      <br />
      <br />
      {selected}
    </div>
  );
}
Output:
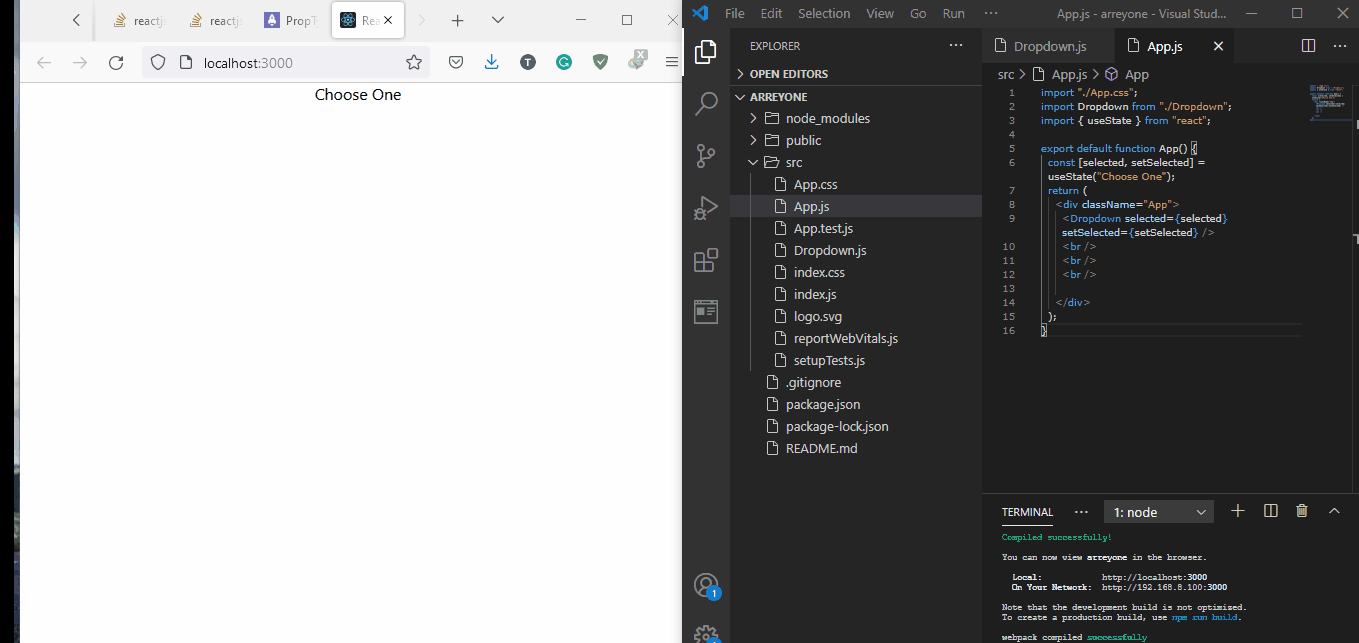
Here, we imported Dropdown and set the initial state of our component to Choose One. This is what the onClick event listener updates when it becomes active.
Then we wrap the Dropdown inside the App div so it can get rendered.
Update Array Values in React useState Hook With Mouse Events
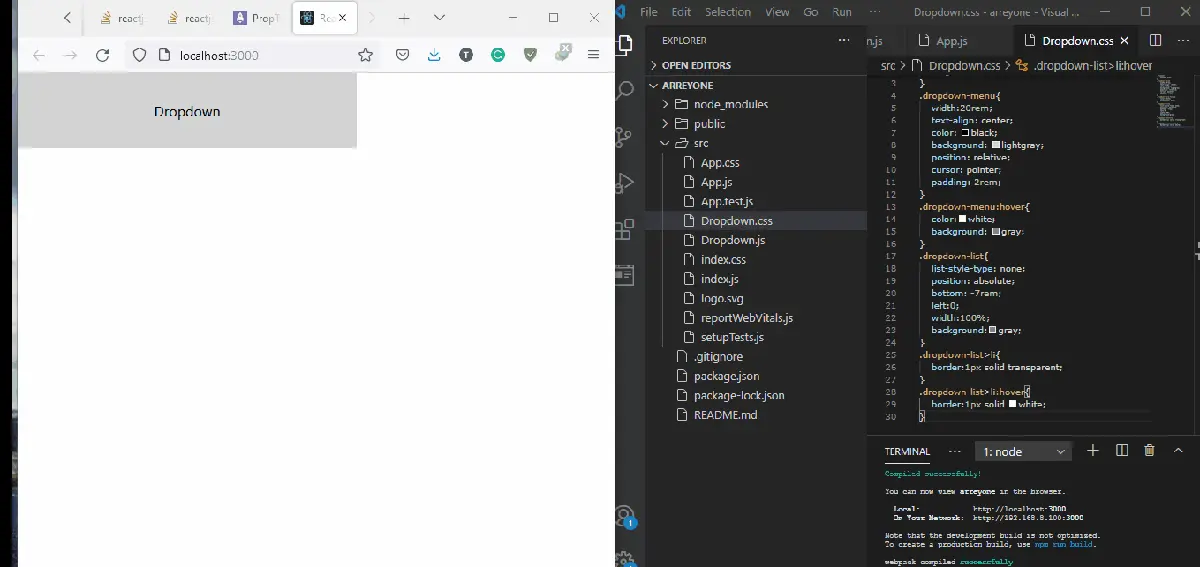
This method causes our web app to look and function in a sleek manner. The user only has to hover the mouse over the dropdown menu, and the list is displayed.
We will apply the onMouseEnter and the onMouseLeave events in this example. After creating a new project folder, we will create two files inside the src folder: dropdown.js and dropdown.css.
Inside the dropdown.js file, we will write these codes:
Code Snippet - Dropdown.js
import React, { useState } from 'react'
import './Dropdown.css';

function Dropdown() {
    const [state, setstate] = useState(false);
    const showDropdown=()=>{
        setstate(true);
    }
    const hideDropdown=()=>{
        setstate(false);
    }

    return (
        <div className="dropdown">
        <div className="dropdown-menu" onMouseEnter={showDropdown} onMouseLeave={hideDropdown}>
            Dropdown

            {state ?( <ul className="dropdown-list" onMouseEnter={showDropdown}>
                <li>1st Value</li>
                <li>2nd Value</li>
                <li>3rd Value</li>
                <li>4th Value</li>
                </ul>):
                null}
        </div>
        </div>
    )
}
export default Dropdown;
We declared the mouse events in this file, onMouseEnter, and we declared that it shows the items in the dropdown by assigning the event to showDropdown. We did the same to onMouseLeave so that once we move the mouse away from the dropdown menu, the listed items are hidden.
Then we need to import Dropdown into the App.js file and wrap it inside the App div. Doing this will cause our component to render.
Code Snippet - App.js:
import React from 'react';
import Dropdown from './Dropdown';

function App() {
    return (
        <div>
            <Dropdown/>
        </div>
    )
}
To create some stylings on the webpage, we can apply the CSS below:
.dropdown {
    height: 2rem;
}
.dropdown-menu{
    width:20rem;
    text-align: center;
    color: black;
    background: lightgray;
    position: relative;
    cursor: pointer;
    padding: 2rem;
}
.dropdown-menu:hover{
    color:white;
    background: gray;
}
.dropdown-list{
    list-style-type: none;
    position: absolute;
    bottom: -7rem;
    left:0;
    width:100%;
    background:gray;
}
.dropdown-list>li{
    border:1px solid transparent;
}
.dropdown-list>li:hover{
    border:1px solid white;
}
Output:
Conclusion
There is no doubt as to the importance and effectiveness of utilizing the dropdown function in React. A well-designed dropdown makes our web app pleasing to the eye while it loads at optimum speed as the contents in the dropdown are not loaded on the webpage but hidden behind a function.

Fisayo is a tech expert and enthusiast who loves to solve problems, seek new challenges and aim to spread the knowledge of what she has learned across the globe.
LinkedIn