How to Use Multiprocessing on a Pandas DataFrame
- Introduction to Multiprocessing
- Importance of Using Multiprocessing
- Use Multiprocessing on a Pandas DataFrame

This tutorial introduces multiprocessing in Python and educates about it using code examples and graphical representations. It also highlights the importance of multiprocessing and demonstrates how to use the multiprocessing module with a Pandas dataframe.
Introduction to Multiprocessing
Multiprocessing means having the ability of the system to support multiple processors at the same time. In multiprocessing, applications are split up into smaller routines that can run independently or less independently.
The operating system will allocate these threads to different processors, improving the system’s performance. How? Let’s understand it via the following simple program.
Example Code:
import time

start = time.perf_counter()


def print_something():
    print("Sleeping for 1 second.")
    time.sleep(1)
    print("Done with sleeping.")


print_something()
finish = time.perf_counter()
print(f"Completed in {round(finish-start,2)} second(s)")
OUTPUT:
Sleeping for 1 second.
Done with sleeping.
Completed in 1.01 second(s)
The above output sounds right because, in the code fence, we first imported the time module, which we will use to measure how long it takes the script to run. To measure that, we calculated the start and finish time using start = time.perf_counter() and finish = time.perf_counter().
We also have a function named print_something() that prints something, sleeps for one second, and prints another statement. We call this function and finally print the last statement showing that we have completed the script.
Now, if we run print_something() twice, it will take almost two seconds. You may check that below.
Example Code:
import time

start = time.perf_counter()


def print_something():
    print("Sleeping for 1 second.")
    time.sleep(1)
    print("Done with sleeping.")


print_something()
print_something()

finish = time.perf_counter()
print(f"Completed in {round(finish-start,2)} second(s)")
OUTPUT:
Sleeping for 1 second.
Done with sleeping.
Sleeping for 1 second.
Done with sleeping.
Completed in 2.02 second(s)
Now, the program is sleeping for one second twice, so it takes almost two seconds to finish the script.
So, we can see that each time we run this print_something() function, it adds about one second to the script. Our script is just waiting around sleeping for a second, and then, it moves on to the next function and sits around waiting for another second.
Then, at that point, we’re done, and our script finishes. We can understand it via the following graphical representation.
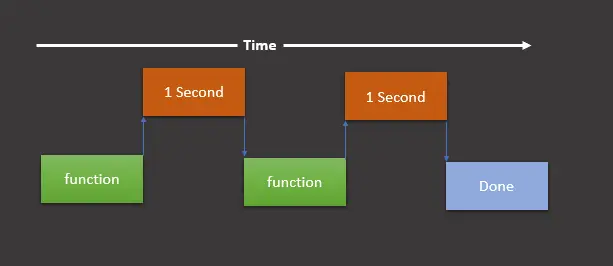
This graphical representation shows that we run a function (it is print_something() in our case), wait for one second, run the function again, then wait for another second, and once that’s done, it prints the final print statement demonstrating that we are done.
As presented in the above graphical representation, executing the script in this order is called running synchronously.
Now, if we have some task that does not need to be run synchronously, then we can use the multiprocessing module to split these tasks onto the other CPUs and run them simultaneously.
Remember, multithreading is not the same as multiprocessing. You may find the difference here.
The graphical representation will look as follows if we are supposed to use the multiprocessing module.
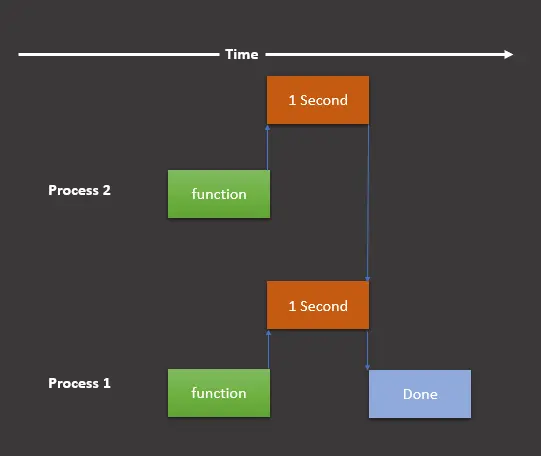
Here, we still have two tasks but break this up into two processes that run simultaneously on different processes. Now, let’s implement this graphical representation in our program as follows:
import multiprocessing
import time


start = time.perf_counter()


def print_something():
    print("Sleeping for 1 second.")
    time.sleep(1)
    print("Done with sleeping.")


process1 = multiprocessing.Process(target=print_something)
process2 = multiprocessing.Process(target=print_something)

process1.start()
process2.start()

process1.join()
process2.join()

finish = time.perf_counter()
print(f"Completed in {round(finish-start,2)} second(s)")
OUTPUT:
Sleeping for 1 second.
Done with sleeping.
Sleeping for 1 second.
Done with sleeping.
Completed in 1.02 second(s)
As we can see now, the script is taking one second instead of two. The script above is similar to the previous one except for a few modifications.
We imported the multiprocessing module, which we will use to create processes. Then, we make two processes using multiprocessing.Process(target=print_something) and save them into process1 and process2.
After that, we start both of these processes using process1.start() and process2.start(). We used the .join() method to avoid running the rest of our script before finishing the processes.
It means if we omit the .join() method, it will execute the following two statements before finishing the processes:
finish = time.perf_counter()
print(f"Completed in {round(finish-start,2)} second(s)")
We can learn it by using the following example code:
import multiprocessing
import time


start = time.perf_counter()


def print_something():
    print("Sleeping for 1 second.")
    time.sleep(1)
    print("Done with sleeping.")


process1 = multiprocessing.Process(target=print_something)
process2 = multiprocessing.Process(target=print_something)

process1.start()
process2.start()

# process1.join()
# process2.join()

finish = time.perf_counter()
print(f"Completed in {round(finish-start,2)} second(s)")
OUTPUT:
Completed in 0.01 second(s)
Sleeping for 1 second.
Done with sleeping.
Sleeping for 1 second.
Done with sleeping.
As we can see, it prints the Completed statement before the Sleeping and Done statements. To avoid that, we can use the .join() method.
Importance of Using Multiprocessing
Suppose we have a machine (PC/Laptop) with one processor. If we assign multiple processes to it simultaneously, it will have to disturb or interrupt every task and switch from one to another to keep running all processes.
This is where the concept of multiprocessing comes into the picture. A multiprocessing computer can have multiple central processors (multiprocessor) or one computing component with two or more independent actual processing units known as cores (multi-core processors).
Here, the CPU will easily run multiple tasks simultaneously, where each task will be using its process. In this way, we will speed up our program and save a lot of time and cost.
Use Multiprocessing on a Pandas DataFrame
We have enough knowledge about the multiprocessing module, its basic use, and its importance. Let’s learn how we can use this module with data frames.
-
Import the libraries and modules.
First, import all the necessary modules and libraries.
import pandas as pd from geopy.distance import geodesic from itertools import combinations import multiprocessing as mp -
Create a data frame.
We create a data frame containing the
serial_number,column_name,lat, andloncolumns and their values.df = pd.DataFrame( { "serial_number": [1, 2, 3, 4, 5, 6, 7, 8, 9, 0], "column_name": ["aa", "aa", "aa", "bb", "bb", "bb", "bb", "cc", "cc", "cc"], "lat": [1, 2, 3, 4, 5, 6, 7, 8, 9, 10], "lon": [21, 22, 23, 24, 25, 26, 27, 28, 29, 30], } ) -
Split the tasks.
We split the task between processes, probably sending every tuple
(grp, lst)to a separate process. The following lines of code do the same:grp_lst_args = list(df.groupby("column_name").groups.items()) print(grp_lst_args) # [('aa', [0, 1, 2]), ('cc', [7, 8, 9]), ('bb', [3, 4, 5, 6])]After that, we send each tuple as an argument to a function (
calc_dist()in this case) in a separate process. Let’s look at that below. -
Send the list of tuples to a function.
The
calc_dist()takes alisttype parameter to calculate the distance and returns it as a data frame. Note thatpd.DataFrame()is used to convert to a data frame.Here, the list contains three tuples
[('aa', [0, 1, 2]), ('cc', [7, 8, 9]), ('bb', [3, 4, 5, 6])]that we created in the previous.def calc_dist(arg): grp, lst = arg return pd.DataFrame( [ [ grp, df.loc[c[0]].serial_number, df.loc[c[1]].serial_number, geodesic(df.loc[c[0], ["lat", "lon"]], df.loc[c[1], ["lat", "lon"]]), ] for c in combinations(lst, 2) ], columns=["column_name", "machine_A", "machine_B", "Distance"], ) -
Implement multiprocessing.
At this point, we will use multiprocessing to simultaneously call the
calc_dist()function for each tuple. In the following code, we usePool()for parallel execution of thecalc_dist()function for each tuple.pool = mp.Pool(processes=(mp.cpu_count() - 1)) results = pool.map(calc_dist, grp_lst_args) pool.close() pool.join() results_df = pd.concat(results)
The complete source code is given below:
import pandas as pd
from geopy.distance import geodesic
from itertools import combinations
import multiprocessing as mp
df = pd.DataFrame(
    {
        "serial_number": [1, 2, 3, 4, 5, 6, 7, 8, 9, 0],
        "column_name": ["aa", "aa", "aa", "bb", "bb", "bb", "bb", "cc", "cc", "cc"],
        "lat": [1, 2, 3, 4, 5, 6, 7, 8, 9, 10],
        "lon": [21, 22, 23, 24, 25, 26, 27, 28, 29, 30],
    }
)
grp_lst_args = list(df.groupby("column_name").groups.items())
print(grp_lst_args)
# [('aa', [0, 1, 2]), ('cc', [7, 8, 9]), ('bb', [3, 4, 5, 6])]
def calc_dist(arg):
    grp, lst = arg
    return pd.DataFrame(
        [
            [
                grp,
                df.loc[c[0]].serial_number,
                df.loc[c[1]].serial_number,
                geodesic(df.loc[c[0], ["lat", "lon"]], df.loc[c[1], ["lat", "lon"]]),
            ]
            for c in combinations(lst, 2)
        ],
        columns=["column_name", "machine_A", "machine_B", "Distance"],
    )
pool = mp.Pool(processes=(mp.cpu_count() - 1))
results = pool.map(calc_dist, grp_lst_args)
pool.close()
pool.join()
results_df = pd.concat(results)
results_df
OUTPUT:
|      | column_name | machine_A | machine_B | Distance              |
| ---- | ----------- | --------- | --------- | --------------------- |
| 0    | aa          | 1         | 2         | 156.87614940188664 km |
| 1    | aa          | 1         | 3         | 313.70544546930296 km |
| 2    | aa          | 2         | 3         | 156.82932911607335 km |
| 0    | bb          | 4         | 5         | 156.66564184752647 km |
| 1    | bb          | 4         | 6         | 313.21433304645853 km |
| 2    | bb          | 4         | 7         | 469.6225353706956 km  |
| 3    | bb          | 5         | 6         | 156.54889742502786 km |
| 4    | bb          | 5         | 7         | 312.95759748703733 km |
| 5    | bb          | 6         | 7         | 156.40899678081678 km |
| 0    | cc          | 8         | 9         | 156.0601654009819 km  |
| 1    | cc          | 8         | 0         | 311.91099818906036 km |
| 2    | cc          | 9         | 0         | 155.85149814424545 km |
