How to Press Any Key to Continue in PowerShell
-
Use
ReadKey (System.Console)to Enable thepress any key to continuein the PowerShell -
Use
ReadKey (Console)to Enable thepress any key to continuein the PowerShell -
Use
ReadKey (RawUI)to Enable thepress any key to continuein the PowerShell -
Use
Read-Hostto Enable thepress any key to continuein the PowerShell -
Use the
cmd /c 'pause'Command to Enable thepress any key to continuein the PowerShell -
Use
timeoutto Enable thepress any key to continuein the PowerShell - Conclusion

In PowerShell scripting, enabling a press any key to continue functionality is a common requirement, especially when creating interactive command-line applications or providing feedback to users. Several methods exist to achieve this functionality, each with its own advantages and use cases.
This article explores various methods for implementing the press any key to continue feature in PowerShell scripts, ranging from built-in cmdlets to leveraging external commands and COM objects.
Use ReadKey (System.Console) to Enable the press any key to continue in the PowerShell
The [System.Console]::ReadKey() method in PowerShell is used to read the next key or function key pressed by the user from the standard input stream (typically the keyboard). When called without any arguments, this method waits for the user to press a key and returns an object of type [System.ConsoleKeyInfo], which represents the key pressed.
The System.Console ReadKey can be executed as shown below. It accepts any key except Shift, Alt, Ctrl, and other modifier keys.
$keyInfo = [System.Console]::ReadKey($true)
Write-Host "Key Pressed: $($keyInfo.KeyChar)"
In the line of code $keyInfo = [System.Console]::ReadKey($true), we are utilizing the [System.Console]::ReadKey() method to capture user input. By passing $true as an argument, we indicate that the pressed key should not be displayed in the console window.
This prevents the console from cluttering with unnecessary characters, providing a cleaner user experience. To display the output of $keyInfo, we can access its properties using dot notation.
Output:

Use ReadKey (Console) to Enable the press any key to continue in the PowerShell
You can use the [Console]::ReadKey() to enable the press any key to continue in the PowerShell. It can read keys and modifiers while pausing the execution. It excludes Shift, Alt, Ctrl, and other modifier keys.
$keyInfo = [Console]::ReadKey()
In the line $keyInfo = [Console]::ReadKey(), we utilize the [Console]::ReadKey() method to capture user input. This method waits for the user to press a key and returns an object representing the key pressed, storing it in the variable $keyInfo.
Output:

Use ReadKey (RawUI) to Enable the press any key to continue in the PowerShell
The $Host.UI.RawUI.ReadKey() method in PowerShell is used to read the next key or function key pressed by the user from the console input. When called, this method waits for the user to press a key and returns an object representing the key pressed.
This object contains properties such as Character, representing the Unicode character of the key pressed, and KeyDown, indicating whether the key was pressed down.
This method is similar to the [Console]::ReadKey(). It accepts any key, including Ctrl, Shift, Alt, and other modifier keys.
There are different ReadKeyOptions that can be passed in the RawUI ReadKey method, such as IncludeKeyDown, IncludeKeyUp, NoEcho, and AllowCtrlC.
Example:
$keyInfo = $Host.UI.RawUI.ReadKey()
In this example, we use $Host.UI.RawUI.ReadKey() to capture the key pressed by the user and store it in the $keyInfo variable. This method waits for the user to press a key and returns an object representing the key pressed.
The $keyInfo object contains properties such as Character (representing the character of the key pressed) and KeyDown (indicating whether the key was pressed down).
Output:

Use Read-Host to Enable the press any key to continue in the PowerShell
The Read-Host cmdlet in PowerShell is a versatile tool used to capture user input from the console window. Its primary purpose is to display a prompt message to the user and wait for them to input a value, which is then stored in a variable for further processing within the script.
Example:
Read-Host -Prompt "Press any key to continue"
In this example, we use Read-Host with the -Prompt parameter to display the message "Press any key to continue..." to the user. The script pauses execution at this point, waiting for the user to input any text followed by the Enter key.
Although it’s not exactly press any key, this method achieves a similar outcome by requiring user input before proceeding.
Output:

Use the cmd /c 'pause' Command to Enable the press any key to continue in the PowerShell
In PowerShell scripting, the cmd /c 'pause' method provides a simple way to pause script execution and wait for user acknowledgment before proceeding further. This method leverages the cmd command to execute the pause command from the Command Prompt within a PowerShell script.
When executed, the pause command displays the message "Press any key to continue . . ." and waits for the user to press any key before allowing the script to continue execution.
Example:
cmd /c pause
In this example, we use the cmd /c 'pause' command to pause script execution and wait for user input. When executed, the Command Prompt window displays the message "Press any key to continue . . ." and waits for the user to press any key before allowing the script to continue.
Output:

Use timeout to Enable the press any key to continue in the PowerShell
The timeout command can pause the execution for a specific period of time or infinite time. You can use the /t option to specify the time in seconds.
The valid value of the specified timeout ranges from -1 to 99999.
Example:
timeout /t 5
In this example, we use the timeout command to pause script execution for 5 seconds. This effectively creates a prompt for the user to wait for 5 seconds before proceeding.
Output:

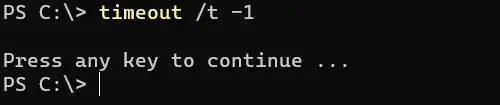
The -1 value is used to pause the execution for an infinite amount of time if a key is not pressed.
timeout /t -1
Output:
Conclusion
Implementing the press any key to continue feature in PowerShell scripts is essential for creating interactive and user-friendly command-line applications. By utilizing methods like [System.Console]::ReadKey(), [Console]::ReadKey(), Read-Host, cmd /c 'pause', timeout, and WScript.Shell Popup, script authors can provide users with clear prompts and pause execution until user acknowledgment.
Each method offers unique capabilities and can be tailored to suit specific requirements, ensuring a seamless user experience and enhanced script interactivity. Whether displaying informative messages, confirming actions, or creating interactive utilities, PowerShell offers versatile tools to meet diverse scripting needs.