How to Parse XML Files Using PowerShell
-
Use the
Select-Xmlto Parse XML Files Using PowerShell -
Use the
System.Xml.XmlDocumentClass to Parse XML Files Using PowerShell -
Use the
System.Xml.XmlTextReaderClass to Parse XML Files Using PowerShell - Conclusion

The Extensible Markup Language or XML format is still widely used today. Configuration files, RSS feeds, and Office files are just a few examples that use the XML format.
Parsing XML in PowerShell is a common task, often required for tasks such as data extraction, configuration management, and automation. While PowerShell offers several methods for parsing XML, each method has its strengths and use cases.
In this article, we’ll explore three methods for parsing XML in PowerShell: using the Select-Xml cmdlet, the System.Xml.XmlDocument class, and the System.Xml.XmlTextReader class. We’ll provide detailed examples and explanations for each method, highlighting their syntax, functionality, and practical applications.
Use the Select-Xml to Parse XML Files Using PowerShell
Parse PowerShell XML Elements
First, let us cover one of the most popular and easiest ways to use PowerShell to parse XML with Select-XML. The Select-Xml PowerShell command allows us to supply an XML file or string and an XPath filter to pull out specific information.
We have an XML file on many PCs that we’d like to parse with PowerShell. For example, each machine has a name, an IP address, and an Include element that can be used in a report.
Example XML:
<Computers>
	<Computer>
		<Name>WINPC-01</Name>
		<Ip>127.0.0.1</Ip>
		<Include>true</Include>
	</Computer>
	<Computer>
		<Name>WINPC-02</Name>
		<Ip>192.168.1.105</Ip>
		<Include>false</Include>
	</Computer>
	<Computer>
		<Name>WINPC-03</Name>
		<Ip>192.168.1.104</Ip>
		<Include>true</Include>
	</Computer>
</Computers>
We want to use PowerShell to parse this XML file and get the computer names. To do that, we could use the Select-XML command.
For example, in the file above, the computer names appear in the inner text (InnerXML) of the Name element.
We would first provide the appropriate XPath to find the computer names. Only the Name nodes contained in the Computer elements would be returned using this XPath technique.
Example Code:
Select-Xml -Path sample.xml -XPath '/Computers/Computer/Name' | ForEach-Object { $_.Node.InnerXML }
We use Select-Xml to search the XML file located at C:\path\sample.xml for nodes matching the XPath expression '/Computers/Computer/Name'. This XPath expression instructs PowerShell to select all <Name> elements within each <Computer> element under the <Computers> root node.
We then utilize the ForEach-Object cmdlet to iterate over the results returned by the Select-Xml cmdlet. Within this loop, we access each matched node’s InnerXML property.
This property contains the inner text content of the XML element, allowing us to extract the desired data.
Output:

Parse PowerShell XML Attributes
Now, let’s take a new approach to locating computer names. Instead of being represented by XML elements, computer descriptors are directly expressed by XML attributes.
Below is an example XML file with computer descriptors represented with attributes. We can now see each descriptor as an attribute rather than an element.
Example XML:
<Computers>
	<Computer name="WINPC-01" ip="127.0.0.1" include="true" />
	<Computer name="WINPC-02" ip="192.168.1.104" include="false" />
	<Computer name="WINPC-03" ip="192.168.1.105" include="true" />
</Computers>
Since each descriptor is an attribute, tweak the XPath only to find the Computer elements. Then, using a ForEach-Object cmdlet, find the name attribute’s value.
Example Code:
Select-Xml -Path sample.xml -XPath '/Computers/Computer' | ForEach-Object { $_.Node.name }
We useSelect-Xml to search the XML file located at C:\path\computers-attr.xml for nodes matching the XPath expression '/Computers/Computer'. This XPath expression selects all <Computer> elements under the <Computers> root node.
We then utilize the ForEach-Object cmdlet to iterate over the results; within the loop, we access each matched node’s name property. This property represents the value of the name attribute of each <Computer> element.
Output:

Whether we are reading elements or attributes, the syntax of Select-Xml is cumbersome: it forces us to use the XPath parameter, then pipe the result to a loop, and finally look for the data under the Node property.
Use the System.Xml.XmlDocument Class to Parse XML Files Using PowerShell
The System.Xml.XmlDocument class for parsing XML in PowerShell offers a versatile and effective solution for handling XML data, making it a valuable tool for various automation tasks, data processing, and configuration management scenarios.
This method involves creating an instance of the XmlDocument class, loading the XML content into the document object, and then navigating through the document’s nodes to access the desired data.
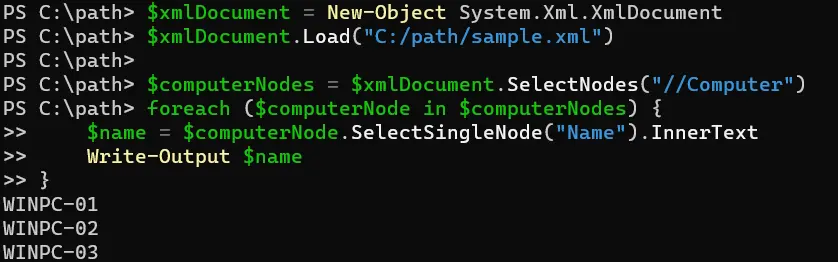
Example Code:
$xmlDocument = New-Object System.Xml.XmlDocument
$xmlDocument.Load("sample.xml")

$computerNodes = $xmlDocument.SelectNodes("//Computer")
foreach ($computerNode in $computerNodes) {
    $name = $computerNode.SelectSingleNode("Name").InnerText
    Write-Output $name
}
In this code snippet, we create a new instance of the System.Xml.XmlDocument class using New-Object. We then load the XML content from the file C:\path\computers.xml into the $xmlDocument object using the Load method.
We use the SelectNodes method to retrieve all <Computer> elements in the XML document.
Then, we iterate over each <Computer> node using a foreach loop. Within the loop, we use SelectSingleNode to find the <Name> element inside each <Computer> node and extract its inner text using the InnerText property.
Finally, we output the computer names using Write-Output.
Output:
Use the System.Xml.XmlTextReader Class to Parse XML Files Using PowerShell
Parsing XML in PowerShell using the System.Xml.XmlTextReader class offers a straightforward and memory-efficient method to process XML data. This class provides a forward-only, read-only stream that parses XML data efficiently without loading the entire document into memory.
By utilizing the XmlTextReader, PowerShell scripts can efficiently extract specific elements or attributes from XML documents, enabling tasks such as data extraction, configuration management, and automation.
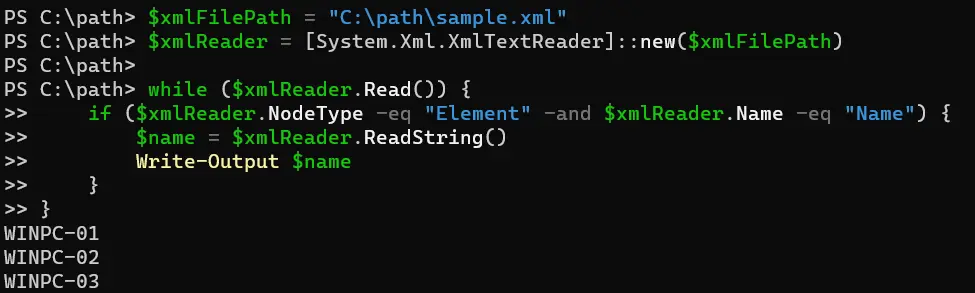
Example Code:
$xmlFilePath = "sample.xml"
$xmlReader = [System.Xml.XmlTextReader]::new($xmlFilePath)

while ($xmlReader.Read()) {
    if ($xmlReader.NodeType -eq "Element" -and $xmlReader.Name -eq "Name") {
        $name = $xmlReader.ReadString()
        Write-Output $name
    }
}
In this code snippet, we specify the path to the XML file using the $xmlFilePath variable. We then create a new instance of the System.Xml.XmlTextReader class and initialize it with the XML content from the file specified by $xmlFilePath.
We use a while loop to iterate through the XML content using the Read method of the XmlTextReader class. Within the loop, we check if the current node type is an element and if its name is Name.
If both conditions are met, we use the ReadString method to extract the inner text of the <Name> element and output it using Write-Output.
Output:
Conclusion
Parsing XML in PowerShell is a versatile and essential skill for many automation and data processing tasks. By understanding the various methods available, such as Select-Xml, System.Xml.XmlDocument, and System.Xml.XmlTextReader, PowerShell users can efficiently extract and manipulate data from XML documents to suit their needs.
Whether parsing elements or attributes, each method offers its advantages, allowing PowerShell scripts to handle XML data effectively. By leveraging these parsing techniques, PowerShell users can streamline their workflows and achieve their automation goals more efficiently.

Marion specializes in anything Microsoft-related and always tries to work and apply code in an IT infrastructure.
LinkedIn