How to Copy Files Over the Network in PowerShell
-
Use
Copy-ItemCmdlet to Copy Files to Network Share in PowerShell -
Use
Robocopyto Copy Files Over the Network in PowerShell

PowerShell is a powerful tool that lets you perform different file and folder operations from its command-line interface. You can create, rename, copy, move, delete, and view files and folders with PowerShell.
Copying files is one of the essential features available in PowerShell. You can easily copy files and folders from one location to another using PowerShell.
Selecting and manually copying files can be time-consuming when there are many files to copy. Instead, you can run the PowerShell script and wait for the copying process to complete.
This tutorial will teach you to copy local files to a network share using PowerShell.
Use Copy-Item Cmdlet to Copy Files to Network Share in PowerShell
The Copy-Item is a popular cmdlet used in PowerShell for copying files from one location to another. It does not delete the original file that is being copied.
The following command copies the process.txt file to the \\DelftStack\record directory in the network share.
Copy-Item C:\New\process.txt -Destination \\DelftStack\record
You can verify whether the file is copied using the command below.
Get-Item \\DelftStack\record\process.txt
Output:
Directory: \\DelftStack\record


Mode                 LastWriteTime         Length Name
----                 -------------         ------ ----
-a----        21-01-2022     17:47          70920 process.txt
The process.txt is present in the destination directory, which means it is successfully copied to the specified location.
The Copy-Item also allows you to rename the file name while copying. To rename the file, you must specify a new name to the -Destination parameter.
For example, this command copies the process.txt file and renames it to newprocess.txt in the destination directory.
Copy-Item C:\New\process.txt -Destination \\DelftStack\record\newprocess.txt
Now, confirm the file by checking in the destination directory.
Get-Item \\DelftStack\record\newprocess.txt
Output:
Directory: \\DelftStack\record


Mode                 LastWriteTime         Length Name
----                 -------------         ------ ----
-a----        21-01-2022     17:47          70920 newprocess.txt
Use Robocopy to Copy Files Over the Network in PowerShell
The robocopy is a powerful command-line tool to copy file data from one location to another in Windows. The syntax for using the robocopy command is as follows.
robocopy <source> <destination> [<file>] [<options>]
The following command copies an output.csv file from the C:\New directory to a file share \\DelftStack\record.
robocopy C:\New \\DelftStack\record output.csv
Output:
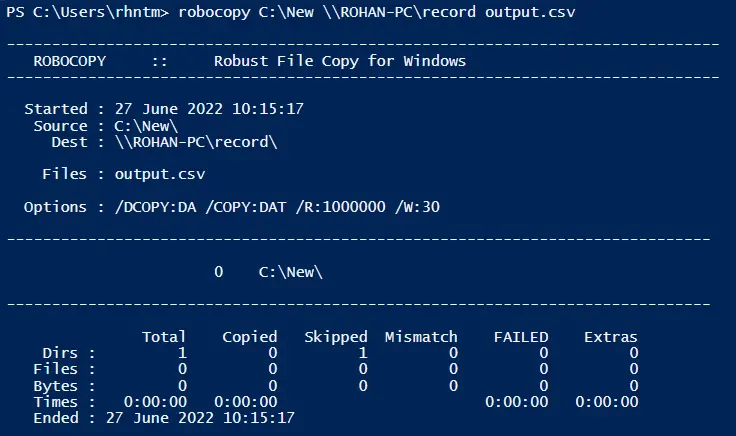
The robocopy command displays the output’s job head and summary. You can use the /njh option to hide the job header and the /njs option to hide the job summary.
The following example copies a car.png file from the C:\pc directory to a network share //DelftStack/record and hides both job header and summary in the output.
robocopy C:\pc \\DelftStack\record car.png /njh /njs
Output:
1 C:\pc\
Next, check if the file is copied to the specified destination.
Get-Item \\DelftStack\record\car.png
Output:
  Directory: \\DelftStack\record


Mode                 LastWriteTime         Length Name
----                 -------------         ------ ----
-a----        03-01-2022     14:26           3465 car.png
Both commands are easy to use and provide the functionality of copying files from the local server to a network share. Now you should know how to copy files over network share using PowerShell.