How to Track Mouse Position in JavaScript
- Various Ways of Tracking Mouse Events in JavaScript
-
Tracking Mouse Position Using
PageX,PageY, andclientX,clientYin JavaScript

To track mouse movement in JavaScript, we make use of an event listener. An event listener is something that keeps on listening for the changes which are happening. For example, a mousedown event is only triggered when a user clicks on the mouse button.
There are various mouse events available in JavaScript, out of which we will be focusing on the mousemove event as we want to track mouse position. To see a full list of mouse events, you can visit the Mouse Events MDN docs.
Various Ways of Tracking Mouse Events in JavaScript
To track the mouse position, we have to find its x-axis (horizontal position) and y-axis (vertical position) inside the browser’s tab. You might be aware that the top-left corner of the browser is represented with (0,0). If you move the mouse horizontally, its x position will change, and if you move the mouse vertically, its y position will change.
There are two different ways of getting these x and y positions of the mouse within the browser’s tab, and these ways are as follows.
- If you want to track mouse positions relative to the size of the webpage, use
pageXandpageY. - If you want to track mouse position based on the screen’s visible area, use
clientXandclientY.
Tracking Mouse Position Using PageX, PageY, and clientX, clientY in JavaScript
Let’s understand both these ways with the below example.
<!DOCTYPE html>
<html lang="en">
<head>
    <meta charset="UTF-8">
    <meta http-equiv="X-UA-Compatible" content="IE=edge">
    <meta name="viewport" content="width=device-width, initial-scale=1.0">
    <title>Document</title>
</head>
<body>
    <div style="height: 1000px;">Div with height 1000px...</div>
    <script src="./script.js"></script>
</body>
</html>
Here, we have an HTML document. Inside the body tag, we have a div element with some text and a height of 1000px. There is a reason why we have given this much height to this div element. By providing this much height to the div, we will get a scroll bar inside the webpage, and this is necessary to illustrate both the above ways of tracking mouse movement.
Then we have a script tag that links the below script to the HTML document.
function mousemove(event) {
  console.log(
      'pageX: ', event.pageX, 'pageY: ', event.pageY,
      'clientX: ', event.clientX, 'clientY:', event.clientY)
}

window.addEventListener('mousemove', mousemove);
We have added a mousemove event to the window object using the addEventListener function in the script file. This function takes two parameters, the first parameter is the event that we want to add. The second parameter is a function that will be executed after the event is triggered.
In this case, we have created the function mousemove() and have passed it as a callback to the event listener. This function takes event as an argument. This event variable will provide the mouse’s updated x and y positions. You can give whatever name to the mousemove() function, but you have to pass the exact event name to the event listener; otherwise, it will not work.
Inside the mousemove() function, we just have console.log() the mouse values using event.pageX, event.pageY, and event.clientX, event.clientY. The below screenshot illustrates the output of the above code.
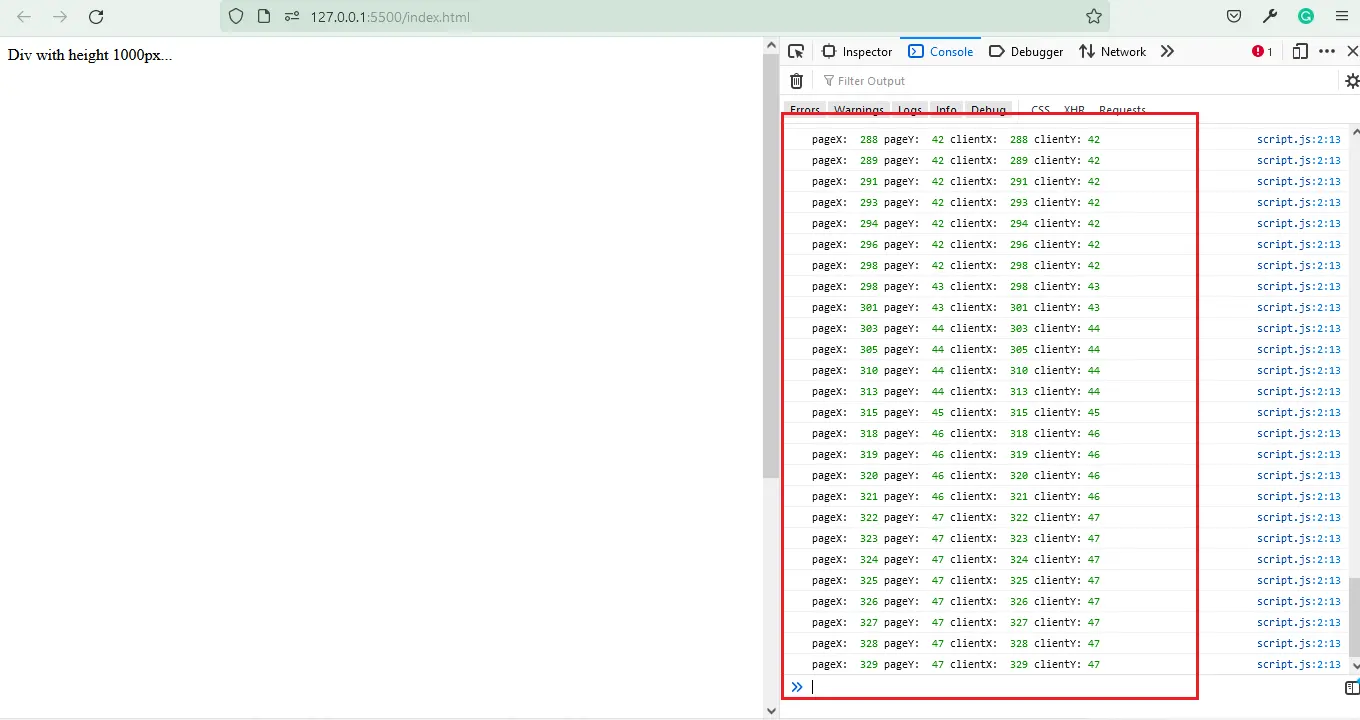
Seeing the output in the console, you will not see any difference as the pageX, and clientX are showing the same values, and the pageY and clientY are showing the same values. We have not scrolled the page yet, so we are getting the same values.
If you scroll the page and then check the values, there will be a difference in the values. The below screenshot illustrates this.
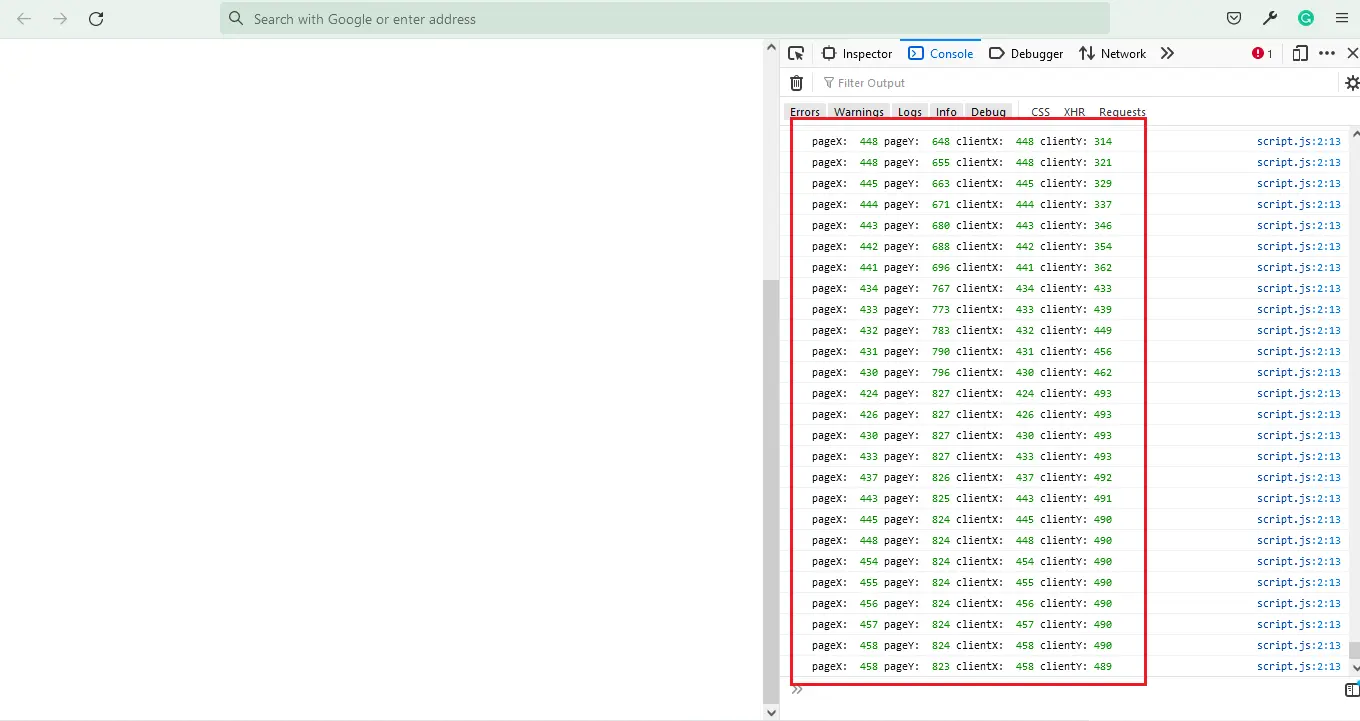
After scrolling the page, the values provided by the events pageX and pageY are larger than those provided by the events clientX and clientY. This is because the pageX and pageY calculate the x and y values from the beginning of the web page, whereas the clientX and clientY calculate the values based on the visible part of the screen.
Later on, you can also take these mouse positions and apply them to the HTML element (by updating the left and top values of the element) so that wherever the mouse cursor moves, the element will also follow it. To achieve this, you also have to use other mouse events as well.
Now, you might get a question about which one of these mouse events to use in practice, and the answer to this is it depends upon the use case. If you want to track mouse position only within the screen’s visible area, go with clientX and clientY. Otherwise, you can use pageX and pageY mouse events for calculating mouse position from the start of the webpage.

Sahil is a full-stack developer who loves to build software. He likes to share his knowledge by writing technical articles and helping clients by working with them as freelance software engineer and technical writer on Upwork.
LinkedIn