How to Use OpenJDK to Install Java in Ubuntu

In this step-by-step guide tutorial, we’ll learn how to install Java in Ubuntu 20.04. It also illustrates how to install default Java, specific Java version, and set the environment variable.
Use OpenJDK to Install Java in Ubuntu
In this tutorial, we will install Java using OpenJDK. You may check this article to install Java using Oracle Java.
The default Ubuntu repositories contain two OpenJDK packages named Java Development Kit (JDK) and Java Runtime Environment (JRE). Remember, the JRE has Java Virtual Machine (JVM), binaries, and classes that let us run our Java programs and applications.
We can install the default OpenJDK (also called JDK 11) version if we are not confirmed which Java package we need to install. However, some Java applications need a specific Java version (we’ll see this kind of installation later in this tutorial).
Install OpenJDK and OpenJRE 11 in Ubuntu
Let’s start with installing OpenJDK on Ubuntu 20.04.
-
Open Terminal and update the package repository to ensure we have downloaded the latest version of the software. It will ask for the
sudoprivileges, so we must have access to it.sudo apt update -
Install Java Development Kit by using the following command.
sudo apt install default-jdk -
Type Y or y (yes) to confirm the installation and hit Enter. It will also install the
OpenJRE 11.
If it does not install, follow the steps given below to install OpenJRE 11.
-
Use the following command to update the repository before installing Java Runtime Environment.
sudo apt update -
Execute the command given below to install Java Runtime Environment (
JRE).sudo apt install default-jre -
It will also ask for confirmation, press Y or y (yes), and press Enter.
Check if Java Is Install on Our System
After completing the installation procedure, we must confirm that we have successfully installed Java on our machine using the following command on the terminal.
java –version
Output:
openjdk version "11.0.16" 2022-07-19
OpenJDK Runtime Environment (build 11.0.16+8-post-Ubuntu-0ubuntu120.04)
OpenJDK 64-Bit Server VM (build 11.0.16+8-post-Ubuntu-0ubuntu120.04, mixed mode, sharing)
Install a Specific Java Version
Let’s see how we can install it using OpenJDK. For instance, we want to install JDK 8 instead of JDK 11, which is the default.
sudo apt install openjdk-8-jdk
Press Y or y (yes) when prompted then, hit Enter. Now, verify the installed version of Java using the following command.
java –version
Set Default Java Version
Setting the default Java version is required when multiple versions of Java are installed on the machine. For instance, in this article, we have installed Java 8 and 11, where Java 11 is set as default.
Let us make Java 8 the default by using the following command.
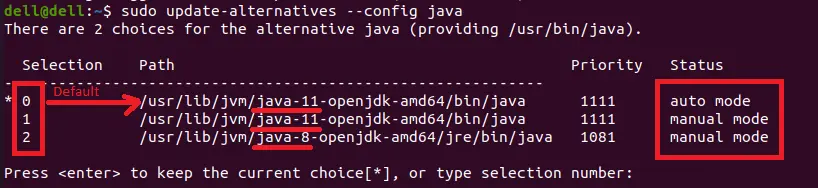
sudo update-alternatives --config java
The above command will show the following details where 0 indicates the current default version of Java while 1 and 2 represents Java 11 and Java 8, respectively.
It also asks whether we want to change the current default version of Java or not. Hit Enter to keep the current choice or write number (number from the Selection column) to change it and then, press Enter.
Output:
Set JAVA_HOME Environment Variable
We are required to set the JAVA_HOME environment variable because it determines Java’s installation and assists other applications in retrieving the installation path of Java.
-
To set this variable, we must know the path of Java’s installation. Let’s find that out using the following command.
sudo update-alternatives --config javaOutput:

In the above image, the
Pathsection shows the installation directory for all the versions of Java that we have installed on our machine. Now, copy onePathof the preferred version of Java. -
Open a file
/etc/environmentwith any text editor you want. We are usingnanohere.nano /etc/environment -
Add a line as
JAVA_HOME="/your/installation/path/"at the end of this file. For example, if we want to set the environment variable for Java 11, we will do this step as follows.JAVA_HOME="/usr/lib/jvm/java-11-openjdk-amd64/bin/java"
Great, we have successfully set the JAVA_HOME environment variable.
