How to Open Git Bash on Mac
Git is the most in-demand and well-known free version control system used by developers that helps them handle their various kinds of programs securely and efficiently within the team. They can easily track their projects without probing each other’s tasks.
Through this software, developers can also keep track of their ongoing project snapshots and have a secure hand on the development’s history.
Before opening Git Bash on Mac, the installation process is necessary. In this piece of block, we will get to know how to open Git Bash after the installation process of Git on Mac.
Installation of Git on Mac
There are various processes through which we can download Git on Mac. Most developers prefer installing Git using a graphic user interface because it provides a simple installation process using the basic installer for Mac.
We can also install Git using the terminal with the help of a few effortless commands.
Install Git on Mac With Installer for Mac
This method is considered the easiest practice to set up Git using the Git installer for Mac. The following are the steps.
-
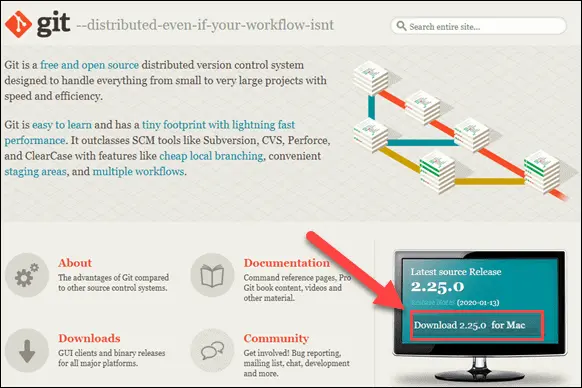
Open a web browser and go to Git’s official website.
-
Here, we will see the version number of the latest source release and a
downloadbutton, as seen in the image. -
Pop the
downloadbutton; it will automatically download the required software package on our system. -
After that, search for the package and open the
Git installerby double-clicking it. -
After opening the
git installer, stick to theinstallation wizardand configure Git according to our development needs. If someone is new to version control systems, it’s better to stick with the default settings to avoid mishandling. -
Pop the
Installbutton. We can set passwords too, but it’s not necessary. -
For more confirmation, pop the
Install Softwarebutton again.
Now we are done with installing Git on Mac through the installer. After that, we can follow the configuration as per our requirements.
Install Git on Mac Using the Terminal
Git installation on Mac using a terminal can be accomplished through different methods. The structure depends upon the development conditions or package manager we have on our system.
This tutorial includes three different methods.
Install Git Using Xcode
Xcode is the fastest and most convenient method to start working with Git. Git is already present in its command-line tools package.
Xcode can easily be installed through the following command.
xcode-select --install
Now with Xcode working on our Mac, we can check the presence of Git through the following command.
git --version
The output will show the latest version of Git installed in our system. If Git is not present, it will ask for our permission for installation.
We will confirm it by popping the install button; as a result, Xcode sets up Git for us.
Install Git Using Homebrew
Homebrew is the second way through which we can install Git, the package control system for Mac.
We will run the below-mentioned brew command in the terminal.
brew install git
For verification of installation, we will run the following command.
git --version
This will show the latest version of Git installed through the above command.
Install Git Using MacPorts
If we have MacPorts on our system for management, we will use port commands to install Git.
First, we will update MacPorts through the following command.
sudo port -v selfupdate
After it, we will run the following command to search the newest Git ports.
port search git
Then we will run the following command to search for Git variants.
port variants git
After that, we will install Git with the following command.
x sudo port install git
Git Bash
Git Bash is an efficient feature to start working with Git. It allows us to open Git commands.
It is built upon the excellent and ideal Git command line interface that is most likely the ideal tool for all. It comprises many easy and preferable features, including syntax highlighting and tab completion, making it more convenient.
It is a very friendly terminal modification that allows us to see which branch we are on. It is controlled by tab-based autocompletion for all Git’s subcommands, remotes, command-line parameters, and ref names. Install Git Bash on Mac using the following method.
Install Git Bash on Mac
For installation of Git Bash:
-
Go to the
Terminal, and run the command below./bin/bash -c "$(curl -fsSL https://raw.githubusercontent.com/fabriziocucci/git-bash-for-mac/master/install.sh)" -
Open
Terminal>Preferences>Profilesand hit theProtheme. -
Restart the
Terminal, and it’s done.
Open Git Bash on Mac
Once Git and Bash are installed on the personal computer, we can open it successfully. If we want to open Git Bash on Mac, we will first open the terminal application.
We can open it through the Spotlight search bar or go to the Utility folder in our Applications folder. After opening the terminal, we will type the following command:
git bash
That’s it. Now Git Bash is in front of us, and we can do the work perfectly.

Abdul is a software engineer with an architect background and a passion for full-stack web development with eight years of professional experience in analysis, design, development, implementation, performance tuning, and implementation of business applications.
LinkedIn