How to Create a Master Branch in a Bare Git Repository
- Understanding Bare Git Repositories
- Create a Master Branch in a Bare Git Repository
- Conclusion
- Conclusion
- FAQ
Creating a master branch in a bare Git repository is a fundamental task that many developers encounter. Whether you’re setting up a new project or managing an existing one, understanding how to manage branches in a bare repository is essential. A bare repository is a version-controlled repository that does not contain a working directory; rather, it stores the Git data and is typically used for sharing among multiple users. This article will guide you through the steps to create a master branch in an empty Git repository, ensuring you can efficiently manage your code.
In this guide, we’ll explore the commands you need to execute in your terminal to create a master branch in a bare Git repository. By the end of this article, you’ll have a clear understanding of the process and be well-equipped to handle similar tasks in your Git workflow. So, let’s dive right in and get started with creating that master branch!
Understanding Bare Git Repositories
Before we jump into creating a master branch, it’s important to understand what a bare Git repository is and why it is used. A bare repository is essentially a repository without a working directory. This means that it doesn’t contain the actual files of your project, but rather the Git metadata and object database. Bare repositories are typically used as remote repositories where multiple users can push and pull changes.
When you clone a bare repository, you get a working copy with all the files and folders. However, when you create a bare repository, it is often for collaboration purposes, allowing teams to work on the same project without conflicts. Now, let’s see how to create a master branch in this type of repository.
Create a Master Branch in a Bare Git Repository
As we had mentioned earlier, you cannot do much in an empty git repository. Let’s try to checkout the master branch in a bare git repo.
We will create an empty directory called Test-Repo.git and initialize a bare repository.
Command:
$ git init --bare
Output:

We can not proceed with development in a bare git repository. To create a master branch, we must create a test-clone repository and clone it there.
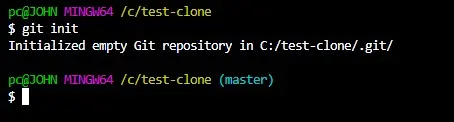
We will create a test-clone folder and initialize a git repository.
Command:
$ git init
Output:
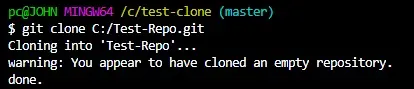
Next, we will clone our bare repository to our test-clone repo.
Command:
$ git clone C:/Test-Repo.git
Output:
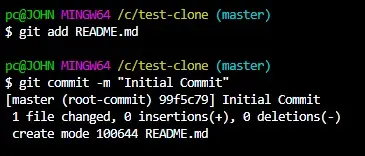
Then create a README.md file and commit it to our test-clone repository.
Command:
$ touch README.md
Next, we will add the file for commit.
Command:
$ git add README.md
$ git commit -m "Initial Commit"
Output:
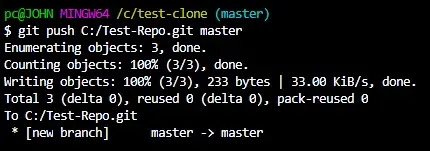
What’s left is to push our master branch and the changes to the bare git repository.
Command:
$ git push C:/Test-Repo.git master
We have treated our bare repository as a hosted server, but instead of git push origin master, we used the path to our bare repo.
The command above should create a master branch in our bare repo with our "Initial Commit".
Output:
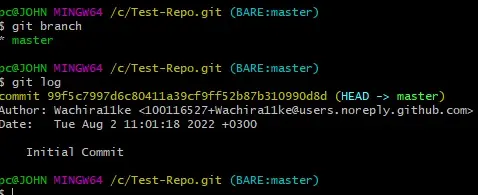
Let’s check if we have the master branch and its commit in our bare repository.
Command:
$ git branch
$ git log
Output:
Conclusion
You cannot develop in a bare repository. Your best option is to clone it to another git repo and push a branch from there.
When cloning, be sure to enter the right path to the bare repo.
Conclusion
Creating a master branch in a bare Git repository is a straightforward process that can significantly enhance your version control workflow. By initializing a bare repository, creating a master branch, and pushing changes, you set the stage for effective collaboration among team members. Understanding these steps is vital for anyone working with Git, whether you’re a seasoned developer or just starting.
Now that you have the knowledge and commands at your fingertips, you can confidently create and manage branches in your bare repositories. Happy coding!
FAQ
-
What is a bare Git repository?
A bare Git repository is a repository that does not have a working directory. It contains only the Git metadata and object database, which makes it suitable for sharing among multiple users. -
Why would I use a bare repository?
Bare repositories are used for collaboration purposes, allowing multiple users to push and pull changes without conflicts. They serve as a central hub for the project. -
How do I create a local repository to push to a bare repository?
You can create a local repository using the commandgit init my-local-repo, then add files, commit changes, and set the bare repository as a remote. -
Can I create branches other than master in a bare repository?
Yes, you can create multiple branches in a bare repository. Just use the commandgit symbolic-ref HEAD refs/heads/your-branch-nameto create new branches. -
What happens if I push to a bare repository without creating a branch?
If you push to a bare repository without a branch, Git will not know where to place your changes, and the push will fail.

John is a Git and PowerShell geek. He uses his expertise in the version control system to help businesses manage their source code. According to him, Shell scripting is the number one choice for automating the management of systems.
LinkedIn