WebSocket in Angular
We will introduce WebSockets in Angular with an example.
WebSockets in Angular
A WebSocket is a persistent connection between a client and a server. It provides a bidirectional and full-duplex channel that operates over HTTP.
This operation is through a single TCP/IP socket connection. The best example of the usage of WebSockets is in chat applications.
Chat applications work on WebSockets, and it provides a real-time connection that sends and receives messages in real-time.
This tutorial demonstrates how to use WebSocket in our Angular application. The best way to use WebSocket in our Angular application is by encapsulating our WebSocket and events in service.
And we can use that service in any component we want to use it.
Let’s create a new Angular application to start working with WebSocket in the Angular application. We can create a new Angular application by using the following command.
# angular
ng new my_app
Once our application is created, we will go inside our application folder using the following command.
# angular
cd my_app
We will run our application using the following command as shown below.
# angular
ng serve
Use RxJS to Implement WebSockets in Angular
To get started, we need to create a very simple service that will connect to a given URL and return an RxJS subject. This RxJS subject will be subscribed to any services or components in which we want to listen for any new incoming messages from the connected socket.
We can create a new service using the following command as shown below.
# angular
ng g service websocketchat
Once we have created our new service, we will import * from our service’s rxjs library. It will allow us to create the subject that can work as both the observer and observable.
Our subject will watch for any incoming messages, and it will also broadcast the messages to any components that have subscribed to that subject.
Our code in our service will look like the below.
import { Injectable } from '@angular/core';
import * as Rj from 'rxjs';

@Injectable()
export class WebsocketChatService {
  constructor() {}

  private subject: Rj.Subject<MessageEvent>;

  public connect(url): Rj.Subject<MessageEvent> {
    if (!this.subject) {
      this.subject = this.create(url);
      console.log('Successfully connected To: ' + url);
    }
    return this.subject;
  }

  private create(url): Rj.Subject<MessageEvent> {
    let wsc = new WebSocket(url);

    let observable = Rj.Observable.create((obs: Rj.Observer<MessageEvent>) => {
      wsc.onmessage = obs.next.bind(obs);
      wsc.onerror = obs.error.bind(obs);
      wsc.onclose = obs.complete.bind(obs);
      return wsc.close.bind(wsc);
    });
    let observer = {
      next: (data: Object) => {
        if (wsc.readyState === WebSocket.OPEN) {
          wsc.send(JSON.stringify(data));
        }
      },
    };
    return Rj.Subject.create(observer, observable);
  }
}
Now that we have created our websocketchat service, we need another service that will interface with our WebSocket and act as an adapter. It will adapt the output from the WebSocket into a form that can be easily used on the front-end.
We will name our service chatservice, which can be easily created using the following command below.
# angular
ng g service chatservice
Once we have created our new service, we will import our websocketchat service and observable from the rxjs library. We will define our chat URL as well.
We will create a messages interface to define the user of the message and the messageContent as shown below.
import { Injectable } from '@angular/core';
import { Observable, Subject } from 'rxjs';
import { map } from 'rxjs/operators';

import { WebsocketChatService } from './websocketchat.service';

const CHAT_URL = 'wss://echo.websocket.org/';

export interface Message {
  user: string;
  messageContent: string;
}

@Injectable()
export class ChatService {
  public messages: Subject<Message>;

  constructor(wscService: WebsocketChatService) {
    this.messages = <Subject<Message>>(
      wscService.connect(CHAT_URL).pipe(map((response: MessageEvent): Message => {
        let content = JSON.parse(response.data);
        return {
          user: content.user,
          messageContent: content.messageContent,
        };
      }))
    );
  }
}
We will update our app.component.ts file by importing both of our services into our component. We will send messages as shown below.
import { Component } from '@angular/core';
import { WebsocketChatService } from './websocketchat.service';
import { ChatService } from './chatservice.service';
@Component({
selector: 'my-app',
templateUrl: './app.component.html',
styleUrls: ['./app.component.css'],
providers: [WebsocketChatService, ChatService],
})
export class AppComponent {
constructor(private chatService: ChatService) {
chatService.messages.subscribe((msg) => {
console.log('Response recieved from websocket: ' + msg);
});
}
private message = {
user: 'Husnain',
messageContent: 'Hello World!',
};
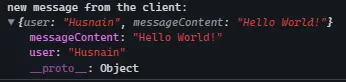
sendMessage() {
console.log('new message from the client: ', this.message);
this.chatService.messages.next(this.message);
this.message.messageContent = '';
}
}
Now we will create a front-end for our application in which we will create a button that will send messages whenever we click on it, as shown below.
<h1>Send Message by clicking button</h1>
<button (click)="sendMessage()">Send</button>
Now, let’s try and check how it works.
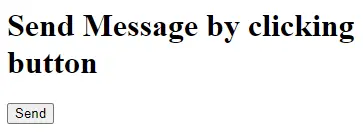
When we click on the send button, it will send the following message in the console.
As you can see from the above example that it is very easy to implement WebSockets using rxjs.

Rana is a computer science graduate passionate about helping people to build and diagnose scalable web application problems and problems developers face across the full-stack.
LinkedIn