How to Sort Tables in Angular
Web pages are a great way to make presentations; when it comes to preparing statistical data, making a list of items’ prices, or classifying items, it is mostly required that we make a table that allows us to sort these lists.
We can sort the table in ascending order, descending, etc. Let us now look at the best methods we can apply to create tables with sort functionality inside the Angular framework.
Sort Table with Angular Material
It is no longer news that the Angular material dependency is the go-to library for every kind of Angular component; we will be installing the Angular Material library for this method.
After the project folder has been created, move into the project folder in your terminal and install the Angular Material dependency with: ng add @angular/material; once that is done, the next thing is to create the page structure with Angular Material-prepped codes for sorting table.
Inside the app.component.html file, we insert these codes.
Code Snippet app.component.html:
<table mat-table [dataSource]="dataSource" matSort (matSortChange)="announceSortChange($event)"
  class="mat-elevation-z8">
  <ng-container matColumnDef="position">
    <th mat-header-cell *matHeaderCellDef mat-sort-header sortActionDescription="Sort by number">
      No.
    </th>
    <td mat-cell *matCellDef="let element"> {{element.position}} </td>
  </ng-container>
  <ng-container matColumnDef="name">
    <th mat-header-cell *matHeaderCellDef mat-sort-header sortActionDescription="Sort by name">
      Name
    </th>
    <td mat-cell *matCellDef="let element"> {{element.name}} </td>
  </ng-container>
  <ng-container matColumnDef="weight">
    <th mat-header-cell *matHeaderCellDef mat-sort-header sortActionDescription="Sort by weight">
      Weight
    </th>
    <td mat-cell *matCellDef="let element"> {{element.weight}} </td>
  </ng-container>
  <ng-container matColumnDef="symbol">
    <th mat-header-cell *matHeaderCellDef mat-sort-header sortActionDescription="Sort by symbol">
      Symbol
    </th>
    <td mat-cell *matCellDef="let element"> {{element.symbol}} </td>
  </ng-container>
  <tr mat-header-row *matHeaderRowDef="displayedColumns"></tr>
  <tr mat-row *matRowDef="let row; columns: displayedColumns;"></tr>
</table>
We are setting up the table structure inside this file like the headers, rows and columns.
Next, we go to the app.component.ts file to set up codes that will control the table; we will write these codes:
Code Snippet app.component.ts:
import { LiveAnnouncer } from '@angular/cdk/a11y';
import { AfterViewInit, Component, ViewChild } from '@angular/core';
import { MatSort, Sort } from '@angular/material/sort';
import { MatTableDataSource } from '@angular/material/table';
export interface PeriodicElement {
name: string;
position: number;
weight: number;
symbol: string;
}
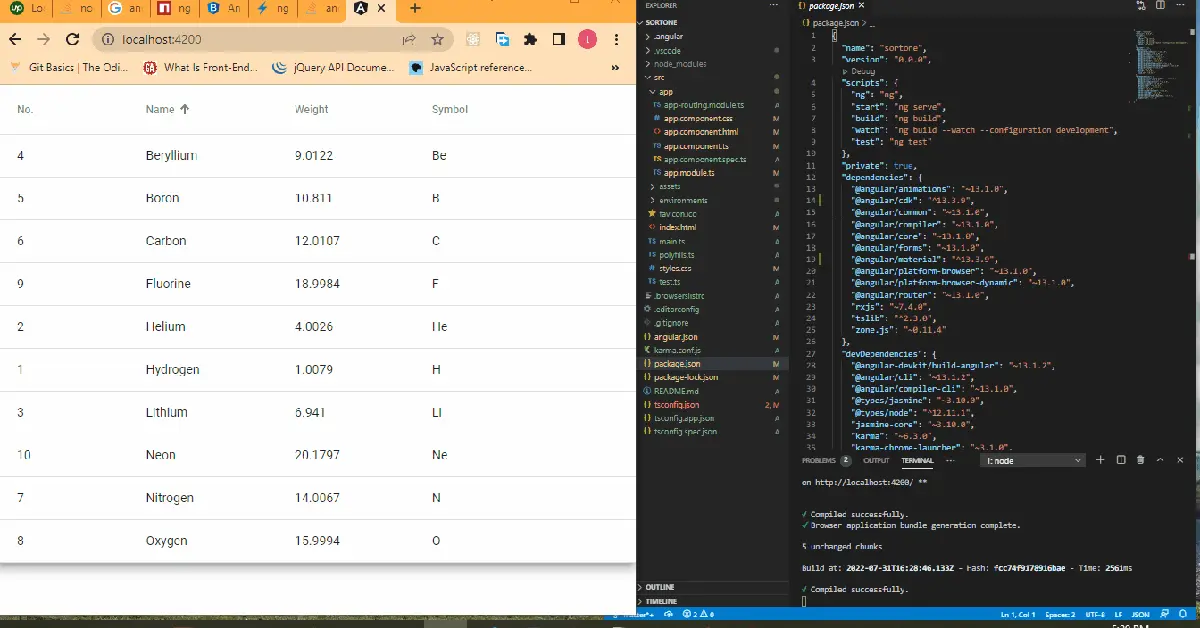
const ELEMENT_DATA: PeriodicElement[] = [
{ position: 1, name: 'Hydrogen', weight: 1.0079, symbol: 'H' },
{ position: 2, name: 'Helium', weight: 4.0026, symbol: 'He' },
{ position: 3, name: 'Lithium', weight: 6.941, symbol: 'Li' },
{ position: 4, name: 'Beryllium', weight: 9.0122, symbol: 'Be' },
{ position: 5, name: 'Boron', weight: 10.811, symbol: 'B' },
{ position: 6, name: 'Carbon', weight: 12.0107, symbol: 'C' },
{ position: 7, name: 'Nitrogen', weight: 14.0067, symbol: 'N' },
{ position: 8, name: 'Oxygen', weight: 15.9994, symbol: 'O' },
{ position: 9, name: 'Fluorine', weight: 18.9984, symbol: 'F' },
{ position: 10, name: 'Neon', weight: 20.1797, symbol: 'Ne' },
];
@Component({
selector: 'app-root',
templateUrl: './app.component.html',
styleUrls: ['./app.component.css']
})
export class AppComponent implements AfterViewInit {
title = 'sortone';
displayedColumns: string[] = ['position', 'name', 'weight', 'symbol'];
dataSource = new MatTableDataSource(ELEMENT_DATA);
constructor(private _liveAnnouncer: LiveAnnouncer) { }
@ViewChild(MatSort) sort: MatSort;
ngAfterViewInit() {
this.dataSource.sort = this.sort;
}
announceSortChange(sortState: Sort) {
if (sortState.direction) {
this._liveAnnouncer.announce(`Sorted ${sortState.direction}ending`);
} else {
this._liveAnnouncer.announce('Sorting cleared');
}
}
}
First, we import the required modules from the Angular Material library; then, we declare the type of input that will be in each table header; for name, we declare type string, and for weight and position, we declare type number.
Then we declare the data that we want in the table in the form of an array; next, we move to create the sort function using this.dataSource.sort.
The app.module.ts file is the module that handles the modules and dependencies we use for our app, so we need to import the dependencies here. The file should look as below.
Code Snippet app.module.ts:
import { NgModule } from '@angular/core';
import { BrowserModule } from '@angular/platform-browser';
import { AppRoutingModule } from './app-routing.module';
import { AppComponent } from './app.component';
import { BrowserAnimationsModule } from '@angular/platform-browser/animations';
import { MatTableModule } from '@angular/material/table';
import { FormsModule } from '@angular/forms';
import { DragDropModule } from '@angular/cdk/drag-drop';
import { MatSortModule } from '@angular/material/sort';
@NgModule({
  declarations: [
    AppComponent
  ],
  imports: [
    BrowserModule,
    AppRoutingModule,
    BrowserAnimationsModule,
    MatTableModule,
    FormsModule,
    DragDropModule,
    MatSortModule
  ],
  providers: [],
  bootstrap: [AppComponent]
})
export class AppModule { }
Where’s the beauty and placement of a page without CSS? Just add this little snippet of codes into the app.component.css file like below.
Code Snippet app.component.css:
table {
    width: 100%;
  }

  th.mat-sort-header-sorted {
    color: black;
  }
Output:
Sort Table with Bootstrap
Bootstrap makes a programmer’s life easier; where we ought to write a novel of codes, Bootstrap helps us write more concise codes with better functionality.
Like the Angular Material, we will equally install the Bootstrap library inside the project folder with ng add @ng-bootstrap/ng-bootstrap. After successful installation, we navigate to the app.component.html file to write these codes.
Code Snippet app.component.html:
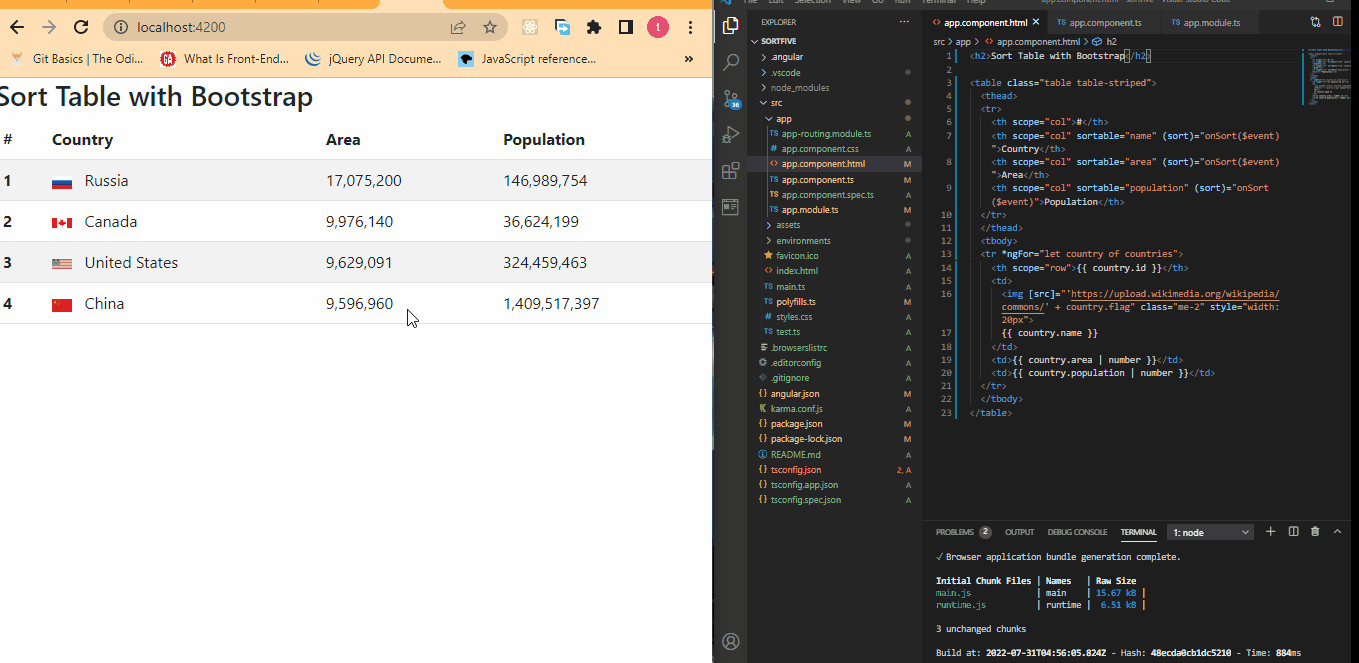
<h2>Sort Table with Bootstrap</h2>
<table class="table table-striped">
  <thead>
  <tr>
    <th scope="col">#</th>
    <th scope="col" sortable="name" (sort)="onSort($event)">Country</th>
    <th scope="col" sortable="area" (sort)="onSort($event)">Area</th>
    <th scope="col" sortable="population" (sort)="onSort($event)">Population</th>
  </tr>
  </thead>
  <tbody>
  <tr *ngFor="let country of countries">
    <th scope="row">{{ country.id }}</th>
    <td>
      <img [src]="'https://upload.wikimedia.org/wikipedia/commons/' + country.flag" class="me-2" style="width: 20px">
      {{ country.name }}
    </td>
    <td>{{ country.area | number }}</td>
    <td>{{ country.population | number }}</td>
  </tr>
  </tbody>
</table>
Here we create the structure of the table and the headers; now, we need to head to the app.component.ts file to write the codes to make the table functional.
The file will look like the below.
Code Snippet app.component.ts:
import { Component, Directive, EventEmitter, Input, Output, QueryList, ViewChildren } from '@angular/core';

interface Country {
  id: number;
  name: string;
  flag: string;
  area: number;
  population: number;
}
const COUNTRIES: Country[] = [
  {
    id: 1,
    name: 'Russia',
    flag: 'f/f3/Flag_of_Russia.svg',
    area: 17075200,
    population: 146989754
  },
  {
    id: 2,
    name: 'Canada',
    flag: 'c/cf/Flag_of_Canada.svg',
    area: 9976140,
    population: 36624199
  },
  {
    id: 3,
    name: 'United States',
    flag: 'a/a4/Flag_of_the_United_States.svg',
    area: 9629091,
    population: 324459463
  },
  {
    id: 4,
    name: 'China',
    flag: 'f/fa/Flag_of_the_People%27s_Republic_of_China.svg',
    area: 9596960,
    population: 1409517397
  }
];

export type SortColumn = keyof Country | '';
export type SortDirection = 'asc' | 'desc' | '';
const rotate: {[key: string]: SortDirection} = { 'asc': 'desc', 'desc': '', '': 'asc' };
const compare = (v1: string | number, v2: string | number) => v1 < v2 ? -1 : v1 > v2 ? 1 : 0;
export interface SortEvent {
  column: SortColumn;
  direction: SortDirection;
}
@Directive({
  selector: 'th[sortable]',
  host: {
    '[class.asc]': 'direction === "asc"',
    '[class.desc]': 'direction === "desc"',
    '(click)': 'rotate()'
  }
})
export class NgbdSortableHeader {
  @Input() sortable: SortColumn = '';
  @Input() direction: SortDirection = '';
  @Output() sort = new EventEmitter<SortEvent>();
  rotate() {
    this.direction = rotate[this.direction];
    this.sort.emit({column: this.sortable, direction: this.direction});
  }
}
@Component({
  selector: 'app-root',
  templateUrl: './app.component.html',
  styleUrls: ['./app.component.css']
})
export class AppComponent {
  title = 'sortfive';
  countries = COUNTRIES;
  @ViewChildren(NgbdSortableHeader) headers!: QueryList<NgbdSortableHeader>;
  onSort({column, direction}: SortEvent) {
    this.headers.forEach(header => {
      if (header.sortable !== column) {
        header.direction = '';
      }
    });
    if (direction === '' || column === '') {
      this.countries = COUNTRIES;
    } else {
      this.countries = [...COUNTRIES].sort((a, b) => {
        const res = compare(a[column], b[column]);
        return direction === 'asc' ? res : -res;
      });
    }
  }
}
Here we first declared the type of data that will be inputted inside each table, and since we will be sorting the items from the headers, we need to declare the NgbdSortableHeader into an export class.
Then we head into the app.module.ts file to import the necessary modules we applied from ng-bootstrap.
Code Snippet app.module.ts:
import { NgModule } from '@angular/core';
import { BrowserModule } from '@angular/platform-browser';
import { AppRoutingModule } from './app-routing.module';
import { AppComponent, NgbdSortableHeader } from './app.component';
import { NgbModule } from '@ng-bootstrap/ng-bootstrap';
import { CommonModule } from '@angular/common';

@NgModule({
  declarations: [
    AppComponent,NgbdSortableHeader
  ],
  imports: [
    BrowserModule,
    AppRoutingModule,
    NgbModule,
    CommonModule
  ],
  exports: [AppComponent],
  providers: [],
  bootstrap: [AppComponent]
})
export class AppModule { }
Output:
Sort Table Using the ng-model
This example is the most code-efficient of the lot because, unlike the first two above that utilize all the components of the app folder, this example utilizes only the index.html file because the ng-model can bind the value of the HTML controls to the application data. Also, you don’t have to install any dependency for this method to work.
Once the project folder has been created, we head into the index.html file to write these codes.
index.html:
<!doctype html>
<html lang="en">
<head>
  <meta charset="utf-8">
  <title>Sortfour</title>
  <base href="/">
  <meta name="viewport" content="width=device-width, initial-scale=1">
  <link rel="icon" type="image/x-icon" href="favicon.ico">
  <script src="https://ajax.googleapis.com/ajax/libs/angularjs/1.4.8/angular.min.js"></script>

  <link rel="stylesheet" href="https://maxcdn.bootstrapcdn.com/bootstrap/3.3.7/css/bootstrap.min.css">
<script src="https://ajax.googleapis.com/ajax/libs/jquery/3.2.0/jquery.min.js"></script>
<script src="https://maxcdn.bootstrapcdn.com/bootstrap/3.3.7/js/bootstrap.min.js"></script>
</head>
<body>
  <body>
    <div class="container">
        <div ng-app="myApp" ng-controller="namesCtrl" ng-init="IsReverse=false">
        Search: <input type="text" ng-model="test"><br>
        <table class="table table-hover table-bordered table-striped">
          <tr>
              <th ng-click="sort('Name')">Name
              <th ng-click="sort('Age')">Age
              <th ng-click="sort('Email')">Email
              <th>Actions</th>
          </tr>
          <tr ng-repeat="x in names | filter:test | orderBy:sortParam:IsReverse">
              <td>{{x.Name}}
              <td>{{x.Age}}
              <td>{{x.Email}}
              <td>
                <div class="btn-group">
                    <a class="btn btn-primary" href="#">EDIT</a>
                    <a class="btn btn-primary" href="#">DELETE</a>
                </div>
              </td>
          </tr>
          </table>

    </div>

    <script>
    angular.module('myApp', []).controller('namesCtrl', function($scope) {
        $scope.names = [
            {Name:'Manav',Age:'22',Email:'pandya.manav@gmail.com'},
            {Name:'Rahul',Age:'25',Email:'pnd.rahul@gmail.com'},
            {Name:'Rohan',Age:'28',Email:'pnd.rohan@gmail.com'},
            {Name:'Jinish',Age:'18',Email:'jinish@gmail.com'}
        ];
        $scope.sort = function(sortId) {
            $scope.sortParam =  sortId;
            if($scope.IsReverse)
            {
                $scope.IsReverse = false;
            }
            else
            {
                $scope.IsReverse = true;
            }
        };
    });
    </script>
    </body>
</body>
</html>
First, we created the tables. We then added the headers and made them clickable using the ng-click function so that we could sort the table from the headers.
Then we created the data we wanted inside the table in the form of an array and declared it inside the $scope function; this allows us to add the sort functionality to it by using the $scope.sort function.
Output:

Conclusion
Thanks to the flexibility of the Angular framework, we are spoiled with excellent options to help us create tables with the sort functionality.

Fisayo is a tech expert and enthusiast who loves to solve problems, seek new challenges and aim to spread the knowledge of what she has learned across the globe.
LinkedIn