Angular에서 테이블 정렬
웹 페이지는 프레젠테이션을 만드는 좋은 방법입니다. 통계 자료를 작성하거나 품목 가격 목록을 작성하거나 품목을 분류할 때 이러한 목록을 정렬할 수 있는 테이블을 만드는 것이 대부분 필요합니다.
테이블을 오름차순, 내림차순 등으로 정렬할 수 있습니다. 이제 Angular 프레임워크 내에서 정렬 기능이 있는 테이블을 생성하는 데 적용할 수 있는 최상의 방법을 살펴보겠습니다.
앵귤러 머티리얼로 테이블 정렬
Angular 재료 종속성이 모든 종류의 Angular 구성 요소에 대한 이동 라이브러리라는 것은 더 이상 뉴스가 아닙니다. 이 방법을 위해 Angular Material 라이브러리를 설치할 것입니다.
프로젝트 폴더가 생성된 후 터미널의 프로젝트 폴더로 이동하고 ng add @angular/material을 사용하여 Angular Material 종속성을 설치합니다. 완료되면 다음 작업은 테이블 정렬을 위해 Angular Material 준비 코드를 사용하여 페이지 구조를 만드는 것입니다.
app.component.html 파일 내부에 이러한 코드를 삽입합니다.
코드 스니펫 app.component.html:
<table mat-table [dataSource]="dataSource" matSort (matSortChange)="announceSortChange($event)"
  class="mat-elevation-z8">
  <ng-container matColumnDef="position">
    <th mat-header-cell *matHeaderCellDef mat-sort-header sortActionDescription="Sort by number">
      No.
    </th>
    <td mat-cell *matCellDef="let element"> {{element.position}} </td>
  </ng-container>
  <ng-container matColumnDef="name">
    <th mat-header-cell *matHeaderCellDef mat-sort-header sortActionDescription="Sort by name">
      Name
    </th>
    <td mat-cell *matCellDef="let element"> {{element.name}} </td>
  </ng-container>
  <ng-container matColumnDef="weight">
    <th mat-header-cell *matHeaderCellDef mat-sort-header sortActionDescription="Sort by weight">
      Weight
    </th>
    <td mat-cell *matCellDef="let element"> {{element.weight}} </td>
  </ng-container>
  <ng-container matColumnDef="symbol">
    <th mat-header-cell *matHeaderCellDef mat-sort-header sortActionDescription="Sort by symbol">
      Symbol
    </th>
    <td mat-cell *matCellDef="let element"> {{element.symbol}} </td>
  </ng-container>
  <tr mat-header-row *matHeaderRowDef="displayedColumns"></tr>
  <tr mat-row *matRowDef="let row; columns: displayedColumns;"></tr>
</table>
헤더, 행 및 열과 같은 이 파일 내부의 테이블 구조를 설정하고 있습니다.
다음으로 app.component.ts 파일로 이동하여 테이블을 제어할 코드를 설정합니다. 다음 코드를 작성합니다.
코드 스니펫 app.component.ts:
import { LiveAnnouncer } from '@angular/cdk/a11y';
import { AfterViewInit, Component, ViewChild } from '@angular/core';
import { MatSort, Sort } from '@angular/material/sort';
import { MatTableDataSource } from '@angular/material/table';

export interface PeriodicElement {
  name: string;
  position: number;
  weight: number;
  symbol: string;
}
const ELEMENT_DATA: PeriodicElement[] = [
  { position: 1, name: 'Hydrogen', weight: 1.0079, symbol: 'H' },
  { position: 2, name: 'Helium', weight: 4.0026, symbol: 'He' },
  { position: 3, name: 'Lithium', weight: 6.941, symbol: 'Li' },
  { position: 4, name: 'Beryllium', weight: 9.0122, symbol: 'Be' },
  { position: 5, name: 'Boron', weight: 10.811, symbol: 'B' },
  { position: 6, name: 'Carbon', weight: 12.0107, symbol: 'C' },
  { position: 7, name: 'Nitrogen', weight: 14.0067, symbol: 'N' },
  { position: 8, name: 'Oxygen', weight: 15.9994, symbol: 'O' },
  { position: 9, name: 'Fluorine', weight: 18.9984, symbol: 'F' },
  { position: 10, name: 'Neon', weight: 20.1797, symbol: 'Ne' },
];
@Component({
  selector: 'app-root',
  templateUrl: './app.component.html',
  styleUrls: ['./app.component.css']
})
export class AppComponent implements AfterViewInit {
  title = 'sortone';
  displayedColumns: string[] = ['position', 'name', 'weight', 'symbol'];
  dataSource = new MatTableDataSource(ELEMENT_DATA);
  constructor(private _liveAnnouncer: LiveAnnouncer) { }
  @ViewChild(MatSort) sort: MatSort;
  ngAfterViewInit() {
    this.dataSource.sort = this.sort;
  }
  announceSortChange(sortState: Sort) {
    if (sortState.direction) {
      this._liveAnnouncer.announce(`Sorted ${sortState.direction}ending`);
    } else {
      this._liveAnnouncer.announce('Sorting cleared');
    }
  }
}
먼저 Angular Material 라이브러리에서 필요한 모듈을 가져옵니다. 그런 다음 각 테이블 헤더에 있을 입력 유형을 선언합니다. name의 경우 string 유형을 선언하고 weight 및 position의 경우 number 유형을 선언합니다.
그런 다음 테이블에서 원하는 데이터를 배열 형식으로 선언합니다. 다음으로 this.dataSource.sort를 사용하여 sort 함수를 생성합니다.
app.module.ts 파일은 앱에 사용하는 모듈과 종속성을 처리하는 모듈이므로 여기서 종속성을 가져와야 합니다. 파일은 아래와 같아야 합니다.
코드 스니펫 app.module.ts:
import { NgModule } from '@angular/core';
import { BrowserModule } from '@angular/platform-browser';
import { AppRoutingModule } from './app-routing.module';
import { AppComponent } from './app.component';
import { BrowserAnimationsModule } from '@angular/platform-browser/animations';
import { MatTableModule } from '@angular/material/table';
import { FormsModule } from '@angular/forms';
import { DragDropModule } from '@angular/cdk/drag-drop';
import { MatSortModule } from '@angular/material/sort';
@NgModule({
  declarations: [
    AppComponent
  ],
  imports: [
    BrowserModule,
    AppRoutingModule,
    BrowserAnimationsModule,
    MatTableModule,
    FormsModule,
    DragDropModule,
    MatSortModule
  ],
  providers: [],
  bootstrap: [AppComponent]
})
export class AppModule { }
CSS가 없는 페이지의 아름다움과 배치는 어디에 있습니까? 아래와 같이 app.component.css 파일에 이 작은 코드 스니펫을 추가하기만 하면 됩니다.
코드 스니펫 app.component.css:
table {
    width: 100%;
  }

  th.mat-sort-header-sorted {
    color: black;
  }
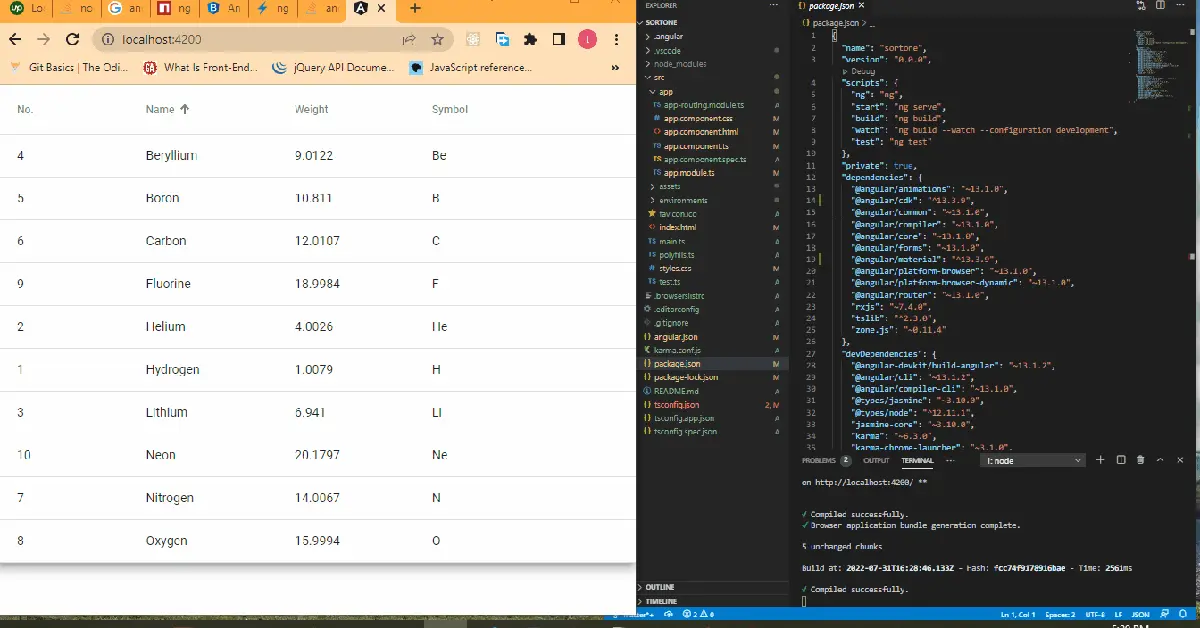
출력:
부트스트랩으로 테이블 정렬
Bootstrap은 프로그래머의 삶을 더 쉽게 만듭니다. 새로운 코드를 작성해야 하는 경우 Bootstrap은 더 나은 기능으로 더 간결한 코드를 작성할 수 있도록 도와줍니다.
Angular Material과 마찬가지로 ng add @ng-bootstrap/ng-bootstrap을 사용하여 프로젝트 폴더 내에 Bootstrap 라이브러리를 동일하게 설치합니다. 성공적으로 설치한 후 app.component.html 파일로 이동하여 이러한 코드를 작성합니다.
코드 스니펫 app.component.html:
<h2>Sort Table with Bootstrap</h2>
<table class="table table-striped">
  <thead>
  <tr>
    <th scope="col">#</th>
    <th scope="col" sortable="name" (sort)="onSort($event)">Country</th>
    <th scope="col" sortable="area" (sort)="onSort($event)">Area</th>
    <th scope="col" sortable="population" (sort)="onSort($event)">Population</th>
  </tr>
  </thead>
  <tbody>
  <tr *ngFor="let country of countries">
    <th scope="row">{{ country.id }}</th>
    <td>
      <img [src]="'https://upload.wikimedia.org/wikipedia/commons/' + country.flag" class="me-2" style="width: 20px">
      {{ country.name }}
    </td>
    <td>{{ country.area | number }}</td>
    <td>{{ country.population | number }}</td>
  </tr>
  </tbody>
</table>
여기서 우리는 테이블과 헤더의 구조를 생성합니다. 이제 app.component.ts 파일로 이동하여 테이블이 작동하도록 코드를 작성해야 합니다.
파일은 아래와 같이 보일 것입니다.
코드 스니펫 app.component.ts:
import { Component, Directive, EventEmitter, Input, Output, QueryList, ViewChildren } from '@angular/core';

interface Country {
  id: number;
  name: string;
  flag: string;
  area: number;
  population: number;
}
const COUNTRIES: Country[] = [
  {
    id: 1,
    name: 'Russia',
    flag: 'f/f3/Flag_of_Russia.svg',
    area: 17075200,
    population: 146989754
  },
  {
    id: 2,
    name: 'Canada',
    flag: 'c/cf/Flag_of_Canada.svg',
    area: 9976140,
    population: 36624199
  },
  {
    id: 3,
    name: 'United States',
    flag: 'a/a4/Flag_of_the_United_States.svg',
    area: 9629091,
    population: 324459463
  },
  {
    id: 4,
    name: 'China',
    flag: 'f/fa/Flag_of_the_People%27s_Republic_of_China.svg',
    area: 9596960,
    population: 1409517397
  }
];

export type SortColumn = keyof Country | '';
export type SortDirection = 'asc' | 'desc' | '';
const rotate: {[key: string]: SortDirection} = { 'asc': 'desc', 'desc': '', '': 'asc' };
const compare = (v1: string | number, v2: string | number) => v1 < v2 ? -1 : v1 > v2 ? 1 : 0;
export interface SortEvent {
  column: SortColumn;
  direction: SortDirection;
}
@Directive({
  selector: 'th[sortable]',
  host: {
    '[class.asc]': 'direction === "asc"',
    '[class.desc]': 'direction === "desc"',
    '(click)': 'rotate()'
  }
})
export class NgbdSortableHeader {
  @Input() sortable: SortColumn = '';
  @Input() direction: SortDirection = '';
  @Output() sort = new EventEmitter<SortEvent>();
  rotate() {
    this.direction = rotate[this.direction];
    this.sort.emit({column: this.sortable, direction: this.direction});
  }
}
@Component({
  selector: 'app-root',
  templateUrl: './app.component.html',
  styleUrls: ['./app.component.css']
})
export class AppComponent {
  title = 'sortfive';
  countries = COUNTRIES;
  @ViewChildren(NgbdSortableHeader) headers!: QueryList<NgbdSortableHeader>;
  onSort({column, direction}: SortEvent) {
    this.headers.forEach(header => {
      if (header.sortable !== column) {
        header.direction = '';
      }
    });
    if (direction === '' || column === '') {
      this.countries = COUNTRIES;
    } else {
      this.countries = [...COUNTRIES].sort((a, b) => {
        const res = compare(a[column], b[column]);
        return direction === 'asc' ? res : -res;
      });
    }
  }
}
여기에서 먼저 각 테이블에 입력될 데이터 유형을 선언하고 헤더에서 항목을 정렬할 것이므로 NgbdSortableHeader를 export 클래스로 선언해야 합니다.
그런 다음 ng-bootstrap에서 적용한 필요한 모듈을 가져오기 위해 app.module.ts 파일로 이동합니다.
코드 스니펫 app.module.ts:
import { NgModule } from '@angular/core';
import { BrowserModule } from '@angular/platform-browser';
import { AppRoutingModule } from './app-routing.module';
import { AppComponent, NgbdSortableHeader } from './app.component';
import { NgbModule } from '@ng-bootstrap/ng-bootstrap';
import { CommonModule } from '@angular/common';

@NgModule({
  declarations: [
    AppComponent,NgbdSortableHeader
  ],
  imports: [
    BrowserModule,
    AppRoutingModule,
    NgbModule,
    CommonModule
  ],
  exports: [AppComponent],
  providers: [],
  bootstrap: [AppComponent]
})
export class AppModule { }
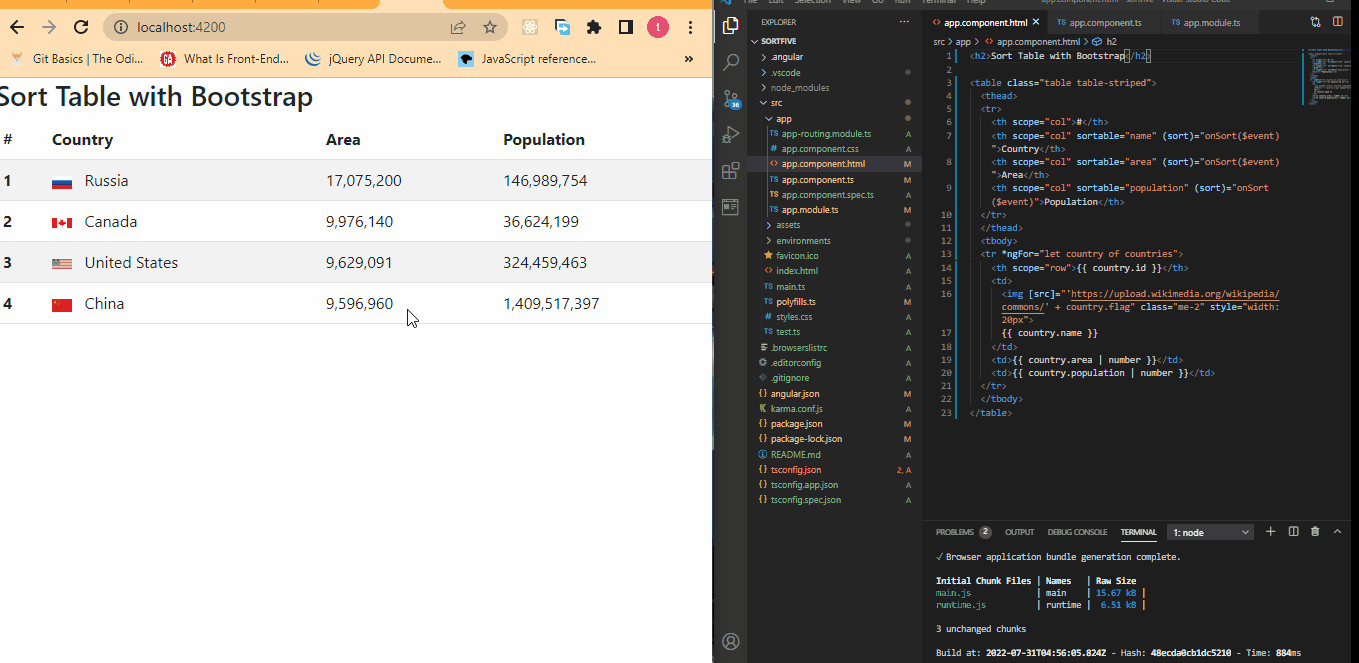
출력:
ng-model을 사용하여 테이블 정렬
이 예제는 app 폴더의 모든 구성 요소를 활용하는 위의 처음 두 개와 달리 ng-model이 바인딩할 수 있기 때문에 index.html 파일만 사용하기 때문에 가장 코드 효율적입니다. 응용 프로그램 데이터에 대한 HTML 컨트롤의 값입니다. 또한 이 방법이 작동하기 위해 종속성을 설치할 필요가 없습니다.
프로젝트 폴더가 생성되면 index.html 파일로 이동하여 이러한 코드를 작성합니다.
index.html:
<!doctype html>
<html lang="en">
<head>
  <meta charset="utf-8">
  <title>Sortfour</title>
  <base href="/">
  <meta name="viewport" content="width=device-width, initial-scale=1">
  <link rel="icon" type="image/x-icon" href="favicon.ico">
  <script src="https://ajax.googleapis.com/ajax/libs/angularjs/1.4.8/angular.min.js"></script>

  <link rel="stylesheet" href="https://maxcdn.bootstrapcdn.com/bootstrap/3.3.7/css/bootstrap.min.css">
<script src="https://ajax.googleapis.com/ajax/libs/jquery/3.2.0/jquery.min.js"></script>
<script src="https://maxcdn.bootstrapcdn.com/bootstrap/3.3.7/js/bootstrap.min.js"></script>
</head>
<body>
  <body>
    <div class="container">
        <div ng-app="myApp" ng-controller="namesCtrl" ng-init="IsReverse=false">
        Search: <input type="text" ng-model="test"><br>
        <table class="table table-hover table-bordered table-striped">
          <tr>
              <th ng-click="sort('Name')">Name
              <th ng-click="sort('Age')">Age
              <th ng-click="sort('Email')">Email
              <th>Actions</th>
          </tr>
          <tr ng-repeat="x in names | filter:test | orderBy:sortParam:IsReverse">
              <td>{{x.Name}}
              <td>{{x.Age}}
              <td>{{x.Email}}
              <td>
                <div class="btn-group">
                    <a class="btn btn-primary" href="#">EDIT</a>
                    <a class="btn btn-primary" href="#">DELETE</a>
                </div>
              </td>
          </tr>
          </table>

    </div>

    <script>
    angular.module('myApp', []).controller('namesCtrl', function($scope) {
        $scope.names = [
            {Name:'Manav',Age:'22',Email:'pandya.manav@gmail.com'},
            {Name:'Rahul',Age:'25',Email:'pnd.rahul@gmail.com'},
            {Name:'Rohan',Age:'28',Email:'pnd.rohan@gmail.com'},
            {Name:'Jinish',Age:'18',Email:'jinish@gmail.com'}
        ];
        $scope.sort = function(sortId) {
            $scope.sortParam =  sortId;
            if($scope.IsReverse)
            {
                $scope.IsReverse = false;
            }
            else
            {
                $scope.IsReverse = true;
            }
        };
    });
    </script>
    </body>
</body>
</html>
먼저 테이블을 만들었습니다. 그런 다음 헤더를 추가하고 ng-click 기능을 사용하여 헤더를 클릭할 수 있도록 하여 헤더에서 테이블을 정렬할 수 있도록 했습니다.
그런 다음 배열 형식으로 테이블 내부에 원하는 데이터를 생성하고 $scope 함수 내부에 선언했습니다. 이를 통해 $scope.sort 기능을 사용하여 정렬 기능을 추가할 수 있습니다.
출력:

결론
Angular 프레임워크의 유연성 덕분에 정렬 기능이 있는 테이블을 만드는 데 도움이 되는 탁월한 옵션을 사용할 수 있습니다.

Fisayo is a tech expert and enthusiast who loves to solve problems, seek new challenges and aim to spread the knowledge of what she has learned across the globe.
LinkedIn