Angular でテーブルを並べ替える
Web ページはプレゼンテーションを作成する優れた方法です。 統計データを作成したり、商品の価格表を作成したり、商品を分類したりする場合、これらのリストを並べ替えることができる表を作成する必要があります。
テーブルを昇順、降順などで並べ替えることができます。次に、Angular フレームワーク内で並べ替え機能を使用してテーブルを作成するために適用できる最適な方法を見てみましょう。
Angular マテリアルでテーブルを並べ替える
Angular マテリアルの依存関係があらゆる種類の Angular コンポーネントの頼りになるライブラリであることは、もはやニュースではありません。 このメソッドのために Angular Material ライブラリをインストールします。
プロジェクト フォルダーが作成されたら、ターミナルのプロジェクト フォルダーに移動し、次のように Angular Material 依存関係をインストールします: ng add @angular/material; それが完了したら、次はテーブルをソートするための Angular Material 準備コードを使用してページ構造を作成することです。
app.component.html ファイル内に、これらのコードを挿入します。
コード スニペット app.component.html:
<table mat-table [dataSource]="dataSource" matSort (matSortChange)="announceSortChange($event)"
  class="mat-elevation-z8">
  <ng-container matColumnDef="position">
    <th mat-header-cell *matHeaderCellDef mat-sort-header sortActionDescription="Sort by number">
      No.
    </th>
    <td mat-cell *matCellDef="let element"> {{element.position}} </td>
  </ng-container>
  <ng-container matColumnDef="name">
    <th mat-header-cell *matHeaderCellDef mat-sort-header sortActionDescription="Sort by name">
      Name
    </th>
    <td mat-cell *matCellDef="let element"> {{element.name}} </td>
  </ng-container>
  <ng-container matColumnDef="weight">
    <th mat-header-cell *matHeaderCellDef mat-sort-header sortActionDescription="Sort by weight">
      Weight
    </th>
    <td mat-cell *matCellDef="let element"> {{element.weight}} </td>
  </ng-container>
  <ng-container matColumnDef="symbol">
    <th mat-header-cell *matHeaderCellDef mat-sort-header sortActionDescription="Sort by symbol">
      Symbol
    </th>
    <td mat-cell *matCellDef="let element"> {{element.symbol}} </td>
  </ng-container>
  <tr mat-header-row *matHeaderRowDef="displayedColumns"></tr>
  <tr mat-row *matRowDef="let row; columns: displayedColumns;"></tr>
</table>
このファイル内に、ヘッダー、行、列などのテーブル構造を設定しています。
次に、app.component.ts ファイルに移動して、テーブルを制御するコードを設定します。 これらのコードを書きます:
コード スニペット app.component.ts:
import { LiveAnnouncer } from '@angular/cdk/a11y';
import { AfterViewInit, Component, ViewChild } from '@angular/core';
import { MatSort, Sort } from '@angular/material/sort';
import { MatTableDataSource } from '@angular/material/table';

export interface PeriodicElement {
  name: string;
  position: number;
  weight: number;
  symbol: string;
}
const ELEMENT_DATA: PeriodicElement[] = [
  { position: 1, name: 'Hydrogen', weight: 1.0079, symbol: 'H' },
  { position: 2, name: 'Helium', weight: 4.0026, symbol: 'He' },
  { position: 3, name: 'Lithium', weight: 6.941, symbol: 'Li' },
  { position: 4, name: 'Beryllium', weight: 9.0122, symbol: 'Be' },
  { position: 5, name: 'Boron', weight: 10.811, symbol: 'B' },
  { position: 6, name: 'Carbon', weight: 12.0107, symbol: 'C' },
  { position: 7, name: 'Nitrogen', weight: 14.0067, symbol: 'N' },
  { position: 8, name: 'Oxygen', weight: 15.9994, symbol: 'O' },
  { position: 9, name: 'Fluorine', weight: 18.9984, symbol: 'F' },
  { position: 10, name: 'Neon', weight: 20.1797, symbol: 'Ne' },
];
@Component({
  selector: 'app-root',
  templateUrl: './app.component.html',
  styleUrls: ['./app.component.css']
})
export class AppComponent implements AfterViewInit {
  title = 'sortone';
  displayedColumns: string[] = ['position', 'name', 'weight', 'symbol'];
  dataSource = new MatTableDataSource(ELEMENT_DATA);
  constructor(private _liveAnnouncer: LiveAnnouncer) { }
  @ViewChild(MatSort) sort: MatSort;
  ngAfterViewInit() {
    this.dataSource.sort = this.sort;
  }
  announceSortChange(sortState: Sort) {
    if (sortState.direction) {
      this._liveAnnouncer.announce(`Sorted ${sortState.direction}ending`);
    } else {
      this._liveAnnouncer.announce('Sorting cleared');
    }
  }
}
まず、必要なモジュールを Angular Material ライブラリからインポートします。 次に、各テーブル ヘッダーに含まれる入力の型を宣言します。 name については string 型を宣言し、weight と position については number 型を宣言します。
次に、テーブルに必要なデータを配列の形式で宣言します。 次に、this.dataSource.sort を使用して sort 関数を作成します。
app.module.ts ファイルは、アプリに使用するモジュールと依存関係を処理するモジュールであるため、ここで依存関係をインポートする必要があります。 ファイルは次のようになります。
コード スニペット app.module.ts:
import { NgModule } from '@angular/core';
import { BrowserModule } from '@angular/platform-browser';
import { AppRoutingModule } from './app-routing.module';
import { AppComponent } from './app.component';
import { BrowserAnimationsModule } from '@angular/platform-browser/animations';
import { MatTableModule } from '@angular/material/table';
import { FormsModule } from '@angular/forms';
import { DragDropModule } from '@angular/cdk/drag-drop';
import { MatSortModule } from '@angular/material/sort';
@NgModule({
  declarations: [
    AppComponent
  ],
  imports: [
    BrowserModule,
    AppRoutingModule,
    BrowserAnimationsModule,
    MatTableModule,
    FormsModule,
    DragDropModule,
    MatSortModule
  ],
  providers: [],
  bootstrap: [AppComponent]
})
export class AppModule { }
CSS のないページの美しさと配置はどこにあるのでしょうか? 以下のように、この小さなコード スニペットを app.component.css ファイルに追加するだけです。
コード スニペット app.component.css:
table {
    width: 100%;
  }

  th.mat-sort-header-sorted {
    color: black;
  }
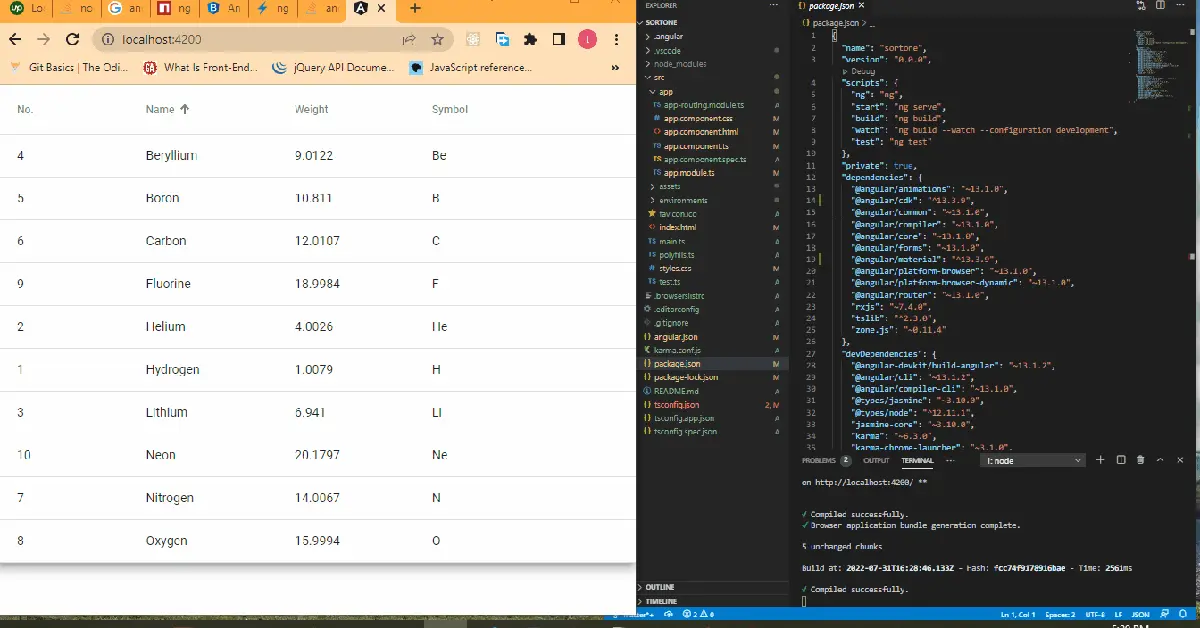
出力:
ブートストラップでテーブルを並べ替える
ブートストラップはプログラマーの生活を楽にします。 コードの小説を書くべきところで、Bootstrap は、より優れた機能を備えたより簡潔なコードを書くのに役立ちます。
Angular Material と同様に、ng add @ng-bootstrap/ng-bootstrap を使用してプロジェクト フォルダー内に Bootstrap ライブラリを均等にインストールします。 インストールが成功したら、app.component.html ファイルに移動してこれらのコードを記述します。
コード スニペット app.component.html:
<h2>Sort Table with Bootstrap</h2>
<table class="table table-striped">
  <thead>
  <tr>
    <th scope="col">#</th>
    <th scope="col" sortable="name" (sort)="onSort($event)">Country</th>
    <th scope="col" sortable="area" (sort)="onSort($event)">Area</th>
    <th scope="col" sortable="population" (sort)="onSort($event)">Population</th>
  </tr>
  </thead>
  <tbody>
  <tr *ngFor="let country of countries">
    <th scope="row">{{ country.id }}</th>
    <td>
      <img [src]="'https://upload.wikimedia.org/wikipedia/commons/' + country.flag" class="me-2" style="width: 20px">
      {{ country.name }}
    </td>
    <td>{{ country.area | number }}</td>
    <td>{{ country.population | number }}</td>
  </tr>
  </tbody>
</table>
ここでは、テーブルとヘッダーの構造を作成します。 ここで、app.component.ts ファイルに移動して、テーブルを機能させるコードを記述する必要があります。
ファイルは以下のようになります。
コード スニペット app.component.ts:
import { Component, Directive, EventEmitter, Input, Output, QueryList, ViewChildren } from '@angular/core';

interface Country {
  id: number;
  name: string;
  flag: string;
  area: number;
  population: number;
}
const COUNTRIES: Country[] = [
  {
    id: 1,
    name: 'Russia',
    flag: 'f/f3/Flag_of_Russia.svg',
    area: 17075200,
    population: 146989754
  },
  {
    id: 2,
    name: 'Canada',
    flag: 'c/cf/Flag_of_Canada.svg',
    area: 9976140,
    population: 36624199
  },
  {
    id: 3,
    name: 'United States',
    flag: 'a/a4/Flag_of_the_United_States.svg',
    area: 9629091,
    population: 324459463
  },
  {
    id: 4,
    name: 'China',
    flag: 'f/fa/Flag_of_the_People%27s_Republic_of_China.svg',
    area: 9596960,
    population: 1409517397
  }
];

export type SortColumn = keyof Country | '';
export type SortDirection = 'asc' | 'desc' | '';
const rotate: {[key: string]: SortDirection} = { 'asc': 'desc', 'desc': '', '': 'asc' };
const compare = (v1: string | number, v2: string | number) => v1 < v2 ? -1 : v1 > v2 ? 1 : 0;
export interface SortEvent {
  column: SortColumn;
  direction: SortDirection;
}
@Directive({
  selector: 'th[sortable]',
  host: {
    '[class.asc]': 'direction === "asc"',
    '[class.desc]': 'direction === "desc"',
    '(click)': 'rotate()'
  }
})
export class NgbdSortableHeader {
  @Input() sortable: SortColumn = '';
  @Input() direction: SortDirection = '';
  @Output() sort = new EventEmitter<SortEvent>();
  rotate() {
    this.direction = rotate[this.direction];
    this.sort.emit({column: this.sortable, direction: this.direction});
  }
}
@Component({
  selector: 'app-root',
  templateUrl: './app.component.html',
  styleUrls: ['./app.component.css']
})
export class AppComponent {
  title = 'sortfive';
  countries = COUNTRIES;
  @ViewChildren(NgbdSortableHeader) headers!: QueryList<NgbdSortableHeader>;
  onSort({column, direction}: SortEvent) {
    this.headers.forEach(header => {
      if (header.sortable !== column) {
        header.direction = '';
      }
    });
    if (direction === '' || column === '') {
      this.countries = COUNTRIES;
    } else {
      this.countries = [...COUNTRIES].sort((a, b) => {
        const res = compare(a[column], b[column]);
        return direction === 'asc' ? res : -res;
      });
    }
  }
}
ここでは、最初に各テーブル内に入力されるデータのタイプを宣言しました。項目をヘッダーからソートするため、NgbdSortableHeader を export クラスに宣言する必要があります。
次に、app.module.ts ファイルに進み、ng-bootstrap から適用した必要なモジュールをインポートします。
コード スニペット app.module.ts:
import { NgModule } from '@angular/core';
import { BrowserModule } from '@angular/platform-browser';
import { AppRoutingModule } from './app-routing.module';
import { AppComponent, NgbdSortableHeader } from './app.component';
import { NgbModule } from '@ng-bootstrap/ng-bootstrap';
import { CommonModule } from '@angular/common';

@NgModule({
  declarations: [
    AppComponent,NgbdSortableHeader
  ],
  imports: [
    BrowserModule,
    AppRoutingModule,
    NgbModule,
    CommonModule
  ],
  exports: [AppComponent],
  providers: [],
  bootstrap: [AppComponent]
})
export class AppModule { }
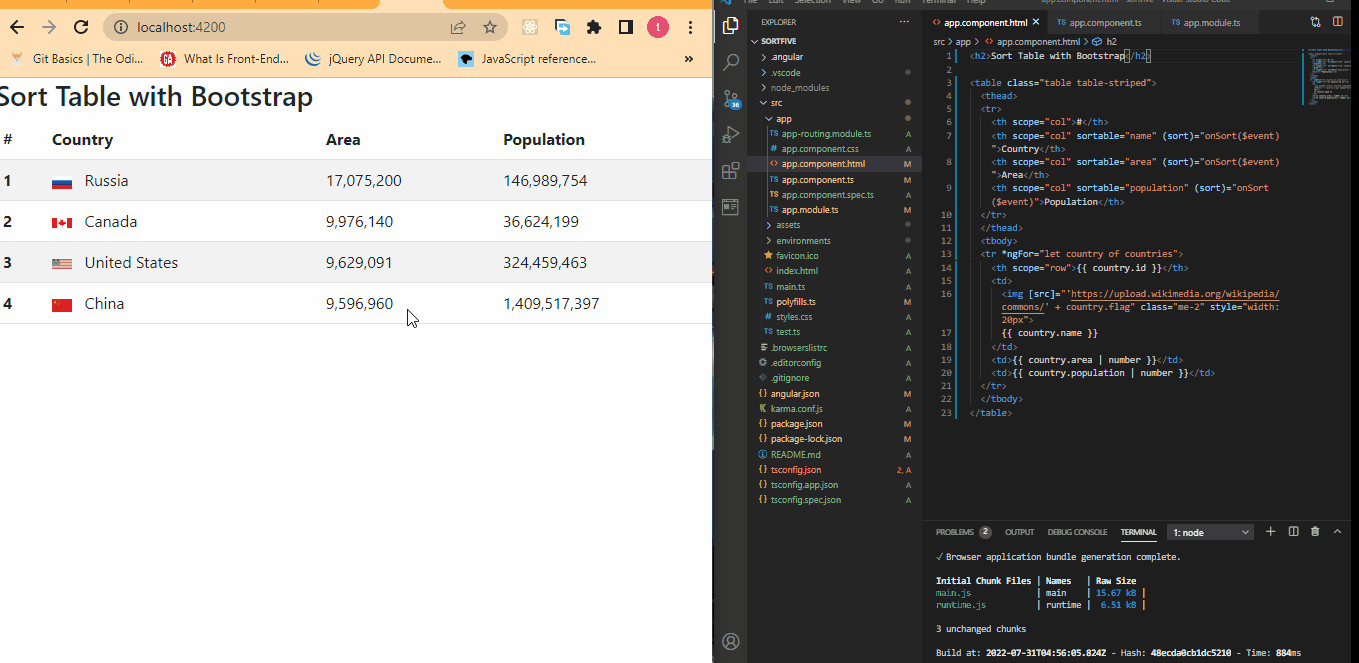
出力:
ng-model を使用してテーブルを並べ替える
app フォルダーのすべてのコンポーネントを使用する上記の最初の 2つとは異なり、この例は index.html ファイルのみを使用するため、この例は多くのコードの中で最も効率的です。 アプリケーション データへの HTML コントロールの値。 また、このメソッドが機能するために依存関係をインストールする必要はありません。
プロジェクト フォルダーが作成されたら、index.html ファイルに移動して、これらのコードを記述します。
index.html:
<!doctype html>
<html lang="en">
<head>
  <meta charset="utf-8">
  <title>Sortfour</title>
  <base href="/">
  <meta name="viewport" content="width=device-width, initial-scale=1">
  <link rel="icon" type="image/x-icon" href="favicon.ico">
  <script src="https://ajax.googleapis.com/ajax/libs/angularjs/1.4.8/angular.min.js"></script>

  <link rel="stylesheet" href="https://maxcdn.bootstrapcdn.com/bootstrap/3.3.7/css/bootstrap.min.css">
<script src="https://ajax.googleapis.com/ajax/libs/jquery/3.2.0/jquery.min.js"></script>
<script src="https://maxcdn.bootstrapcdn.com/bootstrap/3.3.7/js/bootstrap.min.js"></script>
</head>
<body>
  <body>
    <div class="container">
        <div ng-app="myApp" ng-controller="namesCtrl" ng-init="IsReverse=false">
        Search: <input type="text" ng-model="test"><br>
        <table class="table table-hover table-bordered table-striped">
          <tr>
              <th ng-click="sort('Name')">Name
              <th ng-click="sort('Age')">Age
              <th ng-click="sort('Email')">Email
              <th>Actions</th>
          </tr>
          <tr ng-repeat="x in names | filter:test | orderBy:sortParam:IsReverse">
              <td>{{x.Name}}
              <td>{{x.Age}}
              <td>{{x.Email}}
              <td>
                <div class="btn-group">
                    <a class="btn btn-primary" href="#">EDIT</a>
                    <a class="btn btn-primary" href="#">DELETE</a>
                </div>
              </td>
          </tr>
          </table>

    </div>

    <script>
    angular.module('myApp', []).controller('namesCtrl', function($scope) {
        $scope.names = [
            {Name:'Manav',Age:'22',Email:'pandya.manav@gmail.com'},
            {Name:'Rahul',Age:'25',Email:'pnd.rahul@gmail.com'},
            {Name:'Rohan',Age:'28',Email:'pnd.rohan@gmail.com'},
            {Name:'Jinish',Age:'18',Email:'jinish@gmail.com'}
        ];
        $scope.sort = function(sortId) {
            $scope.sortParam =  sortId;
            if($scope.IsReverse)
            {
                $scope.IsReverse = false;
            }
            else
            {
                $scope.IsReverse = true;
            }
        };
    });
    </script>
    </body>
</body>
</html>
まず、テーブルを作成しました。 次に、ヘッダーを追加し、ng-click 関数を使用してクリック可能にして、ヘッダーからテーブルを並べ替えることができるようにしました。
次に、必要なデータをテーブル内に配列の形式で作成し、それを $scope 関数内で宣言しました。 これにより、$scope.sort 関数を使用して並べ替え機能を追加できます。
出力:

まとめ
Angular フレームワークの柔軟性のおかげで、並べ替え機能を備えたテーブルを作成するのに役立つ優れたオプションに恵まれています。

Fisayo is a tech expert and enthusiast who loves to solve problems, seek new challenges and aim to spread the knowledge of what she has learned across the globe.
LinkedIn