JavaFX メッセージボックスの作成
今日のチュートリアルでは、Java アプリケーションで JavaFX メッセージボックスを作成する方法を示します。メッセージボックスは、確認、警告、情報、またはエラーアラートにすることができます。
JavaFX メッセージボックスの作成
次のサンプルコードを実行するために、Java バージョン 18、JavaFX バージョン 13、および Netbeans IDE バージョン 13 を使用します。
サンプルコード:
// write your package name
package com.mycompany.javafx_messagebox;
// import required libraries
import javafx.application.Application;
import javafx.event.ActionEvent;
import javafx.geometry.Insets;
import javafx.scene.Scene;
import javafx.scene.control.Alert;
import javafx.scene.control.Alert.AlertType;
import javafx.scene.control.Button;
import javafx.scene.layout.TilePane;
import javafx.stage.Stage;
/**
* JavaFX App
*/
public class App extends Application {
@Override
public void start(Stage stage) {
// create a tile pane
TilePane r = new TilePane();
// add padding
r.setPadding(new Insets(10, 10, 10, 10));
// an array of button names
String[] buttonNames = {"Confirmation MessageBox", "Error MessageBox", "Information MessageBox",
"Warning MessageBox"};
// Show no alert at the startup of the program
Alert alert = new Alert(AlertType.NONE);
/*
a loop to create buttons, define actions when
they are pressed and add them to the tile pane
*/
for (String s : buttonNames) {
Button button = new Button(s);
button.setOnAction((ActionEvent event) -> {
if (null != button.getText()) {
switch (button.getText()) {
case "Confirmation MessageBox":
// set alert type, title, content text and then show it
alert.setAlertType(AlertType.CONFIRMATION);
alert.setTitle("Confirmation MessageBox");
alert.setContentText("This is a CONFIRMATION "
+ "message for you!");
alert.show();
break;
case "Error MessageBox":
// set alert type, title, content text and then show it
alert.setAlertType(AlertType.ERROR);
alert.setTitle("Error MessageBox");
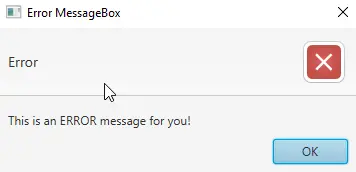
alert.setContentText("This is an ERROR message for you!");
alert.show();
break;
case "Information MessageBox":
// set alert type, title, content text and then show it
alert.setAlertType(AlertType.INFORMATION);
alert.setTitle("Information MessageBox");
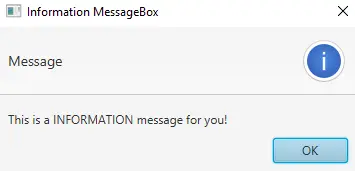
alert.setContentText("This is a INFORMATION "
+ "message for you!");
alert.show();
break;
case "Warning MessageBox":
// set alert type, title, content text and then show it
alert.setAlertType(AlertType.WARNING);
alert.setTitle("Warning MessageBox");
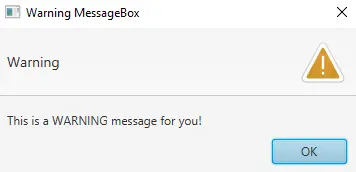
alert.setContentText("This is a WARNING message for you!");
alert.show();
break;
default:
break;
}
}
});
// add button
r.getChildren().add(button);
}
// create a scene
Scene sc = new Scene(r, 640, 50);
// set the scene
stage.setScene(sc);
// show the stage
stage.show();
} // end start method
// main method
public static void main(String[] args) {
launch(args);
} // end main
} // end App class
出力(メインウィンドウ):

出力(確認メッセージボックス、確認メッセージボックスボタンをクリックすると表示されます):

出力(エラーメッセージボックス、Error MessageBox ボタンをクリックすると表示されます):
出力(情報メッセージボックス、Information MessageBox ボタンをクリックすると表示されます):
出力(警告メッセージボックス、Warning MessageBox ボタンをクリックすると表示されます):
このチュートリアルでは、module-info.java ファイルと pom.xml ファイルに変更を加える必要はありません。JavaFX プロジェクトを作成し、上記のコードを練習します。
Application クラス(Java の標準)を拡張する App という名前のメインクラスがあります。プライマリ起動クラス(App)に名前を付けることができます。
次に、App は Application クラスの子クラスであるため、start() メソッドをオーバーライドします。子クラスは、親クラスのすべての抽象関数/メソッドを実装する必要があることに注意してください。
その後、Stage タイプの 1つのパラメーターを受け取る start() メソッドがあります。Stage タイプのパラメーターを使用しているのは、これがすべてのビジュアルコンポーネントの JavaFX アプリケーションが表示される場所だからです。
JavaFX ランタイムがオブジェクトを作成するため、Stage タイプのオブジェクトを作成する必要はありません。以下は、start() メソッドの内容を段階的に説明したものです。
-
JavaFX
TilePaneのオブジェクトを作成します。これはレイアウトコンポーネントであり、すべての子コンポーネントを同じサイズのセルのグリッドにレイアウトします。 -
グリッド全体の周りにマージンを追加します(
top/right/bottom/left)。 -
このアプリケーションに必要なすべてのボタンの名前で配列を作成します。
-
プログラムの起動時にメッセージボックスを表示したくないため、タイプ
NONEのアラートメッセージボックスを作成します。 -
次に、すべてのボタン名を繰り返す
forループがあります。- ループ内に、現在の名前のボタンを作成します。
- 条件に基づいて、その特定のボタンのアクションを設定します。ボタンのテキストを取得し、
switchステートメントを使用してボタン名に基づいてメッセージボックスを表示します。
-
ボタンを
TilePaneに追加します。 -
Sceneクラスを使用してシーンを作成します。 -
シーンを設定します。
-
最後に、ステージを表示します。
さて、それはメインメソッドの番です。main メソッドがなくても JavaFX アプリケーションを起動できますが、コマンドラインを使用してアプリケーションに渡されるパラメーターを使用する必要がある場合に便利です。
