How to Create a Progress Bar in Excel VBA
Visual Basic for Applications is an event-driven programming language used for Microsoft applications. It allows users to automate tasks and rewrite several functionalities according to their requirements.
VBA allows the user to do multiple tasks with the help of a few code statements stored in the form of a macro. The macro allows the user to reuse the code over and over again.
Progress Bar in Microsoft Excel
Data is constantly manipulated in Microsoft Excel. Uploading data from a database, manipulating the records, and summarizing the results are the most common uses of Microsoft Excel, especially in businesses.
Microsoft Excel offers powerful tools to do all the tasks with the help of basic functionalities. To build on the basic functionalities offered by Microsoft Excel, VBA is used.
VBA is an excellent option for automating different tasks. It allows you to build on the basic functionality of Microsoft Excel and create a program specific to your needs.
Creating a progress bar in VBA is quite easy. It allows you to track your activities.
You can monitor how much progress has been made and run parallel tasks with it. You can track multiple tasks simultaneously with the help of a progress bar.
The small addition of a progress bar can make a huge difference in the efficiency of your programs. It allows you to perform tasks more efficiently.
How to Create a Progress Bar in Excel
UserForm in Microsoft Excel allows you to create a progress bar for your sheet using the progressbar control. However, to continuously update the created progress bar, it is necessary to link a few code statements that do this job.
This article mentions two methods of creating a progress bar in Microsoft Excel.
Numbered Progress Bar
This solution is ideal for you if you do not wish to create a fancy progress bar. A numbered progress bar displays output in the following manner:

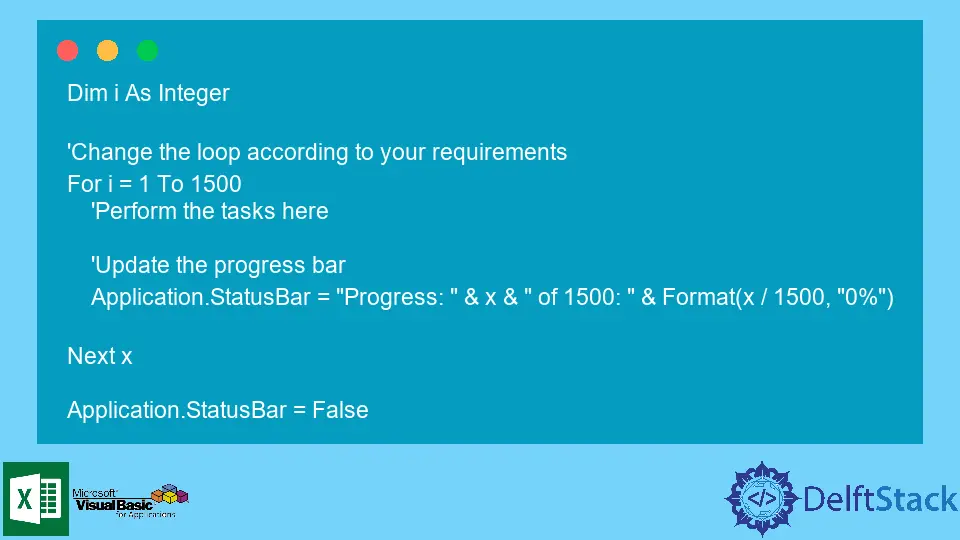
To implement this simple progress bar in Microsoft Excel, use the following code:
Dim i As Integer

'Change the loop according to your requirements
For i = 1 To 1500
    'Perform the tasks here

    'Update the progress bar
    Application.StatusBar = "Progress: " & x & " of 1500: " & Format(x / 1500, "0%")

Next x

Application.StatusBar = False
A numbered progress bar is quite easy to implement. It does not require a lot of effort and works flawlessly.
Fancy Progress Bar
This solution is ideal if you wish to design a fancy progress bar. The StatusBar in Excel is disguised as a progress bar using Unicode characters.
The Unicode characters in the range 9608 to 9615 are used as bars. You can choose one character from the range.
The progress bar’s length will be defined by the lent variable in the code.
' ProgressBar Class Module

Option Explicit

Private Const lent As Integer = 50
Private Const maxlent As Integer = 255
Private charBar As String
Private charSpace As String
Private statusBarVar As Boolean
Private enableEventsVar As Boolean
Private screenUpdatingVar As Boolean

Private Sub initialization()
    ' The initial state of the variables is saved for the progress bars
    charBar = ChrW(9608)
    charSpace = ChrW(9620)
    statusBarVar = Application.DisplayStatusBar
    enableEventsVar = Application.EnableEvents
    screenUpdatingVar = Application.ScreenUpdating
    Application.DisplayStatusBar = True
    Application.ScreenUpdating = False
    Application.EnableEvents = False
End Sub

Private Sub classend()
    ' Restore all the settings
    Application.DisplayStatusBar = statusBarVar
    Application.ScreenUpdating = screenUpdatingVar
    Application.EnableEvents = enableEventsVar
    Application.StatusBar = False
End Sub

Public Sub Update(ByVal Value As Long, _
                  Optional ByVal MaxValue As Long= 0, _
                  Optional ByVal Status As String = "", _
                  Optional ByVal DisplayPercent As Boolean = True)

    If Value < 0 Or MaxValue < 0 Or (Value > 100 And MaxValue = 0) Then Exit Sub

    ' If the maximum is set, then adjust the value to be in the range of 0 to 100
    If MaxValue > 0 Then Value = WorksheetFunction.RoundUp((Value * 100) / MaxValue, 0)

    ' Message to set the status bar to
    Dim display As String
    display = Status & "  "

    ' Set bars
    display = display & String(Int(Value / (100 / lent)), charBar)

    ' set spaces
    display = display & String(lent - Int(Value / (100 / lent)), charSpace)

    ' Closing character to show the end of the bar
    display = display & charBar

    If DisplayPercent = True Then display = display & "  (" & Value & "%)  "

    ' chop off to the maximum length if necessary
    If Len(display) > maxlent Then display = Right(display, maxlent)

    Application.StatusBar = display
End Sub
The code mentioned above sets the initial values of the functions DisplayStatusBar as True, ScreenUpdating as False, and EnableEvents as False.
The Update() subroutine edits the progress bar display depending on the parameter it receives.
The classend() subroutine resets the values of the functionalities DisplayStatusBar, ScreenUpdating, and EnableEvents.
To create an instance of the class, use the following code:
Dim fancyProgressBar As New ProgressBar
Dim i As Integer

For i = 1 To 100
    Call fancyProgressBar.Update(i, 100, "Progress Bar", True)
    ' Required tasks can be mentioned here
Next i
You can experiment with the Unicode characters to design different progress bars. The range 9608 to 9615 has different designs for the progress bar with different spacing.
Experiment with the variables to design a customized progress bar for yourself.
Conclusion
A progress bar is super helpful when multiple tasks are running in parallel. It allows you to track the activity of the tasks side by side.
In addition, you can also measure the time required for the different tasks. This allows you to schedule the tasks in an ideal manner.

Hello, I am Bilal, a research enthusiast who tends to break and make code from scratch. I dwell deep into the latest issues faced by the developer community and provide answers and different solutions. Apart from that, I am just another normal developer with a laptop, a mug of coffee, some biscuits and a thick spectacle!
GitHub